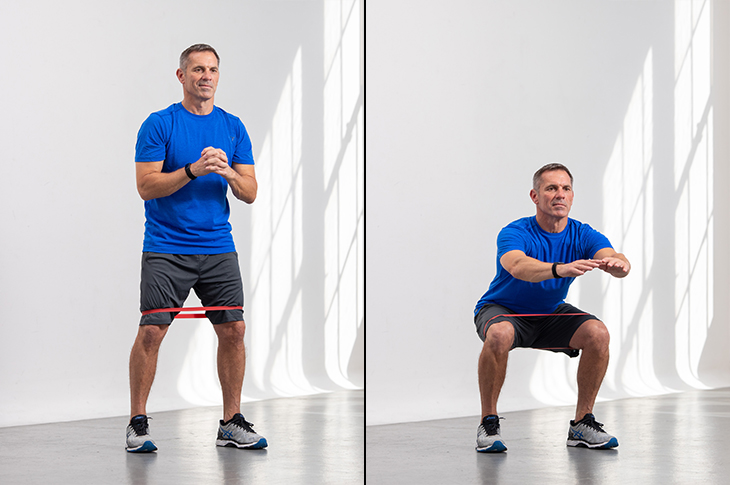
If you're looking to take your squatting to the next level, then you might want to consider using resistance bands. Squatting with resistance bands is a popular technique used by athletes and fitness enthusiasts alike to build strength, improve balance, and increase muscle activation. In this article, we'll take a closer look at the benefits of squatting with resistance bands and how to do it properly.
What are Resistance Bands?

Resistance bands are elastic bands that come in a variety of thicknesses and lengths. They are commonly used in strength training exercises to add resistance to movements and increase muscle activation. Resistance bands are versatile and can be used for a variety of exercises, including squatting.
Benefits of Squatting with Resistance Bands
Squatting with resistance bands offers a range of benefits, including:
- Increased muscle activation
- Improved balance and stability
- Greater range of motion
- Increased strength and power
- Reduced risk of injury
How to Squat with Resistance Bands

To squat with resistance bands, follow these steps:
- Start by standing on the middle of the resistance band with your feet shoulder-width apart.
- Hold the ends of the band and bring them up to your shoulders, so the band is resting on the back of your shoulders.
- Squat down, keeping your weight on your heels and your chest up.
- As you stand up, push through your heels and extend your legs while pulling the band up toward your chin.
- Lower the band back down to your shoulders as you squat down again.
- Repeat for the desired number of reps.
Variations

There are a few variations of squatting with resistance bands that you can try, including:
- Squat with a looped band around your knees to work your glutes and hips.
- Squat with a band attached to a stationary object behind you to increase resistance.
- Hold the band at chest height instead of on your shoulders to work your upper body as well.
Tips for Proper Form

When squatting with resistance bands, it's important to maintain proper form to avoid injury and get the most out of the exercise. Here are some tips:
- Keep your weight on your heels and your chest up.
- Don't let your knees cave in or track too far forward.
- Engage your core and squeeze your glutes at the top of the movement.
- Use a mirror or have someone watch your form to ensure proper technique.
Conclusion
Squatting with resistance bands is a great way to add variety and intensity to your squatting routine. By using resistance bands, you can increase muscle activation, improve balance and stability, and increase strength and power. Remember to maintain proper form and start with a lighter resistance band before progressing to a heavier one. Happy squatting!
Related video of Squatting with Resistance Bands: A Comprehensive Guide

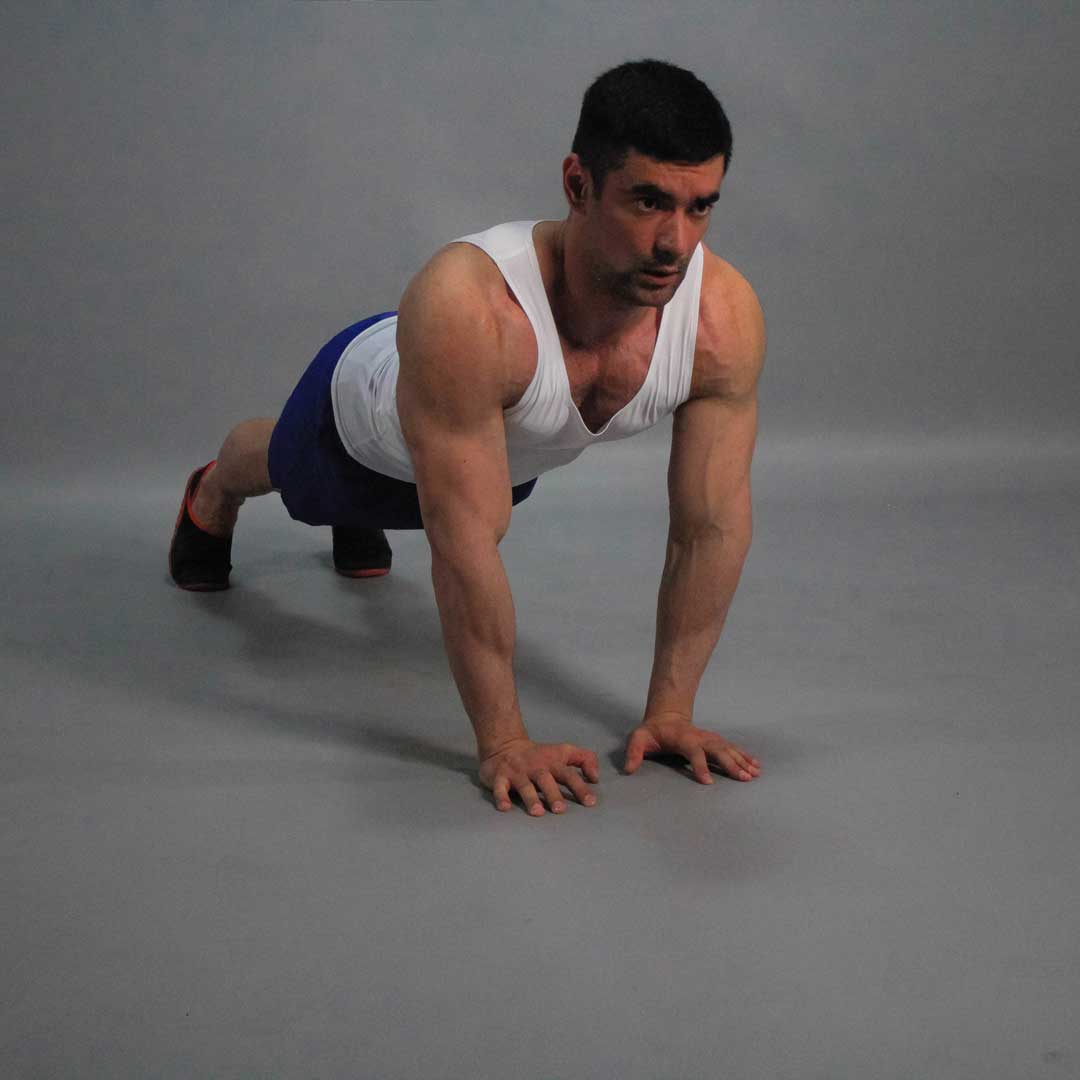
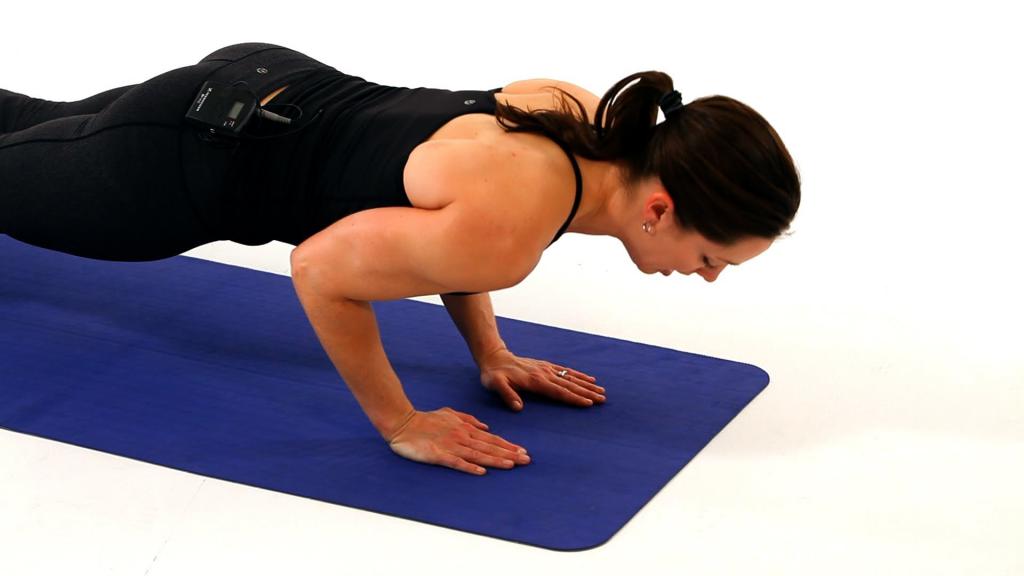
If you're looking to build upper body strength, narrow grip push ups are an excellent exercise to add to your workout routine. This variation of the traditional push up targets your triceps, chest, and shoulders, and also engages your core muscles. In this article, we'll discuss the benefits of narrow grip push ups and how to perform them correctly.
Benefits of Narrow Grip Push Ups

1. Triceps Development: Narrow grip push ups primarily target your triceps, helping you to build strong and toned arms.
2. Chest and Shoulder Strengthening: While narrow grip push ups are primarily a triceps exercise, they also work your chest and shoulders. This makes them an excellent compound exercise that targets multiple muscle groups.
3. Improved Core Strength: Like traditional push ups, narrow grip push ups also engage your core muscles, helping to develop a strong and stable core.
4. Increased Range of Motion: Because your hands are closer together during narrow grip push ups, you'll be able to move through a greater range of motion than you would during traditional push ups. This can help to improve flexibility and mobility in your upper body.
How to Do Narrow Grip Push Ups

1. Start by getting into a plank position, with your hands directly under your shoulders and your feet hip-width apart. Your body should form a straight line from your head to your heels.
2. Move your hands closer together, so that your thumbs are touching and your index fingers are pointing straight ahead.
3. Lower your body towards the ground by bending your elbows, keeping your elbows close to your body. Your chest should be just above the ground.
4. Push back up to the starting position, keeping your body in a straight line throughout the movement.
5. Repeat for the desired number of reps.
Tips for Performing Narrow Grip Push Ups
1. Keep your elbows close to your body throughout the movement to target your triceps more effectively.
2. Engage your core muscles throughout the exercise to maintain proper form and prevent your hips from sagging.
3. Don't let your chest touch the ground during the movement. Instead, lower your body until your chest is just above the ground.
4. Breathe in as you lower your body towards the ground, and exhale as you push back up.
Incorporating Narrow Grip Push Ups into Your Workout Routine
Narrow grip push ups can be incorporated into your regular workout routine in a number of ways. Here are a few ideas:
1. Add them to your upper body workout: Include narrow grip push ups in your regular upper body workout to target your triceps, chest, and shoulders.
2. Use them as a finisher: Finish off your workout with a set of narrow grip push ups to really burn out your triceps and chest.
3. Do them as part of a circuit: Incorporate narrow grip push ups into a circuit workout, alternating them with other exercises to keep your heart rate up and challenge your muscles.
Conclusion
Narrow grip push ups are an excellent exercise for building upper body strength and improving core stability. By incorporating them into your regular workout routine, you can target multiple muscle groups and achieve a toned, lean physique. Remember to maintain proper form throughout the movement, and don't be afraid to challenge yourself by increasing the number of reps or sets over time.
Related video of Narrow Grip Push Ups - Benefits and How to Do Them

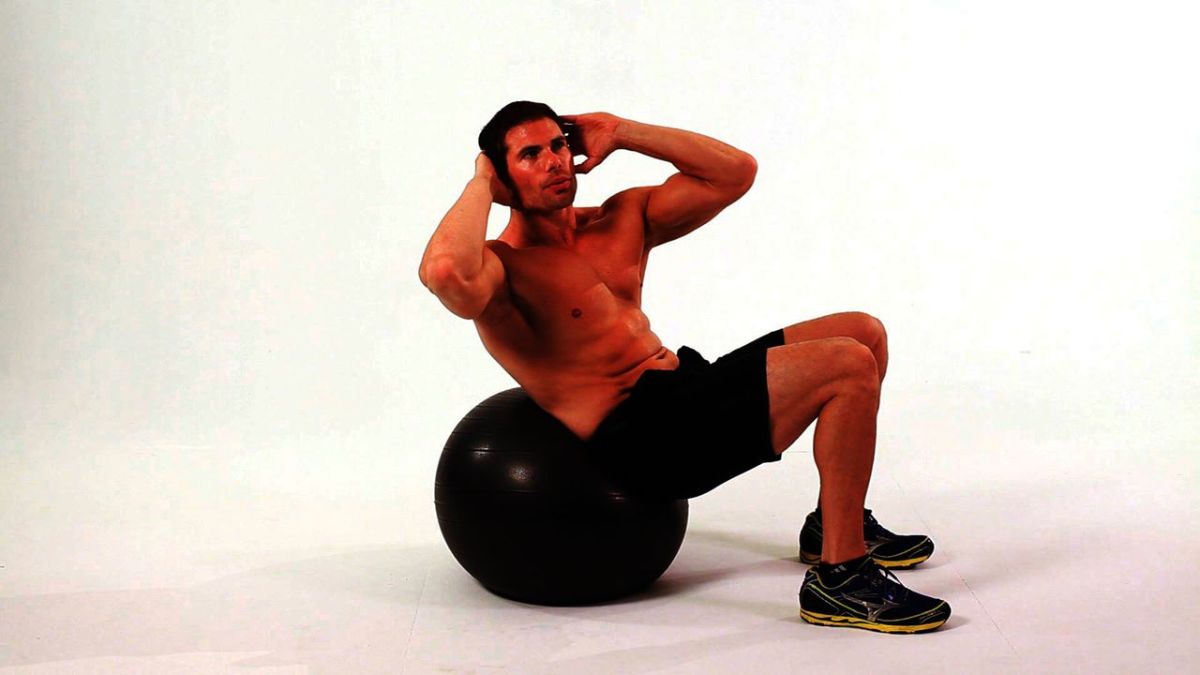
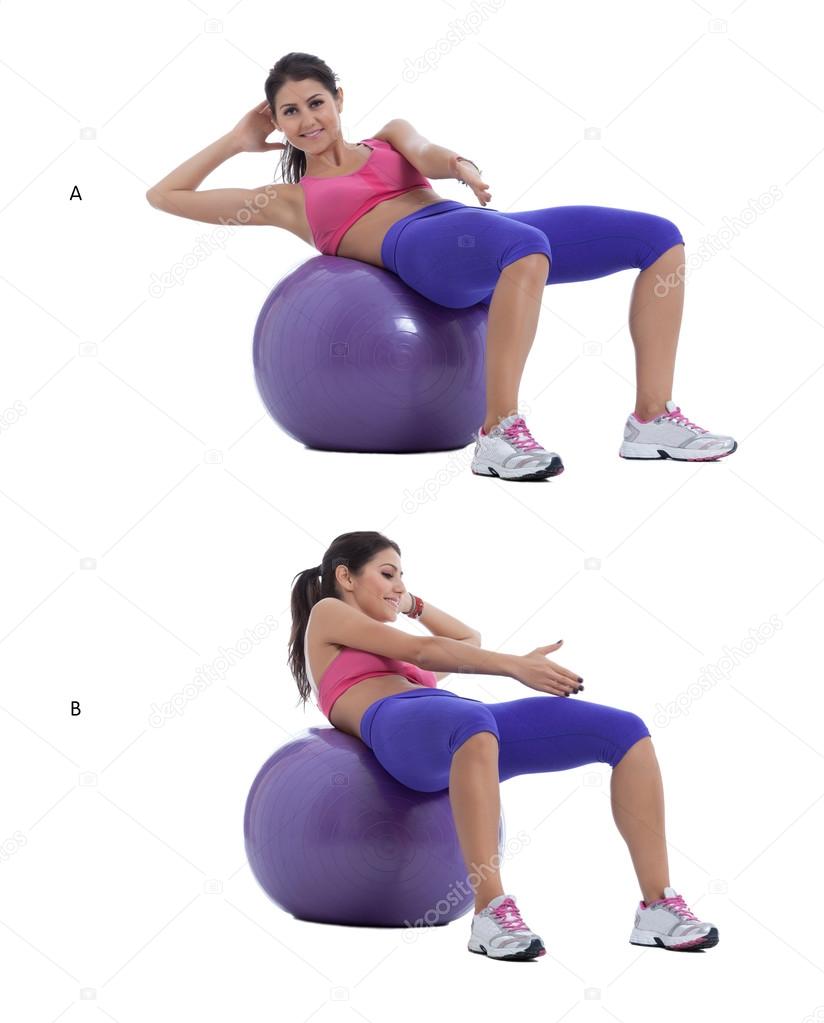
The Swiss Ball Oblique Crunch is an incredibly effective exercise that targets your obliques, the muscles on the sides of your abs. It is a great way to tone and strengthen your core, improve your posture, and enhance your overall fitness level.
What is a Swiss Ball Oblique Crunch?

A Swiss Ball Oblique Crunch is a variation of the traditional crunch exercise that is performed using an exercise ball or Swiss ball. The ball adds an element of instability to the exercise, making it more challenging and engaging your core muscles even more.
How to Perform a Swiss Ball Oblique Crunch

Here are the steps to perform a Swiss Ball Oblique Crunch:
- Start by sitting on the Swiss ball with your feet flat on the ground and your knees bent at a 90-degree angle.
- Place your hands behind your head or across your chest.
- Slowly roll back on the ball until your lower back is supported by it.
- Exhale and engage your core muscles to lift your torso up towards the ceiling.
- As you lift up, twist your torso to one side and bring your elbow towards your opposite knee.
- Lower your torso back down to the starting position while inhaling.
- Repeat the exercise on the other side.
- Continue alternating sides for the desired number of repetitions.
Benefits of Swiss Ball Oblique Crunches
Swiss Ball Oblique Crunches offer numerous benefits, including:
- Toning and strengthening your oblique muscles.
- Improving your overall core strength and stability.
- Enhancing your posture and spinal alignment.
- Improving your balance and coordination.
- Engaging multiple muscle groups at once for a more efficient workout.
- Adding variety to your exercise routine.
Tips for Performing Swiss Ball Oblique Crunches Safely
Here are some tips to help you perform Swiss Ball Oblique Crunches safely and effectively:
- Choose a ball that is the right size for you. When seated on the ball, your hips should be slightly higher than your knees and your feet should be flat on the ground.
- Engage your core muscles throughout the exercise to protect your lower back.
- Avoid using momentum to lift your torso. Instead, focus on using your abs to initiate the movement.
- If you feel any pain or discomfort, stop the exercise immediately.
- Begin with a lower number of repetitions and gradually increase as your strength and fitness level improves.
Incorporating Swiss Ball Oblique Crunches into Your Workout Routine

Swiss Ball Oblique Crunches can be incorporated into your workout routine in a variety of ways. Here are some ideas:
- Add them to your regular ab workout for an extra challenge.
- Perform them as part of a full-body circuit workout.
- Alternate them with other core exercises, such as planks or Russian twists.
- Incorporate them into a Pilates or yoga routine for added core strength and stability.
Conclusion
The Swiss Ball Oblique Crunch is a highly effective exercise that targets your oblique muscles and offers numerous benefits for your overall fitness and well-being. By incorporating this exercise into your workout routine, you can tone and strengthen your core, improve your posture, and enhance your overall fitness level. So grab a Swiss ball and give it a try!
Related video of Swiss Ball Oblique Crunch: The Ultimate Abdominal Exercise
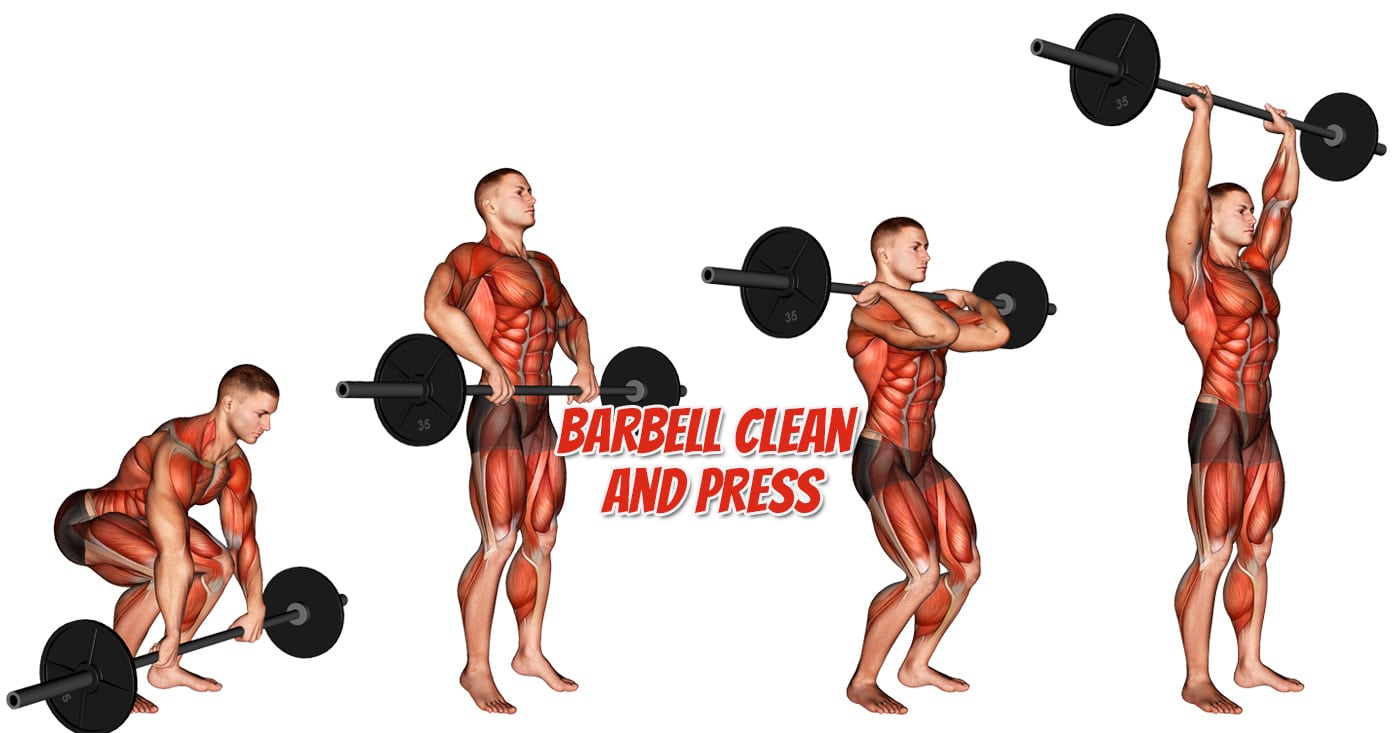
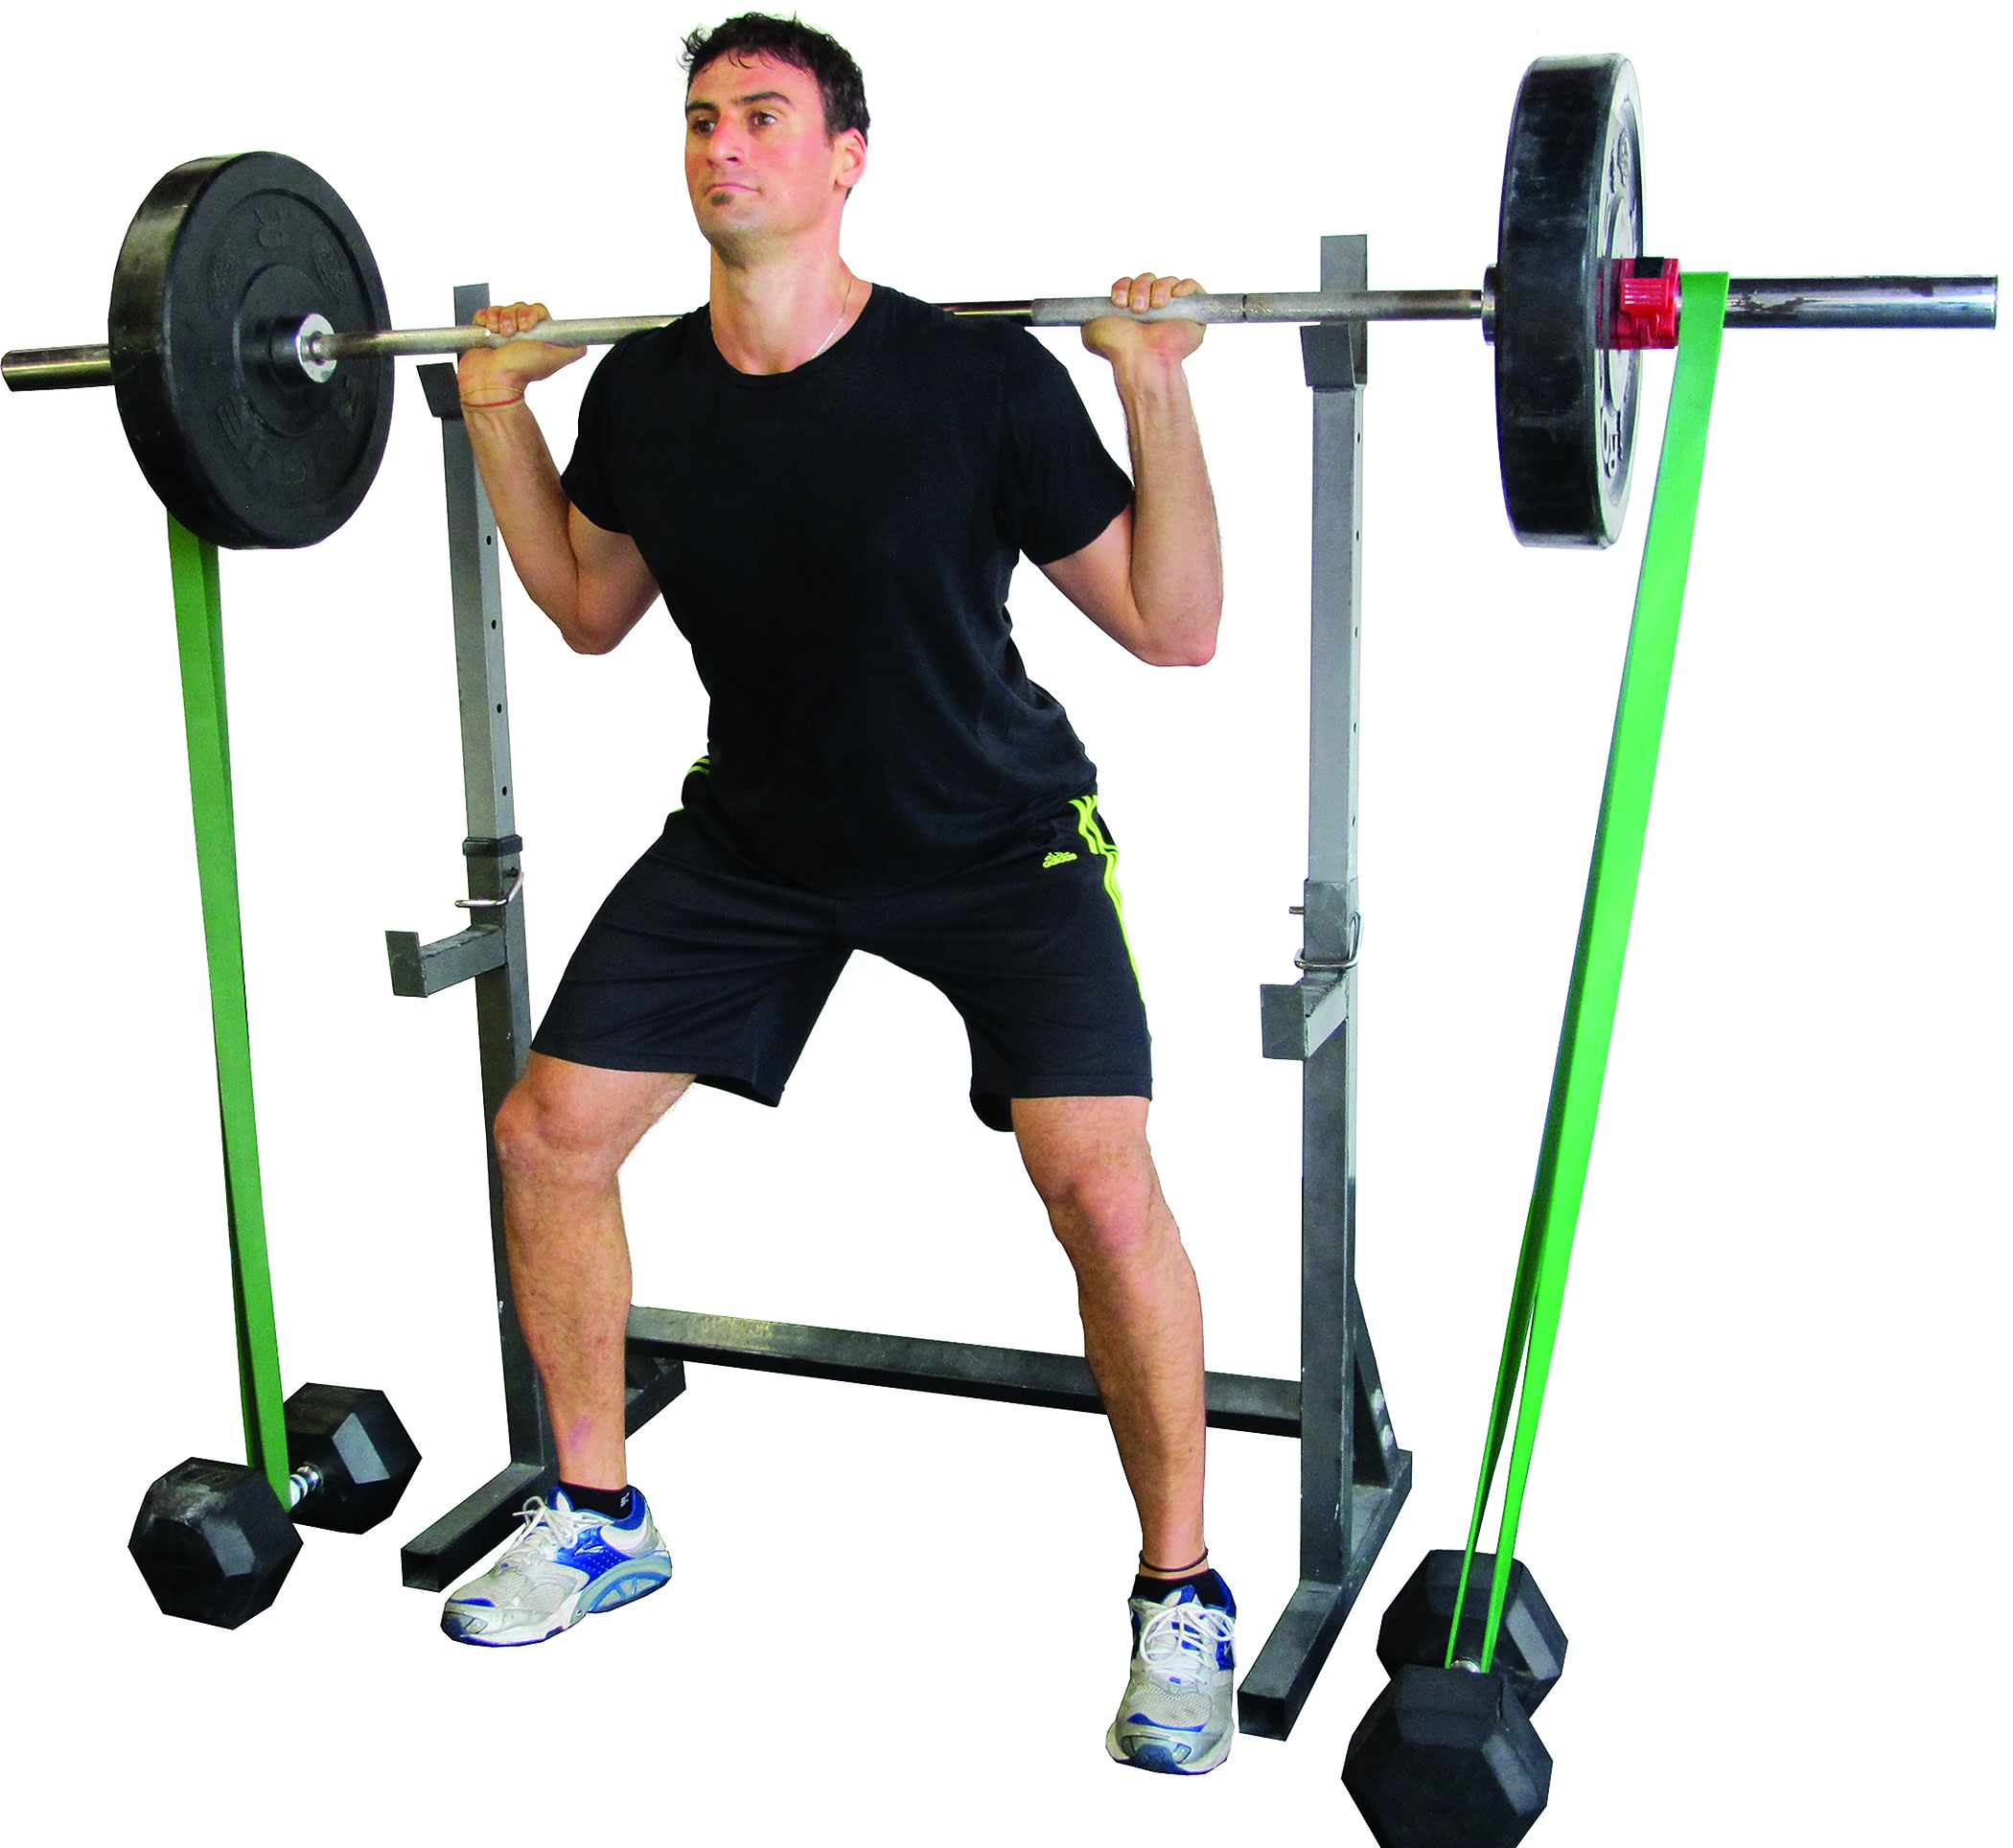
Barbell clean and press is an effective strength training exercise that targets multiple muscle groups in your body, including your shoulders, back, legs, hips, and core. This compound exercise involves two separate movements - the clean and the press - which together help you build strength, power, and explosiveness.
The Clean

The first part of the barbell clean and press is the clean. To perform this movement, stand with your feet shoulder-width apart and grip the barbell with an overhand grip, hands slightly wider than shoulder-width apart. Keep your back straight and your knees slightly bent.
Next, lift the barbell off the floor by extending your hips and knees. As the barbell rises, pull it towards your body and keep your elbows high. When the barbell reaches your chest, quickly rotate your elbows under the bar and "catch" it in a front squat position. Stand up tall and hold the barbell at chest level.
The Press
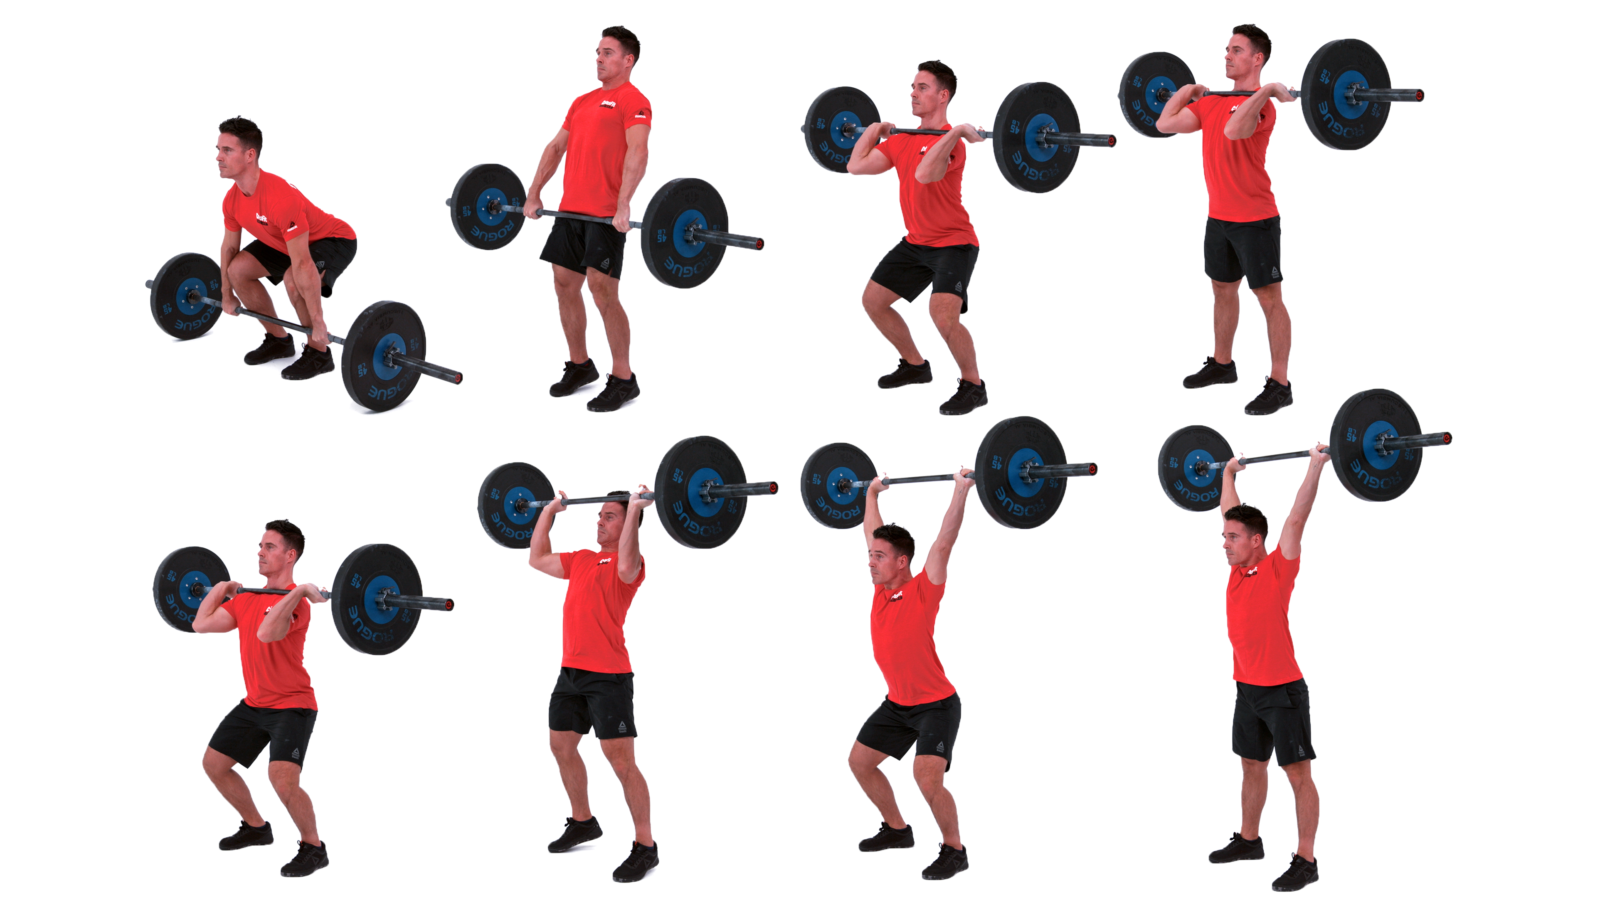
The second part of the barbell clean and press is the press. From the front squat position, brace your core and stand up tall. Take a deep breath and press the barbell overhead, fully extending your arms. Keep your core tight and your back straight throughout the movement.
Lower the barbell back down to your chest and bring it back down to the floor to complete one rep. Repeat for the desired number of reps.
Tips for Success

Here are some tips to help you perform the barbell clean and press with proper form:
- Start with a light weight and focus on proper form before increasing the weight.
- Keep your back straight throughout the movement to avoid injury.
- Use your legs to lift the barbell off the floor, not your back.
- Keep your elbows high during the clean to prevent the barbell from swinging away from your body.
- Brace your core during the press to maintain stability and prevent injury.
Variations

There are several variations of the barbell clean and press that you can try to add variety to your workouts:
- Push press: Instead of starting with a clean, use your legs to help you press the barbell overhead.
- Hang clean and press: Start with the barbell at hip level instead of on the ground.
- Dumbbell clean and press: Use dumbbells instead of a barbell for a different challenge.
Benefits of Barbell Clean and Press

The barbell clean and press is a full-body exercise that offers numerous benefits for your physical fitness and overall health:
- Builds strength and power in multiple muscle groups.
- Improves explosiveness and speed.
- Increases muscle size and definition.
- Boosts cardiovascular health and endurance.
- Enhances overall athletic performance.
Conclusion
The barbell clean and press is a challenging exercise that can help you build strength, power, and explosiveness. By following proper form and incorporating variations into your workouts, you can get the most out of this full-body exercise and achieve your fitness goals.
Related video of Barbell Clean And Press: Build Strength and Power

If you're looking for a great exercise to target your back, then the straight bar cable row is definitely worth considering. This exercise is great for building upper body strength, improving posture, and increasing overall back thickness. It's also relatively easy to perform and can be done with minimal equipment.
How to do a Straight Bar Cable Row

Begin by standing in front of a cable machine with your feet shoulder-width apart. Grasp the straight bar attachment with an overhand grip, making sure your hands are slightly wider than shoulder-width apart. Keep your back straight, your core tight, and your knees slightly bent.
Pull the bar towards your chest, keeping your elbows close to your body. Squeeze your shoulder blades together at the top of the movement, and then slowly lower the bar back to the starting position. Repeat for the desired number of repetitions.
Variations of the Straight Bar Cable Row

There are a few variations of the straight bar cable row that you can try to add some variety to your workout:
- Wide-grip straight bar cable row: Use a wider grip on the bar to target the outer portion of your back.
- Narrow-grip straight bar cable row: Use a narrower grip on the bar to target the inner portion of your back.
- Underhand grip straight bar cable row: Use an underhand grip on the bar to target your biceps as well as your back.
Tips for a Better Straight Bar Cable Row

Here are a few tips to help you get the most out of your straight bar cable row:
- Focus on pulling with your elbows rather than your hands.
- Keep your shoulders down and away from your ears throughout the movement.
- Use a weight that allows you to perform the exercise with good form.
- Exhale as you pull the bar towards your chest, and inhale as you lower it back down.
- Don't rush the movement - focus on slow, controlled reps.
The Benefits of the Straight Bar Cable Row

The straight bar cable row is a great exercise for a number of reasons:
- It targets multiple muscles in your back, including your lats, rhomboids, and traps.
- It's a compound movement, meaning it works multiple joints and muscles at the same time, which can lead to greater overall strength gains.
- It's a low-impact exercise, making it a great option for those with joint pain or injuries.
- It can be easily modified to target different areas of your back.
Conclusion
The straight bar cable row is a great exercise for anyone looking to build upper body strength and improve their posture. With a few variations and some tips for proper form, you can make this exercise a staple in your workout routine. Give it a try and see the benefits for yourself!
Related video of Straight Bar Cable Row

If you're looking for a new and challenging exercise to add to your workout routine, consider the heels elevated back squat. This variation of the traditional back squat offers a number of unique benefits that can help you build strength, improve your balance and stability, and target your muscles in new and effective ways.
What is a Heels Elevated Back Squat?

A heels elevated back squat is a variation of the traditional back squat in which you place your heels on an elevated surface, such as weight plates or a wedge. This forces you to rely more on your quads and glutes to lift the weight, while also increasing the range of motion in your ankles and hips.
To perform a heels elevated back squat, start with your feet shoulder-width apart and your heels elevated on a surface. Hold the barbell on your upper back with your hands slightly wider than shoulder-width apart. Keeping your chest up and your core engaged, squat down until your thighs are parallel to the ground. Drive through your heels and return to the starting position.
Benefits of Heels Elevated Back Squats

There are several benefits to adding heels elevated back squats to your workout routine:
- Increased quad and glute activation: By placing your heels on an elevated surface, you're forced to rely more on your quads and glutes to lift the weight. This can help you build strength and muscle in these areas.
- Improved ankle mobility: The increased range of motion in your ankles can help improve your overall mobility and reduce your risk of injury.
- Better balance and stability: The heels elevated back squat requires greater balance and stability, which can help improve your overall athleticism and reduce your risk of injury.
- Targeted muscle activation: The heels elevated back squat targets your quads, glutes, and hamstrings in a unique way, helping you build muscle and strength in these areas.
How to Incorporate Heels Elevated Back Squats into Your Workout Routine

If you're interested in incorporating heels elevated back squats into your workout routine, start by adding them to your leg day. Begin with a lighter weight than you normally would for traditional back squats, and focus on mastering your form before increasing the weight.
Try performing 3-4 sets of 8-12 reps, with a rest period of 1-2 minutes between sets. As you become more comfortable with the exercise, you can increase the weight and/or reps to continue challenging yourself.
Tips for Performing Heels Elevated Back Squats Safely

As with any exercise, it's important to perform heels elevated back squats safely to avoid injury. Here are a few tips to keep in mind:
- Start with a lighter weight: As mentioned, it's important to start with a lighter weight than you normally would for traditional back squats to allow your body to adjust to the new movement pattern.
- Focus on form: Proper form is key to performing heels elevated back squats safely and effectively. Make sure to keep your chest up, your core engaged, and your knees in line with your toes throughout the movement.
- Use a spotter: If you're new to heels elevated back squats, consider using a spotter to help you maintain proper form and avoid injury.
- Listen to your body: If you experience any pain or discomfort during the exercise, stop immediately and consult with a healthcare professional.
Conclusion
The heels elevated back squat is a challenging and effective exercise that can help you build strength, improve your balance and stability, and target your muscles in new and effective ways. By incorporating this variation into your workout routine, you can continue to challenge yourself and see results in your overall fitness and strength.
Related video of Heels Elevated Back Squat: Why It's Worth Adding to Your Workout Routine

The Single Leg Dumbbell Romanian Deadlift (RDL) is an exercise that targets the hamstrings, glutes, lower back, and core muscles. It is a variation of the traditional Romanian Deadlift, but it's performed with one leg at a time, which increases the difficulty and the demand for balance and stability.
Benefits of Single Leg Dumbbell RDL

The Single Leg Dumbbell RDL has several benefits:
- It strengthens the hamstrings, glutes, and lower back.
- It improves balance, stability, and coordination.
- It increases hip mobility and flexibility.
- It activates the core muscles and improves posture.
- It can help prevent lower back pain and injuries.
- It can be done with minimal equipment and space.
Technique of Single Leg Dumbbell RDL

Here's how to perform the Single Leg Dumbbell RDL:
- Stand with your feet shoulder-width apart and hold a dumbbell in your right hand.
- Lift your left foot off the ground and balance on your right foot.
- Keep your right knee slightly bent and your core engaged.
- Lower the dumbbell towards the ground by hinging at your hips and keeping your back straight.
- Lower the dumbbell until you feel a stretch in your hamstring and glute.
- Pause for a moment and then return to the starting position by squeezing your glutes and hamstrings.
- Repeat for the desired number of reps and then switch sides.
Tips for Single Leg Dumbbell RDL

Here are some tips to help you perform the Single Leg Dumbbell RDL:
- Start with a light weight and focus on proper technique.
- Keep your core tight and your back straight throughout the exercise.
- Keep your knee slightly bent and your foot flexed to maintain balance.
- Lower the dumbbell slowly and under control to maximize the stretch and activation of your muscles.
- Look straight ahead and keep your neck in a neutral position.
- Breathe in as you lower the dumbbell and breathe out as you lift it.
- Don't rush the exercise and avoid jerky movements.
- Gradually increase the weight and the difficulty as you improve your strength and stability.
Conclusion
The Single Leg Dumbbell RDL is a challenging but effective exercise that can help you strengthen your lower body, improve your balance and stability, and prevent injuries. By following the proper technique and tips, you can safely and efficiently perform this exercise and reap its benefits. Incorporate it into your workout routine and see the results for yourself!
Related video of Single Leg Dumbbell RDL: Benefits, Technique, and Tips
The Arnold Press is a popular exercise that targets the shoulders, triceps and upper back. It was named after Arnold Schwarzenegger, the iconic bodybuilder and actor, who was known for his impressive shoulder development.
How to do the Arnold Press

To perform the Arnold Press, follow these steps:
- Hold a dumbbell in each hand, with your palms facing your body, and stand with your feet shoulder-width apart.
- Bring the weights up to your shoulders, with your palms facing your body and your elbows bent.
- As you press the weights up, rotate your palms so that they face forward at the top of the movement.
- Pause for a second, then slowly reverse the movement, rotating your palms back to the starting position as you lower the weights to your shoulders.
- Repeat for the desired number of repetitions.
The Arnold Press is a great exercise for building shoulder strength and size, as well as improving overall upper body stability and mobility. It can be performed using a variety of weights, depending on your fitness level and goals.
Variations of the Arnold Press

There are several variations of the Arnold Press that you can try to add variety to your workouts and target different areas of your shoulders. Some of these variations include:
- Seated Arnold Press: Sit on a bench or chair with your back straight and your feet flat on the floor. Perform the Arnold Press as usual.
- Single-Arm Arnold Press: Hold one dumbbell with both hands and perform the Arnold Press with one arm at a time.
- Kneeling Arnold Press: Kneel on the floor with your back straight and your feet flat on the floor. Perform the Arnold Press as usual.
Try incorporating these variations into your workout routine to challenge your muscles in new ways and avoid plateaus.
Benefits of the Arnold Press
The Arnold Press offers several benefits for your upper body, including:
- Improved shoulder strength and size
- Increased upper body stability and mobility
- Targeted triceps and upper back muscles
- Variety in your workout routine
- Challenging your muscles in new ways
Whether you're a beginner or an experienced lifter, the Arnold Press is a great exercise to add to your workout routine. Try incorporating it into your next shoulder workout and see the results for yourself!
Related video of What's an Arnold Press?
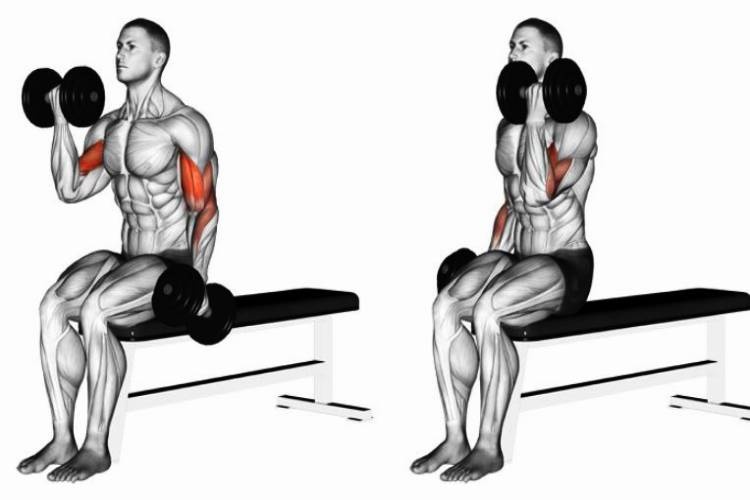
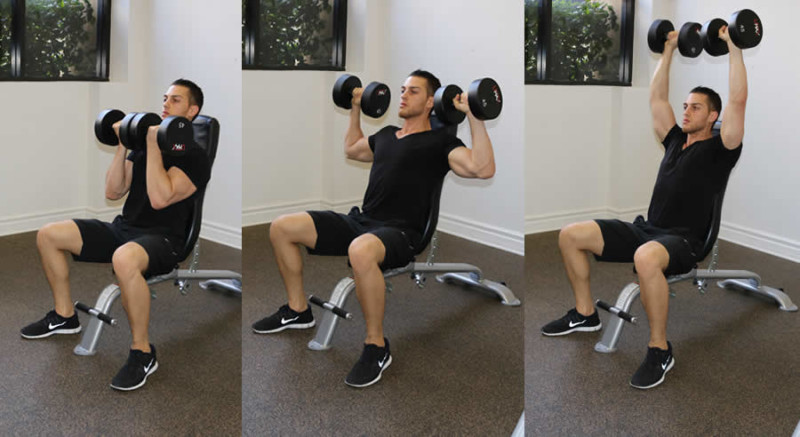
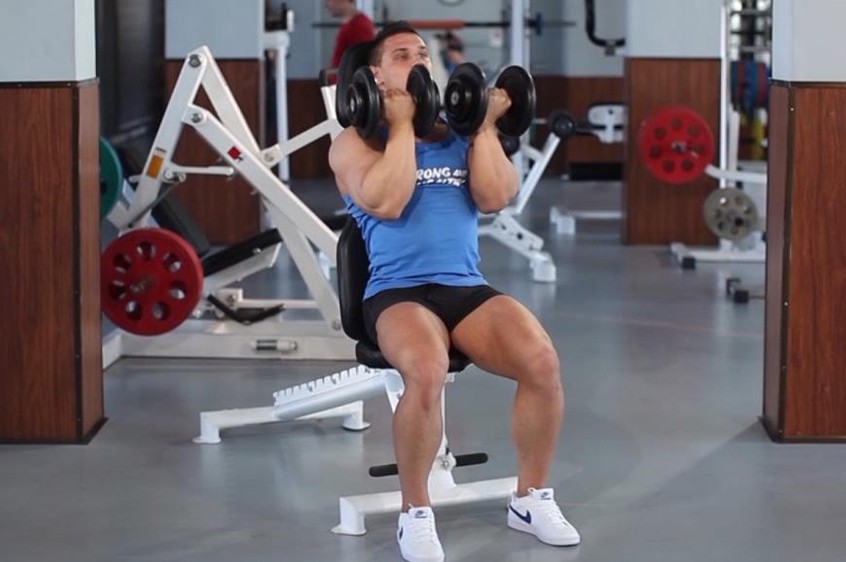
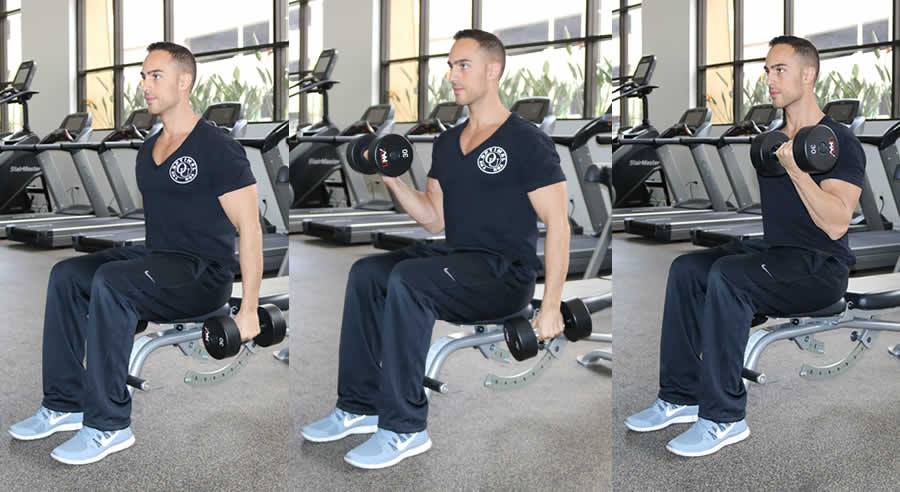
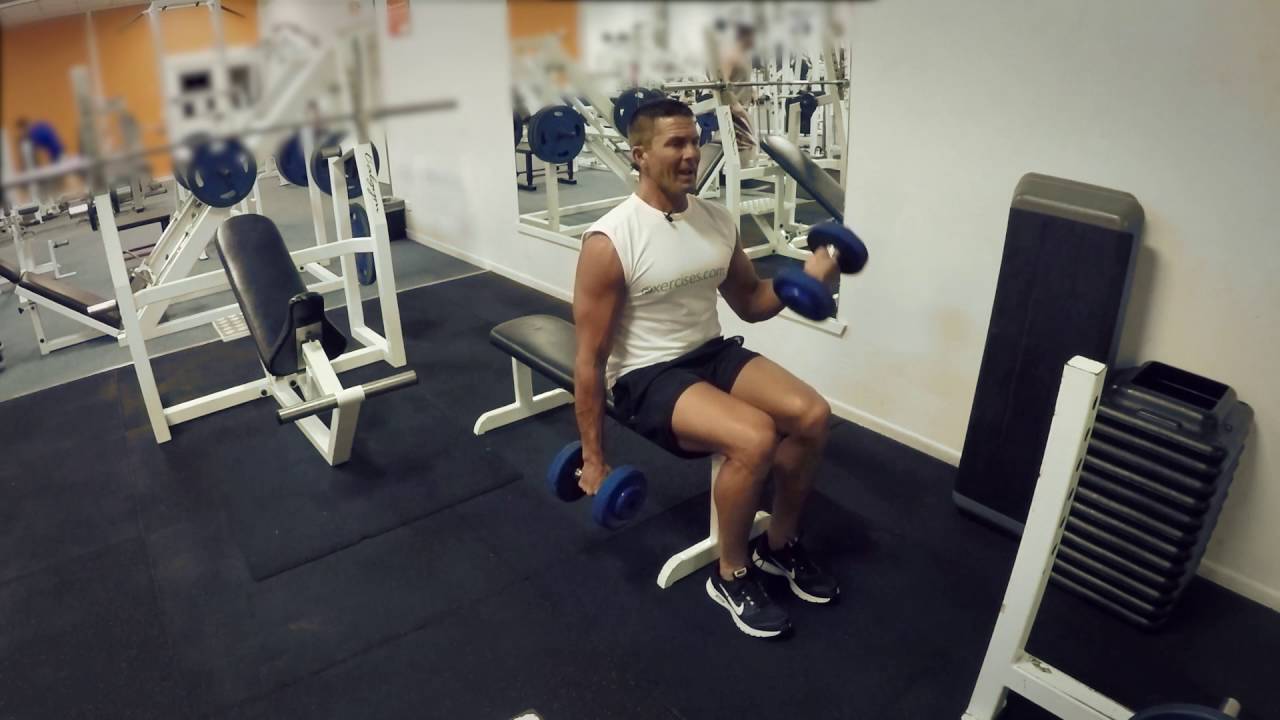
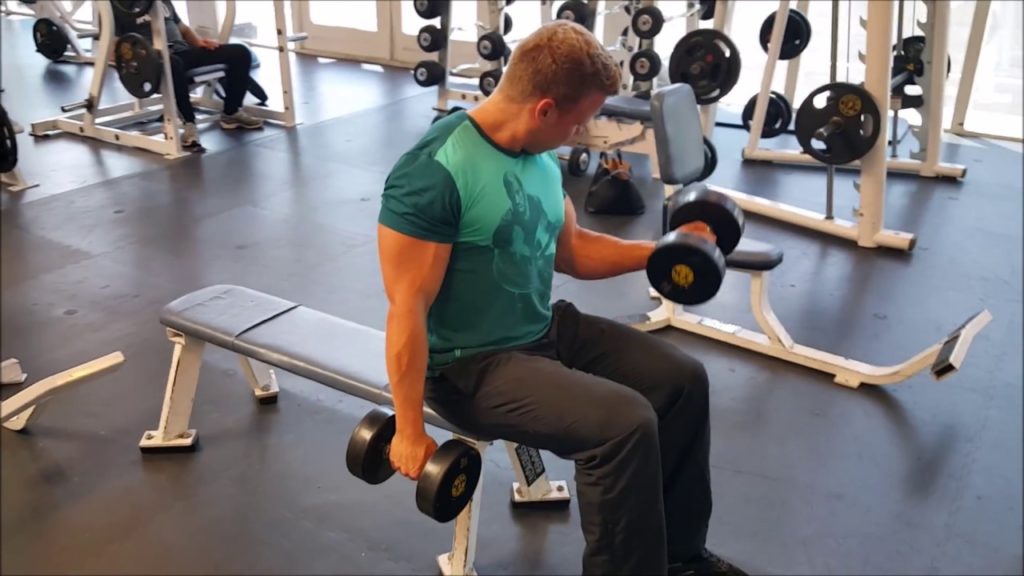
Seated Alternating Dumbbell Curls is a strength training exercise that targets the biceps muscle. It is an excellent exercise for those looking to strengthen and tone their arms. In this exercise, you alternate between curling one arm at a time, using dumbbells. This helps to isolate and work each arm separately, ensuring that one arm does not compensate for the other.
How to Perform Seated Alternating Dumbbell Curls

To perform Seated Alternating Dumbbell Curls, follow these steps:
- Sit on a bench with your back straight and feet flat on the floor.
- Hold a dumbbell in each hand, with your palms facing forward.
- Begin by curling one dumbbell towards your shoulder, while keeping your elbow close to your body.
- Lower the dumbbell back down to the starting position.
- Repeat with the other arm.
- Continue alternating between arms for the desired number of repetitions.
It is important to keep your back straight and your elbows close to your body throughout the exercise to ensure proper form and prevent injury.
Benefits of Seated Alternating Dumbbell Curls
Seated Alternating Dumbbell Curls offer several benefits, including:
- Strengthening and toning the biceps muscle
- Isolating and working each arm separately
- Improving grip strength
- Increasing overall arm strength
- Providing a challenging workout for the upper body
Incorporating Seated Alternating Dumbbell Curls into your workout routine can help you achieve your fitness goals and improve your overall health and well-being.
Variations of Seated Alternating Dumbbell Curls
There are several variations of Seated Alternating Dumbbell Curls that you can try to add variety to your workout routine. These include:
- Seated Hammer Curls: Hold the dumbbells with your palms facing each other instead of facing forward.
- Seated Incline Dumbbell Curls: Sit on an incline bench to target the upper portion of the biceps muscle.
- Seated Concentration Curls: Sit with your legs spread apart and your elbow resting on your inner thigh. Curl the dumbbell towards your shoulder with your palm facing up.
Incorporating these variations into your routine can help you target different areas of the biceps muscle and prevent boredom in your workout.
Precautions to Take
While Seated Alternating Dumbbell Curls are a safe and effective exercise, it is important to take certain precautions to prevent injury. These include:
- Using proper form and technique
- Starting with a weight that is appropriate for your fitness level
- Avoiding jerky or swinging motions
- Taking breaks as needed
- Consulting with a fitness professional if you have any concerns or medical conditions
By following these precautions, you can ensure that you get the most out of your workout while minimizing the risk of injury.
Conclusion
Seated Alternating Dumbbell Curls are a great exercise for anyone looking to strengthen and tone their biceps muscle. By following proper form and technique, you can get the most out of this exercise and achieve your fitness goals. Remember to start with a weight that is appropriate for your fitness level and take breaks as needed to prevent injury.
Related video ofSeated Alternating Dumbbell Curls

Jump squats are a popular plyometric exercise that can help you build explosiveness and power in your lower body. The exercise involves jumping up from a squatting position and landing back down in a squat. But what muscles does the jump squat work exactly? In this article, we'll take a closer look at the jump squat muscles worked.
Quadriceps

The quadriceps, or quads for short, are the primary muscles worked during jump squats. These are the large muscles located at the front of your thigh. When you jump up from a squatting position, your quads contract to extend your knees and push your body upward.
Jump squats are a great way to strengthen your quads, which can improve your performance in other exercises like squats, lunges, and leg presses. Strong quads are also important for everyday activities like climbing stairs, walking, and running.
Glutes

The glutes, or butt muscles, are also heavily involved in jump squats. As you jump up, your glutes contract to extend your hips and propel you forward. This helps you generate more power and speed during the exercise.
Strong glutes are important for many different activities, including running, jumping, and lifting heavy objects. By incorporating jump squats into your workout routine, you can help strengthen and tone your glutes.
Hamstrings

The hamstrings are a group of muscles located at the back of your thigh. During jump squats, your hamstrings work to bend your knees and control your descent back down into the squatting position.
While the hamstrings aren't the primary muscles worked during jump squats, they still play an important role in the exercise. Strengthening your hamstrings can help improve your overall lower body strength and reduce your risk of injury.
Calf Muscles

Your calf muscles, located at the back of your lower leg, also play a role in jump squats. These muscles contract to help push you off the ground during the jumping phase of the exercise.
While jump squats may not be the most effective way to strengthen your calf muscles, they can still provide a good workout for these muscles. To really target your calves, consider adding calf raises or other calf-specific exercises to your routine.
Core Muscles

Your core muscles, including your abs and lower back muscles, are also engaged during jump squats. These muscles work to stabilize your spine and maintain proper form throughout the exercise.
By incorporating jump squats into your workout routine, you can help strengthen and tone your core muscles. A strong core is important for many different activities, including sports, lifting heavy objects, and everyday movements like bending and twisting.
Conclusion
Jump squats are a great exercise for building lower body strength and power. By incorporating this exercise into your workout routine, you can target a variety of muscles, including your quads, glutes, hamstrings, calves, and core muscles.
Remember to start with a light weight or no weight at all until you have mastered the form of the exercise. Then, gradually increase the weight as you become stronger and more comfortable with the movement.
Overall, jump squats are a great addition to any strength training routine. By working a variety of muscles in your lower body and core, you can improve your overall strength and fitness.