Walking is one of the simplest and most effective forms of exercise. It is also one of the most natural activities for humans. When we walk, our body uses a complex system of muscles, joints, and bones to move us forward. But which muscles are used when we walk? This article will explore the answer to this question in detail.
The Basics of Walking

Before we discuss the muscles used in walking, it is important to understand the basic mechanics of the process. Walking involves a repetitive motion of shifting our weight from one leg to the other. When we take a step, our foot lands on the ground and our body weight shifts forward. This motion propels us forward and allows us to take the next step with the opposite foot.
The Muscles Involved

Walking requires the use of several major muscle groups in our legs, including our quadriceps, hamstrings, glutes, and calves. These muscles work together to provide the force needed to move our body weight forward. Our quadriceps, located in the front of our thigh, are responsible for extending our knee and pushing us forward. Our hamstrings, located in the back of our thigh, help to control our speed and provide support for our knee. Our glutes, located in our buttocks, help to stabilize our pelvis and provide power for our forward motion. Our calves, located at the back of our lower leg, help to push us forward and provide lift for our heels.
The Importance of Core Muscles

While our leg muscles are the most obvious muscles used in walking, our core muscles also play an important role. Our core muscles include our abdominal muscles, lower back muscles, and hip muscles. These muscles help to stabilize our body and keep us upright as we walk. They also help to transfer the force generated by our leg muscles into forward motion.
The Role of Joints
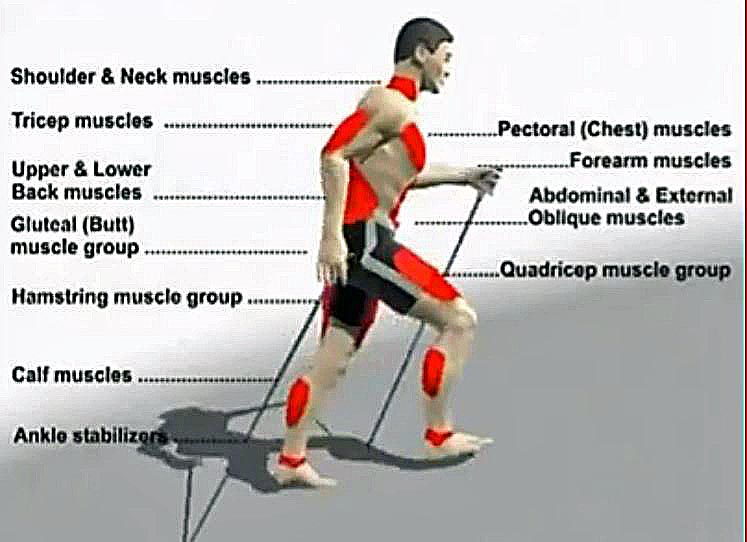
In addition to our muscles, our joints also play a critical role in walking. Our ankle, knee, and hip joints work together to provide stability and mobility as we move. Our ankle joint, for example, helps to absorb shock and provides balance as we push off with our toes. Our knee joint helps to control the motion of our legs and provides support for our body weight. Our hip joint helps to stabilize our pelvis and provides power for our forward motion.
The Benefits of Walking

Walking is a low-impact form of exercise that offers a wide range of benefits. It can help to improve our cardiovascular health, strengthen our muscles, and boost our mood. Regular walking can also help to reduce our risk of chronic diseases such as heart disease, diabetes, and stroke.
Tips for Safe Walking

While walking is generally safe for most people, it is important to take certain precautions to avoid injury. Here are some tips for safe walking:
- Wear comfortable, supportive shoes
- Stay hydrated
- Warm up before you start walking
- Start slowly and gradually increase your pace
- Use proper form
- Be aware of your surroundings
- Stay visible when walking at night
Conclusion
Walking is a simple yet effective exercise that can provide numerous health benefits. When we walk, our body uses a complex system of muscles, joints, and bones to move us forward. By understanding the muscles used when walking, we can better appreciate the importance of this activity and make the most of its benefits.
Related video of Muscles Used When Walking
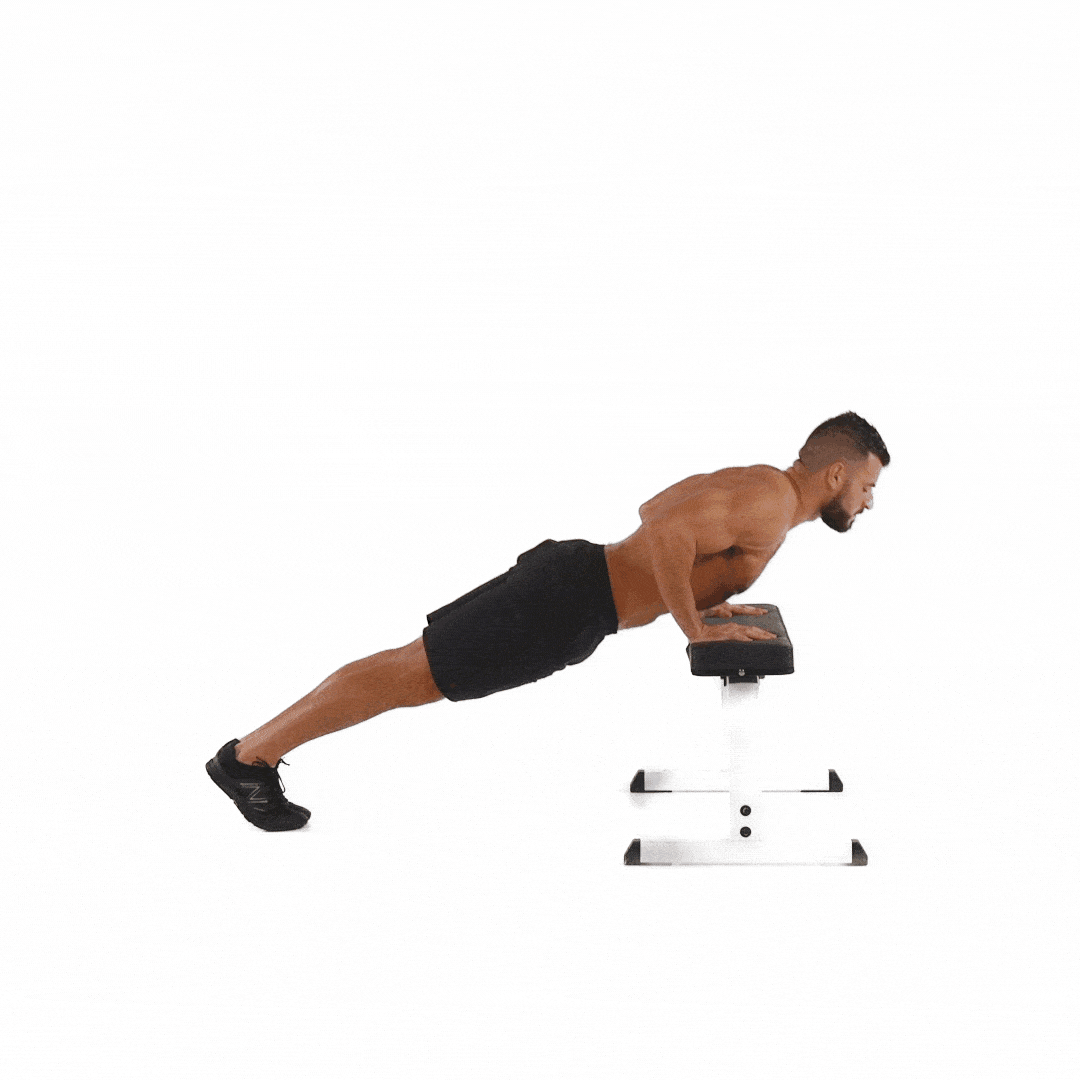
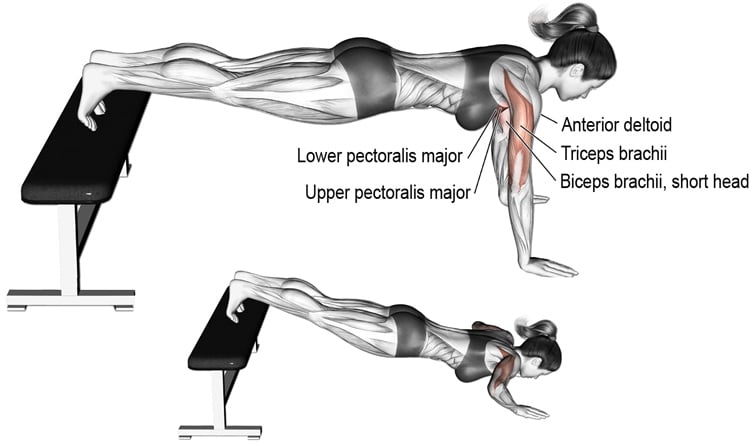
Push ups are one of the best exercises that you can do to build upper body strength. They're simple, effective, and can be done anywhere without any equipment. However, if you want to take your push up game to the next level, you should try hand raised push ups.
What are Hand Raised Push Ups?
Hand raised push ups are a variation of the traditional push up. Instead of placing your hands on the ground, you place them on two elevated surfaces such as two stacks of books or two dumbbells. This increases the range of motion of the exercise and engages more muscle fibers in your chest, shoulders, and triceps.

How to do Hand Raised Push Ups
Follow these steps to perform a hand raised push up:
- Place two elevated surfaces (such as two stacks of books or two dumbbells) parallel to each other and shoulder-width apart.
- Assume the push up position with your hands on the elevated surfaces and your feet on the ground.
- Lower your body until your chest almost touches the elevated surfaces.
- Push back up to the starting position.
- Repeat for the desired number of reps.
It's important to maintain proper form throughout the exercise. Keep your core tight, your back straight, and your elbows close to your body.

Benefits of Hand Raised Push Ups
Hand raised push ups offer several benefits over traditional push ups:
- Increased range of motion: The elevated surfaces allow you to lower your chest deeper than you would with a traditional push up, which engages more muscle fibers in your chest, shoulders, and triceps.
- Greater muscle activation: The increased range of motion and added instability of the elevated surfaces require more muscle activation and control, leading to greater strength gains.
- Variety: Adding hand raised push ups to your workout routine can help prevent boredom and plateauing by providing a new challenge for your muscles.
Hand Raised Push Up Variations
Once you've mastered the basic hand raised push up, you can try these variations to further challenge your upper body:
- Single-arm hand raised push up: Place one hand on an elevated surface and perform a push up with one arm. This variation requires more stability and engages more muscle fibers in your chest, shoulders, and triceps.
- Decline hand raised push up: Place your feet on an elevated surface and perform a hand raised push up with your hands on the ground. This variation places more emphasis on your shoulders and upper chest.
- Spiderman hand raised push up: As you lower your body, bring one knee to the same-side elbow. This variation engages your core and oblique muscles in addition to your upper body.

How Many Hand Raised Push Ups Should You Do?
The number of hand raised push ups you should do depends on your fitness level and goals. If you're a beginner, start with 2-3 sets of 8-10 reps and gradually increase the number of reps and sets as you get stronger. If you're more advanced, you can do up to 4 sets of 15-20 reps.
Conclusion
Hand raised push ups are a challenging and effective exercise that can take your upper body strength to the next level. By adding them to your workout routine, you can increase muscle activation, range of motion, and variety. Try the basic hand raised push up and its variations to keep your muscles guessing and prevent plateauing.
Related video of Hand Raised Push Ups: An Ultimate Guide
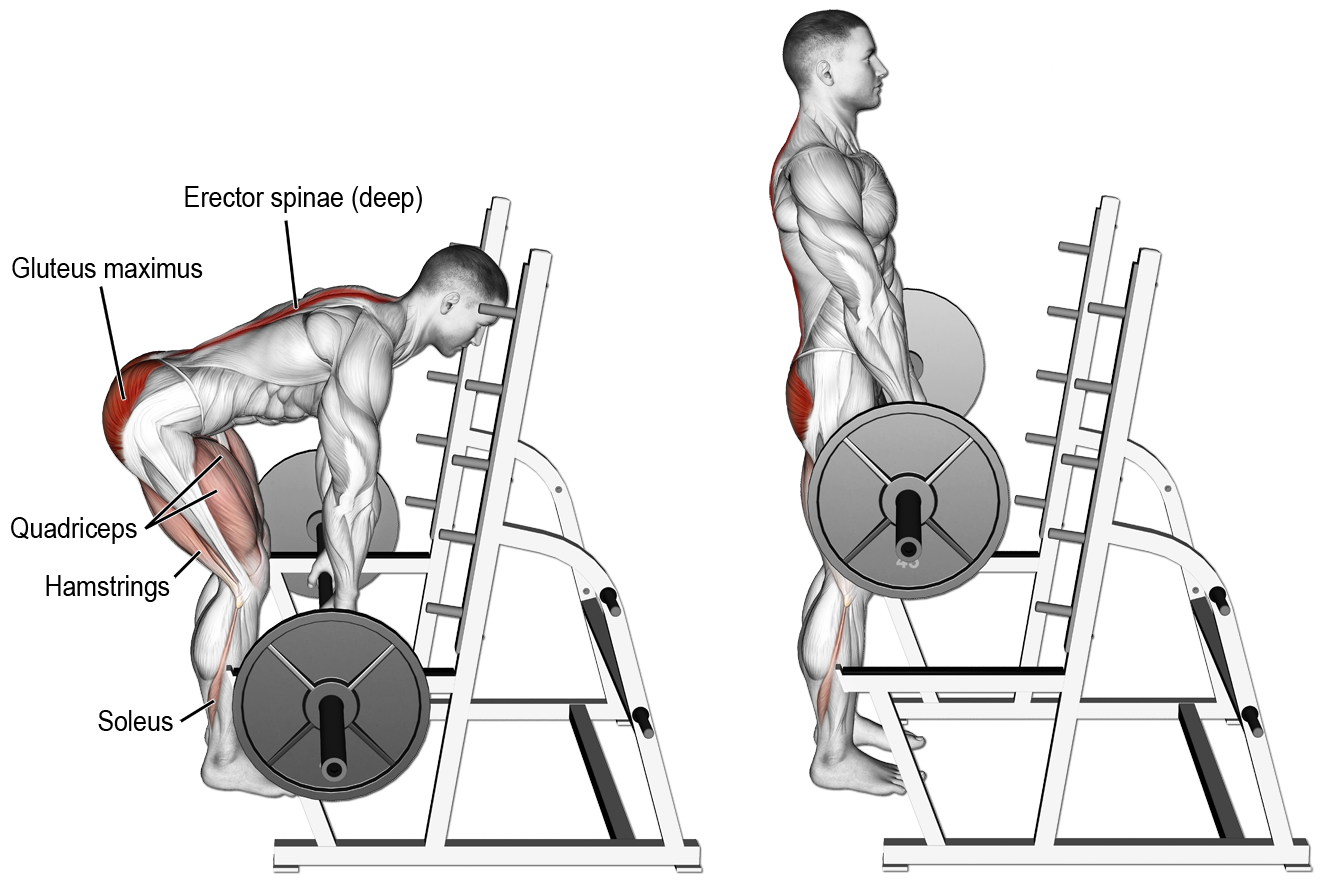
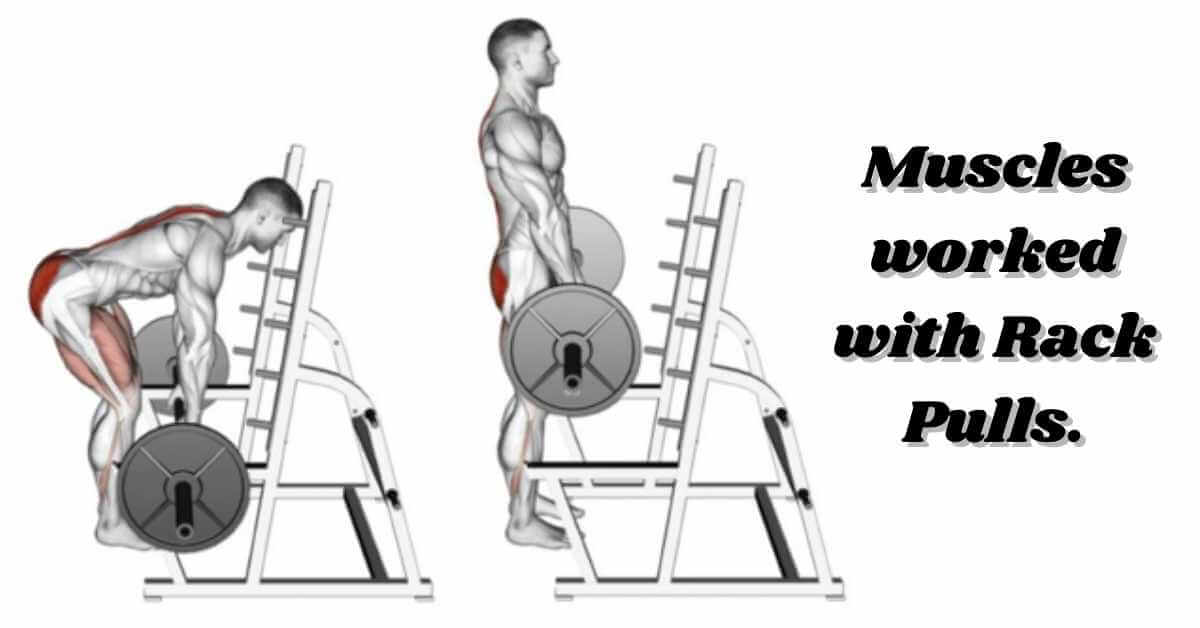
When it comes to building a strong and well-defined back, rack pulls are one of the most effective exercises you can do. This exercise targets the muscles in your upper back, lower back, and glutes, making it an excellent choice for anyone looking to build a stronger, more muscular back. In this article, we'll take a closer look at the muscles worked during rack pulls, as well as some tips for performing the exercise correctly.
The Muscles Worked During Rack Pulls

When you perform rack pulls, you're primarily working the muscles in your back. The exercise targets your latissimus dorsi, which is the large muscle that runs from your armpit down to your lower back. This muscle is responsible for pulling your arms down and back, and it's also involved in many other movements, such as those that involve lifting, pulling, and reaching.
In addition to your latissimus dorsi, rack pulls also work your erector spinae muscles. These are the muscles that run along your spine and are responsible for keeping your back erect and stable. When you perform rack pulls, you'll also be working your glutes, which are the muscles in your buttocks that help to extend your hips.
Tips for Performing Rack Pulls
If you're new to rack pulls, it's important to start with a lighter weight and gradually work your way up. It's also important to maintain proper form throughout the exercise to avoid injury and ensure that you're targeting the right muscles.
When you set up for rack pulls, make sure that the bar is at the correct height. The bar should be set just above your knees, so that you don't have to bend too far down to reach it. To perform the exercise, grip the bar with an overhand grip and stand up straight. Then, lower the bar down to your knees, keeping your back straight and your chest up. Finally, pull the bar up towards your waist, squeezing your shoulder blades together as you do so.
It's important to keep your core engaged throughout the exercise to avoid excessive strain on your lower back. You should also avoid rounding your back or pulling with your arms, as this can put unnecessary strain on your shoulders and elbows.
Variations of Rack Pulls

There are several variations of rack pulls that you can try to target different muscles in your back. For example, you can perform rack pulls with a wider or narrower grip to target your upper or lower back more specifically. You can also adjust the height of the bar to target different areas of your back.
If you're looking for a more challenging variation of rack pulls, you can try performing them with a deficit. This means standing on a platform or weight plate to increase the distance between the bar and the ground. This will require you to use more strength and stability to lift the bar, making it a great way to challenge your muscles and build more strength in your back.
Conclusion
Rack pulls are an excellent exercise for building a strong and muscular back. By targeting your latissimus dorsi, erector spinae, and glutes, rack pulls can help to improve your posture, increase your strength, and reduce your risk of injury. By following the tips outlined in this article, you can perform rack pulls safely and effectively, and start seeing results in no time.
Related video of Rack Pull Muscles Worked
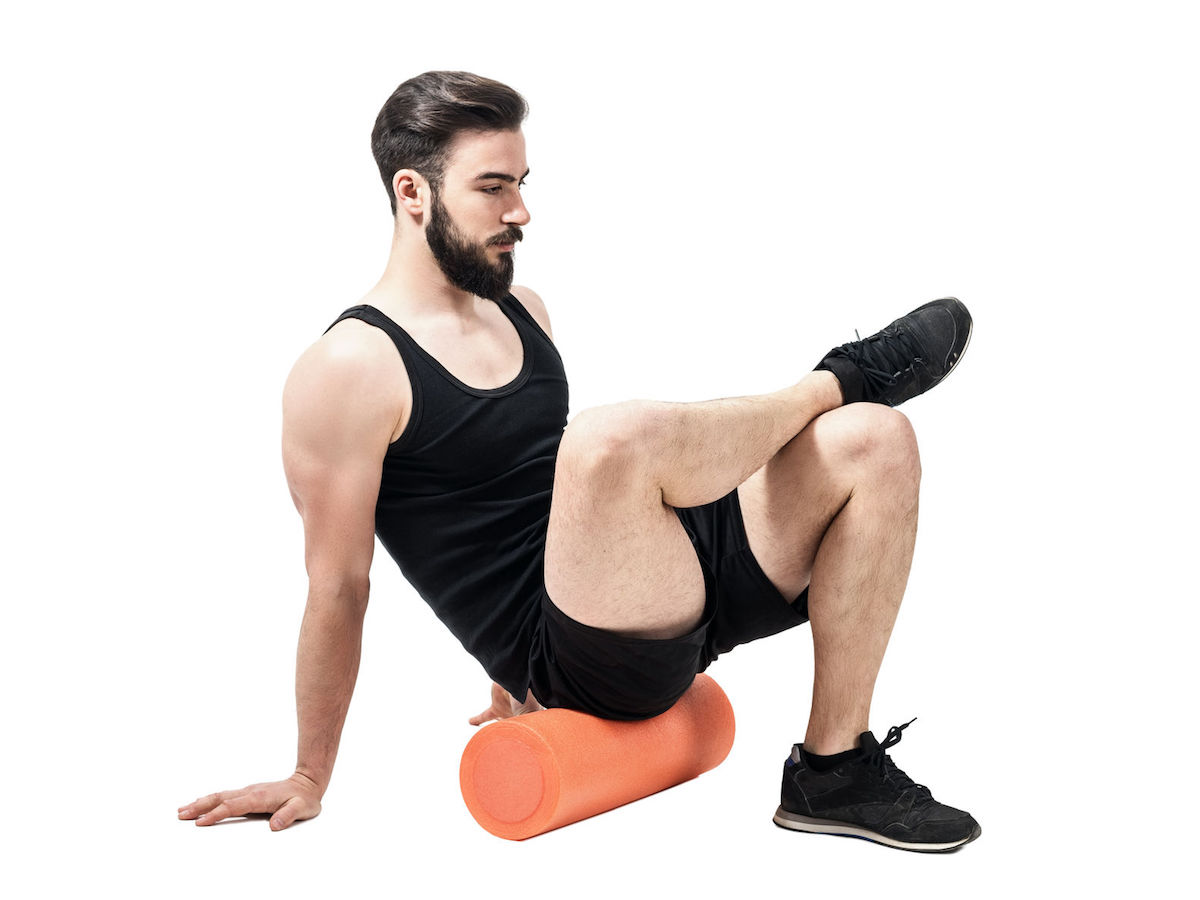
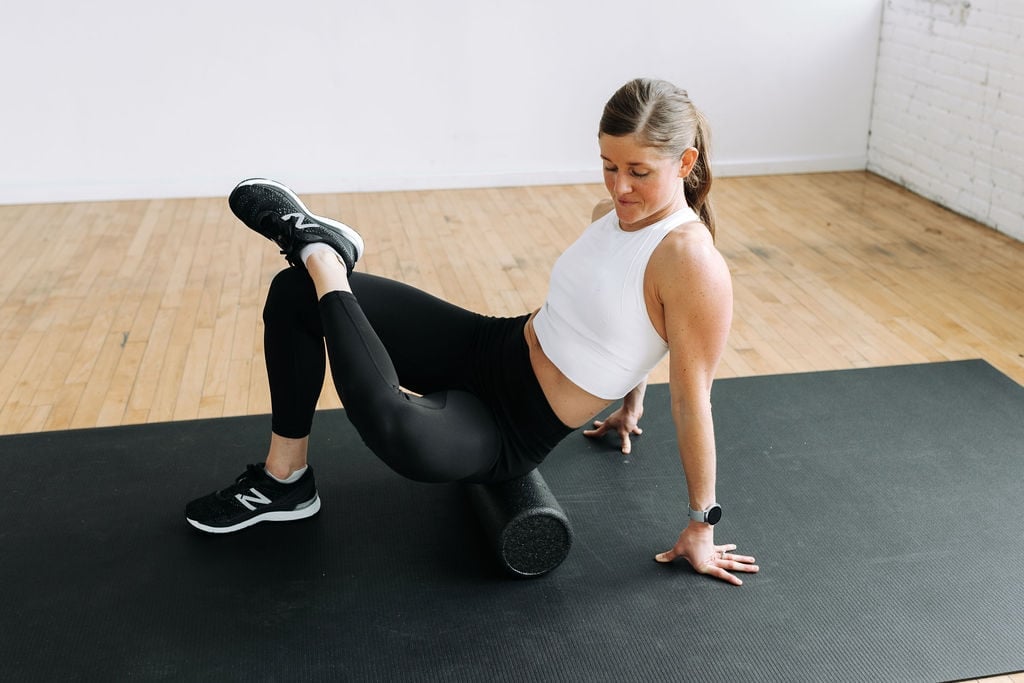
The gluteal muscles, commonly called “glutes,” are one of the largest muscle groups in the human body. These muscles are responsible for hip extension, rotation, and abduction. They play a crucial role in various physical activities, including running, jumping, and climbing stairs. However, due to our sedentary lifestyles, these muscles often become tight and weak, leading to discomfort and pain in the lower back, hips, and knees.
Introducing the Foam Roller

The foam roller is an inexpensive and versatile tool that can help you release muscle tension, reduce pain, and improve flexibility. It’s a cylindrical piece of foam that you can use for self-myofascial release (SMR) or self-massage. SMR is a technique that involves applying pressure to specific points on your muscles to break up adhesions or knots.
The Benefits of Foam Rolling for Glutes

Here are some of the benefits of using a foam roller for your glutes:
- Relieve muscle soreness and stiffness
- Increase blood flow and oxygen to the muscles
- Improve range of motion and flexibility
- Prevent injury
- Enhance athletic performance
How to Use a Foam Roller for Glutes
Before you start, make sure you have a foam roller that’s firm enough to provide adequate pressure but not too hard that it hurts. Here are some techniques to try:
- Butt Roll: Sit on the foam roller with your knees bent and feet flat on the floor. Place your hands behind you for support and roll back and forth over your glutes.
- Side Roll: Lie on your side with the foam roller under your hip. Use your top leg and hand to support your weight and roll back and forth over your glutes.
- Piriformis Roll: Sit on the foam roller with your right ankle crossed over your left knee. Place your hands behind you for support and roll back and forth over your right glute.
- Glute Bridge: Lie on your back with your knees bent and feet flat on the floor. Place the foam roller under your glutes and lift your hips off the ground. Roll back and forth over your glutes.
Tips for Foam Rolling

Here are some tips to make the most out of your foam rolling sessions:
- Start slowly and gradually increase the pressure and duration.
- Breathe deeply and relax into the pressure.
- Avoid rolling directly over bony areas, such as the tailbone.
- Focus on areas that feel tight or sore.
- Drink plenty of water before and after your session to flush out toxins.
Conclusion
A foam roller is an effective and convenient tool for releasing tension and improving flexibility in your glutes. By incorporating foam rolling into your fitness routine, you can reduce pain, prevent injury, and enhance your athletic performance. Remember to start slowly, breathe deeply, and focus on areas that feel tight or sore. Happy rolling!
Related video of Foam Roller for Glutes: Benefits, Techniques, and Tips
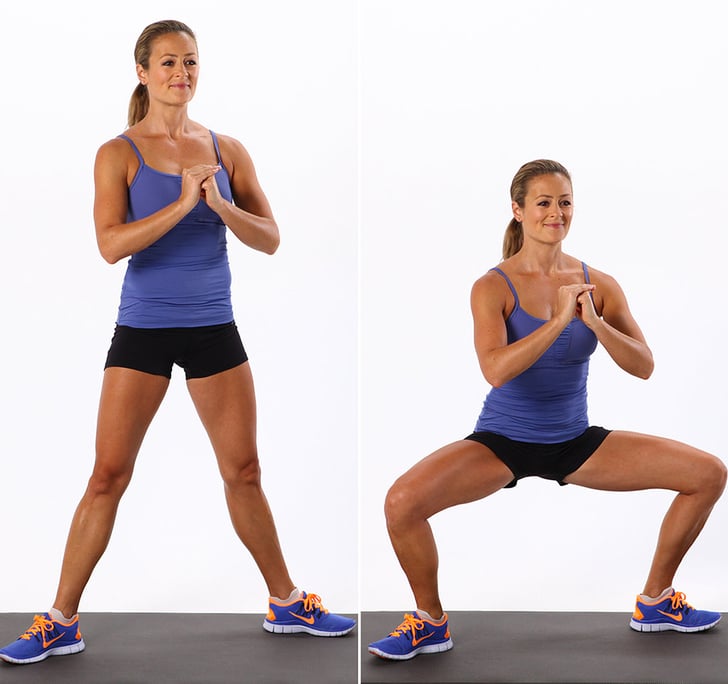
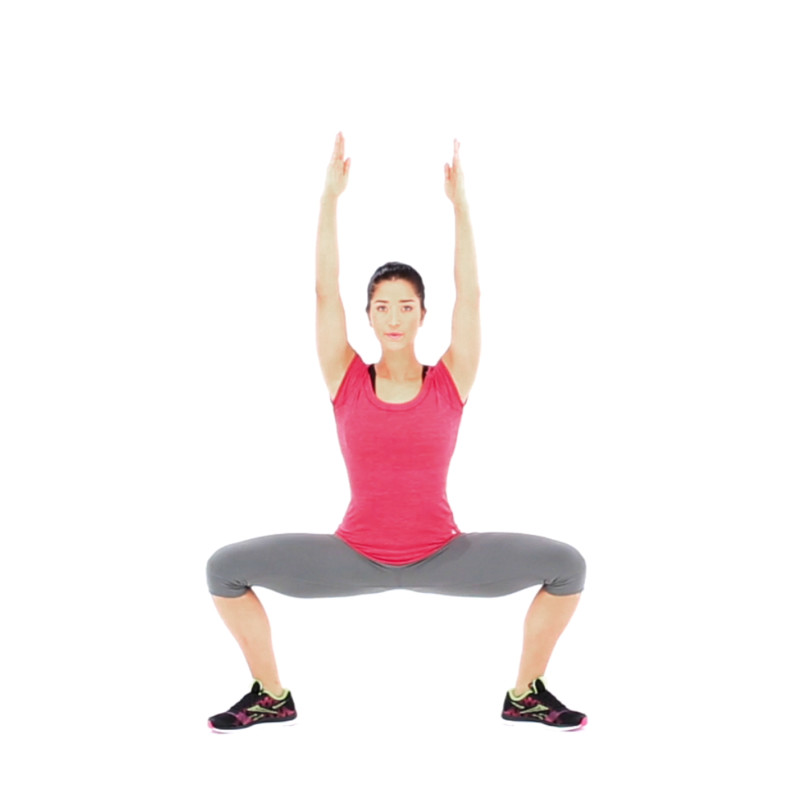
Plie squats are a popular exercise that targets several muscles in the lower body, including the quadriceps, hamstrings, glutes, and calves. This exercise is also known as a sumo squat, and it is performed with the feet wider than shoulder-width apart and the toes pointing outwards.
Quadriceps

The quadriceps are a group of four muscles located in the front of the thigh. These muscles are responsible for extending the knee joint, which is essential for movements such as walking, running, and jumping. Plie squats work the quadriceps by placing a significant amount of tension on the muscle fibers during the lowering and lifting phases of the exercise.
Hamstrings
The hamstrings are a group of three muscles located in the back of the thigh. These muscles are responsible for bending the knee joint and extending the hip joint, which is essential for movements such as walking, running, and jumping. Plie squats work the hamstrings by placing tension on the muscle fibers during the lowering and lifting phases of the exercise.
Glutes

The glutes are a group of three muscles located in the buttocks. These muscles are responsible for extending the hip joint and rotating the thigh, which is essential for movements such as walking, running, and jumping. Plie squats work the glutes by placing tension on the muscle fibers during the lowering and lifting phases of the exercise.
Calves

The calves are a group of two muscles located in the back of the lower leg. These muscles are responsible for plantar flexion of the ankle joint, which is essential for movements such as walking, running, and jumping. Plie squats work the calves by placing tension on the muscle fibers during the lowering and lifting phases of the exercise.
How to Perform Plie Squats
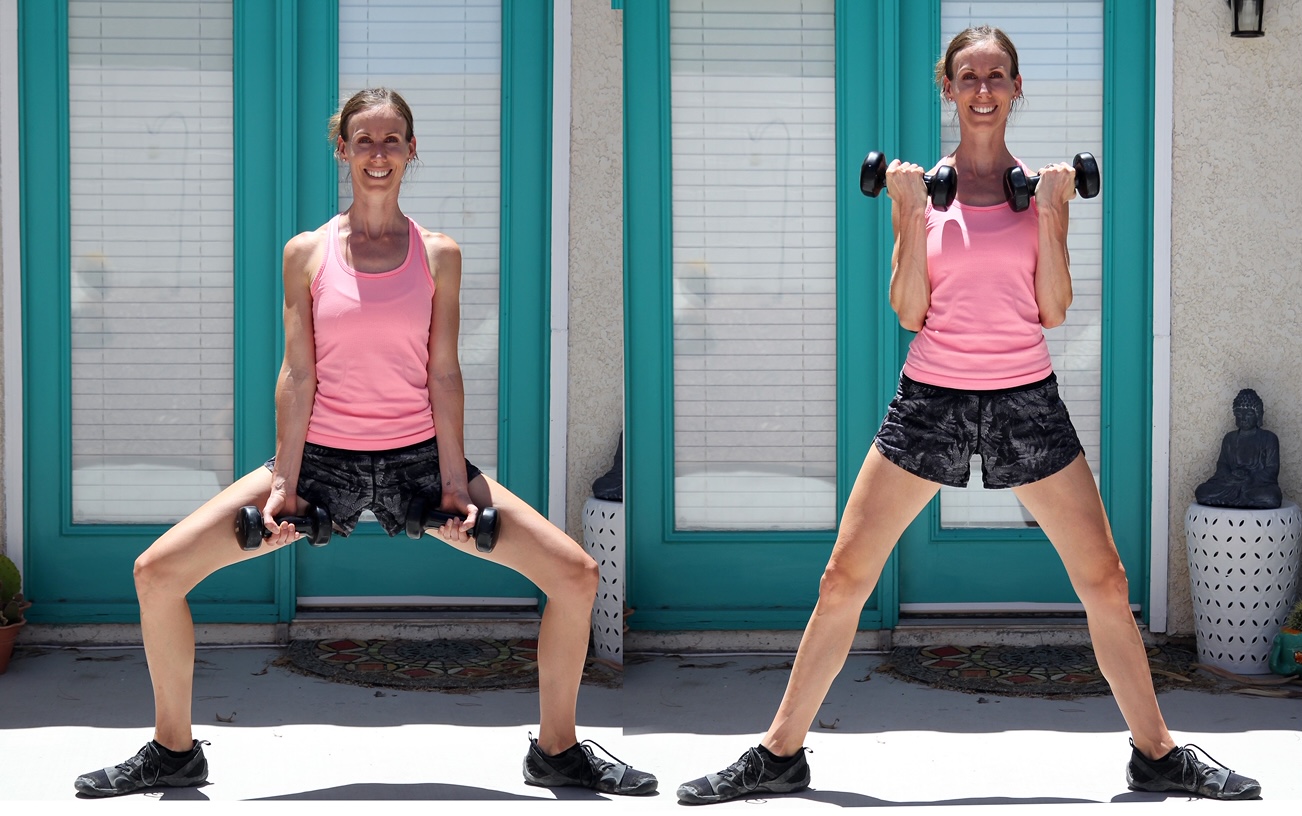
To perform plie squats, follow these steps:
- Stand with your feet wider than shoulder-width apart and your toes pointing outwards.
- Lower your body by bending your knees and hips, keeping your chest up and your back straight.
- Pause briefly at the bottom of the squat, then push through your heels to return to the starting position.
- Repeat for the desired number of reps.
Variations of Plie Squats

There are several variations of plie squats that you can try to target different muscles and add variety to your workout:
- Weighted plie squats: Hold a dumbbell or kettlebell in each hand to add resistance and increase the difficulty of the exercise.
- Pulsing plie squats: Perform small, rapid pulses at the bottom of the squat to keep the muscles under tension for a longer period of time.
- Jumping plie squats: Add a plyometric element to the exercise by jumping explosively out of the squat and landing softly back into it.
Conclusion
Plie squats are an effective exercise for targeting several muscles in the lower body, including the quadriceps, hamstrings, glutes, and calves. By incorporating variations of plie squats into your workout routine, you can add variety and challenge your muscles in new ways.
Related video of Plie Squats Muscles Worked

Push ups are a classic exercise that has been around for centuries. They are a great way to build upper body strength and endurance. There are many variations of push ups, and one of these variations is called the decline push up. In this article, we will discuss what muscles are worked during decline push ups.
What are Decline Push Ups?

Decline push ups are a variation of the traditional push up. The main difference is that your feet are elevated on a bench or other stable surface. This puts more weight on your upper body and makes the exercise more challenging.
What Muscles are Worked During Decline Push Ups?

Decline push ups work many of the same muscles as traditional push ups, but with added emphasis on the upper chest, shoulders, and triceps. The main muscles worked during decline push ups include:
- Chest (pectoralis major and minor)
- Shoulders (anterior deltoids)
- Triceps
- Core (abdominal muscles)
The chest muscles are the primary muscles worked during decline push ups. The upper chest muscles, in particular, are targeted due to the elevated foot position. The shoulders and triceps are also heavily involved in the exercise, as they are required to stabilize the body and perform the pushing motion.
Benefits of Decline Push Ups
Decline push ups offer several benefits over traditional push ups. These include:
- Increased upper chest activation
- Increased shoulder and tricep activation
- Increased core activation
- Increased overall upper body strength and endurance
By incorporating decline push ups into your workout routine, you can target specific muscle groups and increase the overall effectiveness of your workouts.
How to Perform Decline Push Ups
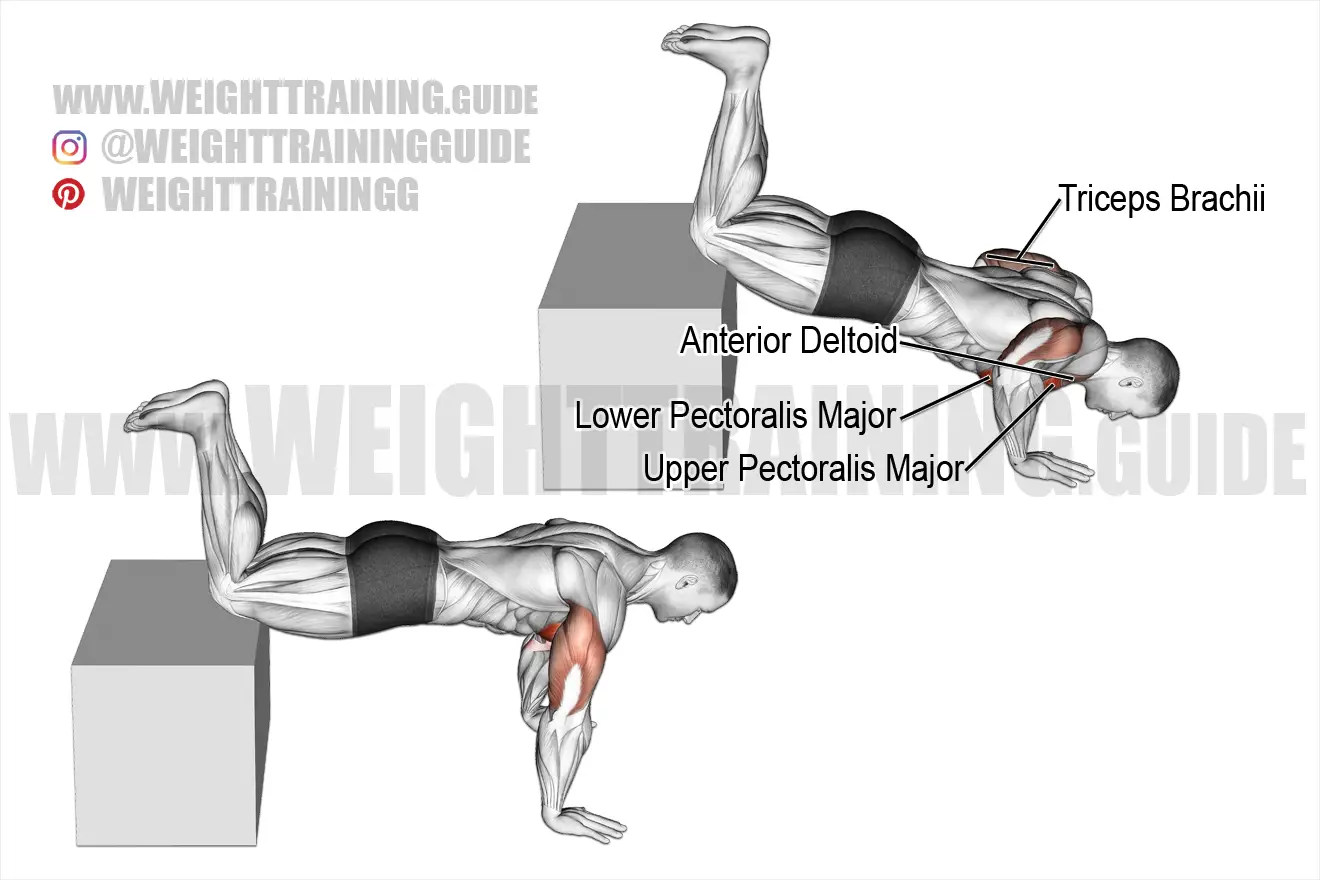
Here is a step-by-step guide on how to perform decline push ups:
- Find a sturdy bench or other stable surface to elevate your feet.
- Assume a push up position with your hands on the ground, shoulder-width apart.
- Place your feet on the elevated surface behind you.
- Lower your body down towards the ground, keeping your elbows close to your sides.
- Push your body back up to the starting position.
- Repeat for the desired number of reps.
It is important to maintain proper form during decline push ups. Keep your body in a straight line from your head to your heels, and avoid arching or sagging your back.
Conclusion
Decline push ups are a challenging variation of the traditional push up that target specific muscle groups in the upper body. By incorporating decline push ups into your workout routine, you can increase the effectiveness of your workouts and build overall upper body strength and endurance.
Related video of Decline Push Ups Work What Muscles
The One Leg Cable Kickback is a great exercise that targets your glutes. It helps to tone and shape your butt, giving you a more round and lifted appearance. This exercise is especially beneficial for those who sit for long periods of time, as it helps to activate and strengthen your glutes, which can become inactive and weak from prolonged sitting.

How to Perform the One Leg Cable Kickback
To perform the One Leg Cable Kickback, follow these steps:
- Attach an ankle strap to a low cable pulley.
- Stand facing the machine with your feet shoulder-width apart and your hands holding onto the machine for support.
- Shift your weight onto your left leg and lift your right leg off the ground, keeping it slightly bent.
- Keeping your right leg straight, extend it backwards until your foot is parallel to the floor.
- Pause for a second, then return your leg to the starting position.
- Repeat for the desired number of repetitions, then switch sides.

Tips for a Better Workout
Here are some tips to help you get the most out of your One Leg Cable Kickback workout:
- Keep your core tight throughout the exercise to help maintain your balance.
- Focus on squeezing your glutes at the top of the movement.
- Use a lighter weight to start and gradually increase as you get stronger.
- Use a mirror to check your form and make sure you are performing the exercise correctly.

Variations of the One Leg Cable Kickback
Here are some variations of the One Leg Cable Kickback that you can try to target your glutes in different ways:
- Single-Arm Cable Kickback: Perform the exercise with one arm instead of two, which will challenge your balance and coordination.
- Standing Cable Hip Extension: Stand facing away from the cable machine and attach the ankle strap to your ankle. Extend your leg backwards, but instead of keeping it straight, bend your knee and bring it towards your chest.
- Resistance Band Kickback: Use a resistance band instead of a cable machine to perform the exercise.

Conclusion
The One Leg Cable Kickback is a great exercise for toning and shaping your glutes. It is easy to perform and can be done at the gym or at home with a cable machine or resistance band. Incorporate this exercise into your workout routine to help activate and strengthen your glutes, giving you a more round and lifted appearance.
Related video of One Leg Cable Kickback - A Great Exercise for Your Glutes

Hip raises are a great exercise for strengthening your glutes and lower back muscles. They are also a great way to improve your core stability and balance. In this article, we will show you how to do hip raises correctly and safely.
What are hip raises?
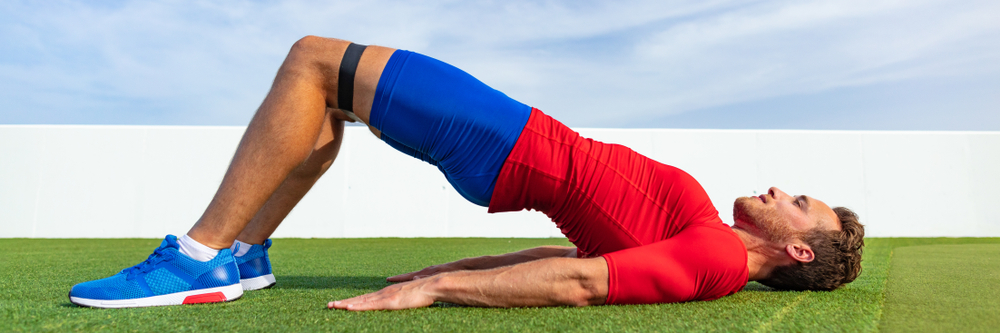
Hip raises are a type of exercise that involves lifting your hips off the ground while lying on your back. This exercise targets your glutes, hamstrings, and lower back muscles. It is a great exercise for improving your overall lower body strength and stability.
How to do hip raises

1. Lie on your back with your knees bent and feet flat on the ground.
2. Place your arms by your sides with your palms facing down.
3. Engage your core muscles by pulling your belly button towards your spine.
4. Slowly lift your hips off the ground until your body forms a straight line from your shoulders to your knees.
5. Hold this position for a few seconds.
6. Lower your hips back down to the ground.
7. Repeat for several repetitions.
8. Make sure to breathe throughout the exercise.
Tips for doing hip raises

1. Keep your feet flat on the ground throughout the exercise.
2. Avoid arching your back during the movement.
3. Keep your knees in line with your hips.
4. Use your glutes to lift your hips, not your lower back.
5. Make sure to engage your core muscles throughout the exercise.
Variations of hip raises

1. Single leg hip raises - lift one leg off the ground while performing the exercise.
2. Weighted hip raises - hold a weight plate or dumbbell on your hips while performing the exercise.
3. Bridge - lift your hips off the ground as high as possible.
Conclusion
Hip raises are a great exercise for improving your lower body strength and stability. They can be performed anywhere, and you don't need any special equipment to do them. By following the tips and variations we have discussed in this article, you can safely and effectively perform hip raises and reap the benefits of this great exercise.
Related video of How To Do Hip Raises

If you're looking for an exercise that can help you build stronger and more defined shoulders, the single dumbbell shoulder raise is a great option. This exercise targets the anterior (front) deltoid muscle, which is responsible for lifting your arm forward and to the side. In this article, we'll show you how to perform the single dumbbell shoulder raise correctly and discuss its benefits.
How to Perform the Single Dumbbell Shoulder Raise
To perform the single dumbbell shoulder raise, follow these steps:
- Stand with your feet shoulder-width apart and hold a dumbbell in one hand with an overhand grip.
- Bring the weight up to shoulder level, keeping your elbow bent.
- Slowly lift the weight straight up in front of you, keeping your arm straight and your elbow locked.
- Pause briefly at the top of the movement, then slowly lower the weight back down to shoulder level.
- Repeat for the desired number of repetitions, then switch arms and repeat the exercise with the other arm.
It's important to use a weight that you can control throughout the entire movement. If you find that you're swinging the weight or using momentum to lift it, you should choose a lighter weight. You can also perform this exercise seated or standing, depending on your preference.
Benefits of the Single Dumbbell Shoulder Raise

The single dumbbell shoulder raise is a great exercise for building shoulder strength and definition. Here are some of the benefits:
- Targets the anterior deltoid, which is responsible for lifting your arm forward and to the side.
- Helps improve shoulder stability and mobility.
- Can be performed with a variety of weights and equipment, making it a versatile exercise for any fitness level.
- Can be combined with other exercises to create a full shoulder workout.
Additionally, the single dumbbell shoulder raise can be a great exercise for those who experience shoulder pain or discomfort during other shoulder exercises. This exercise allows you to isolate the anterior deltoid and work it without putting as much stress on other parts of the shoulder.
Tips for Performing the Single Dumbbell Shoulder Raise

Here are some tips to help you perform the single dumbbell shoulder raise correctly:
- Keep your core engaged and your back straight throughout the movement.
- Avoid swinging the weight or using momentum to lift it.
- Focus on lifting the weight with your shoulder muscles rather than your arm.
- Use a weight that challenges you but allows you to perform the exercise with good form.
By following these tips and performing the exercise correctly, you can maximize the benefits of the single dumbbell shoulder raise and avoid injury.
Conclusion
The single dumbbell shoulder raise is a simple yet effective exercise for building shoulder strength and definition. By following the proper form and using a weight that challenges you, you can target the anterior deltoid and improve your shoulder stability and mobility. Whether you're a beginner or an experienced lifter, this exercise can be a valuable addition to your shoulder workout routine.
Related video of Single Dumbbell Shoulder Raise: How to Perform and Its Benefits

The Single Cable Lateral Raise is a popular exercise that primarily targets the lateral deltoid muscles. This exercise is great for anyone looking to tone and strengthen their shoulders. It is also a great way to improve your overall upper body strength and posture.
How to Perform the Single Cable Lateral Raise

To perform the Single Cable Lateral Raise, follow these simple steps:
- Attach a cable to a low pulley and stand with your feet hip-width apart and your knees slightly bent.
- Hold the cable handle with your right hand and extend your arm out to the side so that it's parallel to the floor.
- Slowly lower your arm back down to your side and repeat for a desired number of repetitions.
- Switch to your left arm and repeat the exercise.
Make sure to keep your elbow slightly bent throughout the exercise and avoid swinging your arm. Also, be sure to use a weight that challenges you, but doesn't cause you to compromise your form.
Variations of the Single Cable Lateral Raise

Here are some variations of the Single Cable Lateral Raise that you can try:
- Single Arm Dumbbell Lateral Raise
- Double Cable Lateral Raise
- Standing Bent-Over Lateral Raise
- Seated Lateral Raise
Each variation targets the same muscle group but provides a slightly different challenge. Experiment with different variations to find the one that works best for you.
Benefits of the Single Cable Lateral Raise

The Single Cable Lateral Raise offers many benefits, including:
- Strengthening the lateral deltoid muscles
- Improving shoulder stability
- Reducing the risk of shoulder injuries
- Improving overall upper body strength
- Improving posture
By incorporating the Single Cable Lateral Raise into your workout routine, you can experience these benefits and more.
Conclusion
The Single Cable Lateral Raise is a simple yet effective exercise that can help you strengthen and tone your shoulders. By following the proper form and using a weight that challenges you, you can experience the many benefits this exercise has to offer. Try incorporating it into your next workout and see the results for yourself!
Related video of Single Cable Lateral Raise: A Great Workout for Your Shoulders

A Front Foot Elevated Dumbbell Split Squat, also known as a Bulgarian Split Squat, is a variation of the traditional split squat exercise. This exercise is great for targeting the legs, particularly the quads, hamstrings, and glutes, and can be done with minimal equipment. In this article, we will discuss the proper form, benefits, and variations of the Front Foot Elevated Dumbbell Split Squat.
Proper Form

To perform a Front Foot Elevated Dumbbell Split Squat, you will need a bench or sturdy elevated surface. Begin by standing about two feet in front of the bench with your feet hip-width apart. Place the top of one foot on the bench, with your toes pointing down. Hold a dumbbell in each hand, with your palms facing inwards.
Next, lower your back knee towards the ground, while keeping your front knee in line with your ankle. Make sure to keep your torso upright and engage your core throughout the movement. Once your back knee is close to the ground, push through your front foot to return to the starting position. Repeat for the desired number of reps before switching legs.
Benefits

The Front Foot Elevated Dumbbell Split Squat has numerous benefits, including:
- Increased Leg Strength: This exercise targets the quadriceps, hamstrings, and glutes, which can help improve leg strength and overall lower body power.
- Better Balance: Due to the split stance, this exercise requires a greater amount of balance and stability, which can translate to improved performance in other exercises and daily activities.
- Improved Mobility: The Front Foot Elevated Dumbbell Split Squat requires a greater range of motion in the hip, knee, and ankle joints, which can lead to improved mobility and flexibility over time.
Variations
There are several ways to vary the Front Foot Elevated Dumbbell Split Squat to target different muscle groups or increase the difficulty of the exercise. Some variations include:
- Single Leg Front Foot Elevated Dumbbell Split Squat: This variation involves performing the exercise with only one weight, held on the same side as the elevated foot.
- Back Foot Elevated Dumbbell Split Squat: In this variation, the back foot is elevated on a bench, while the front foot remains on the ground.
- Jumping Front Foot Elevated Dumbbell Split Squat: This advanced variation involves jumping explosively from the split squat position and switching legs in mid-air.
Conclusion
The Front Foot Elevated Dumbbell Split Squat is a challenging exercise that can help improve leg strength, balance, and mobility. By following proper form and incorporating variations into your workouts, you can maximize the benefits of this exercise and take your fitness to the next level.