Seated row cable attachment is a piece of equipment that can be found at most commercial gyms. It is designed to help you strengthen your back muscles - specifically, your lats, rhomboids, and traps. In this article, we'll take a closer look at the seated row cable attachment, how to use it, and its benefits.
What Is Seated Row Cable Attachment?

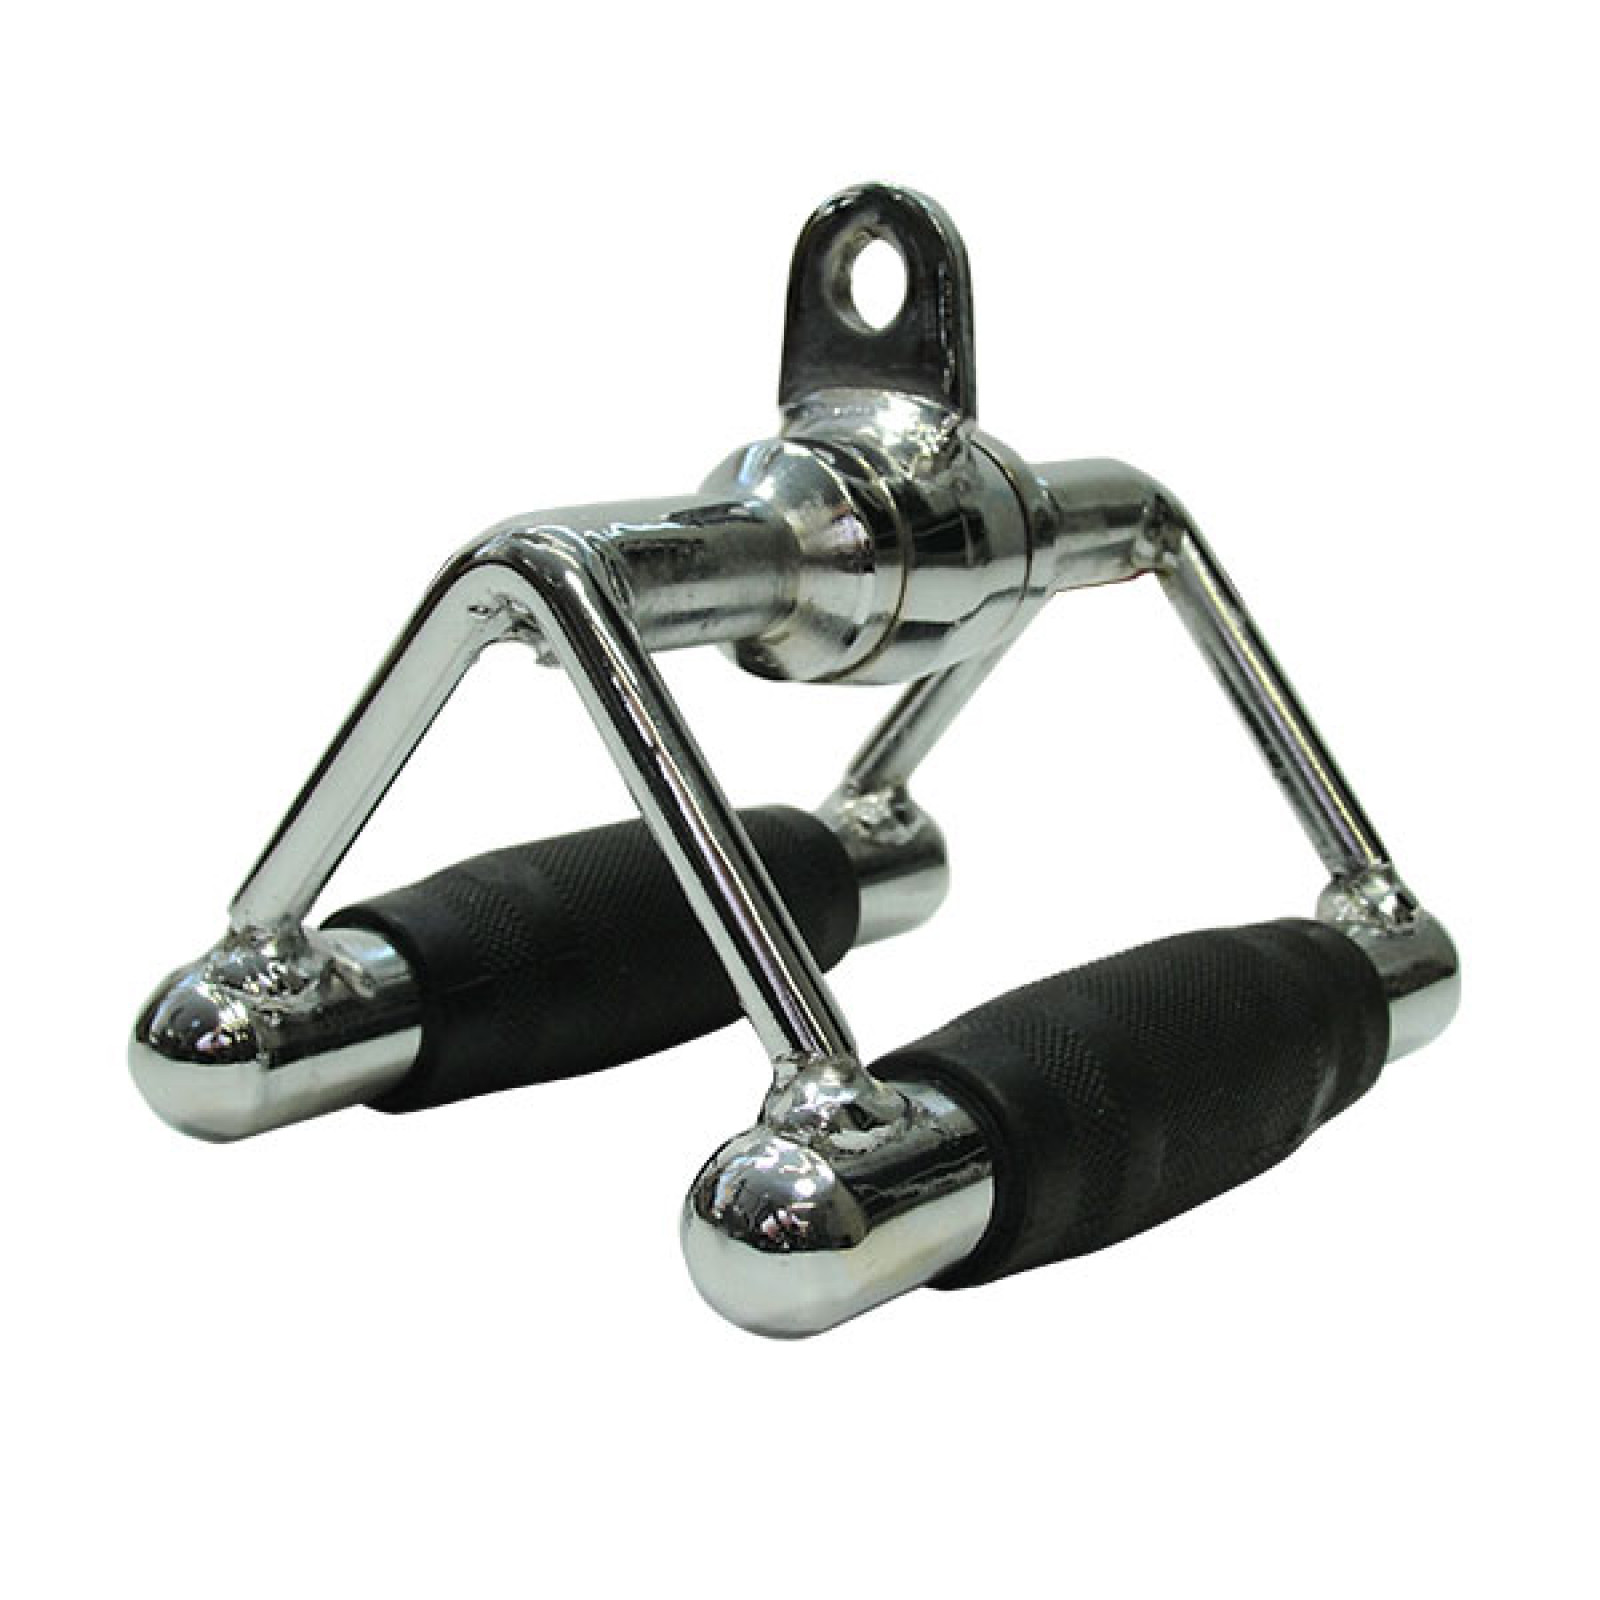
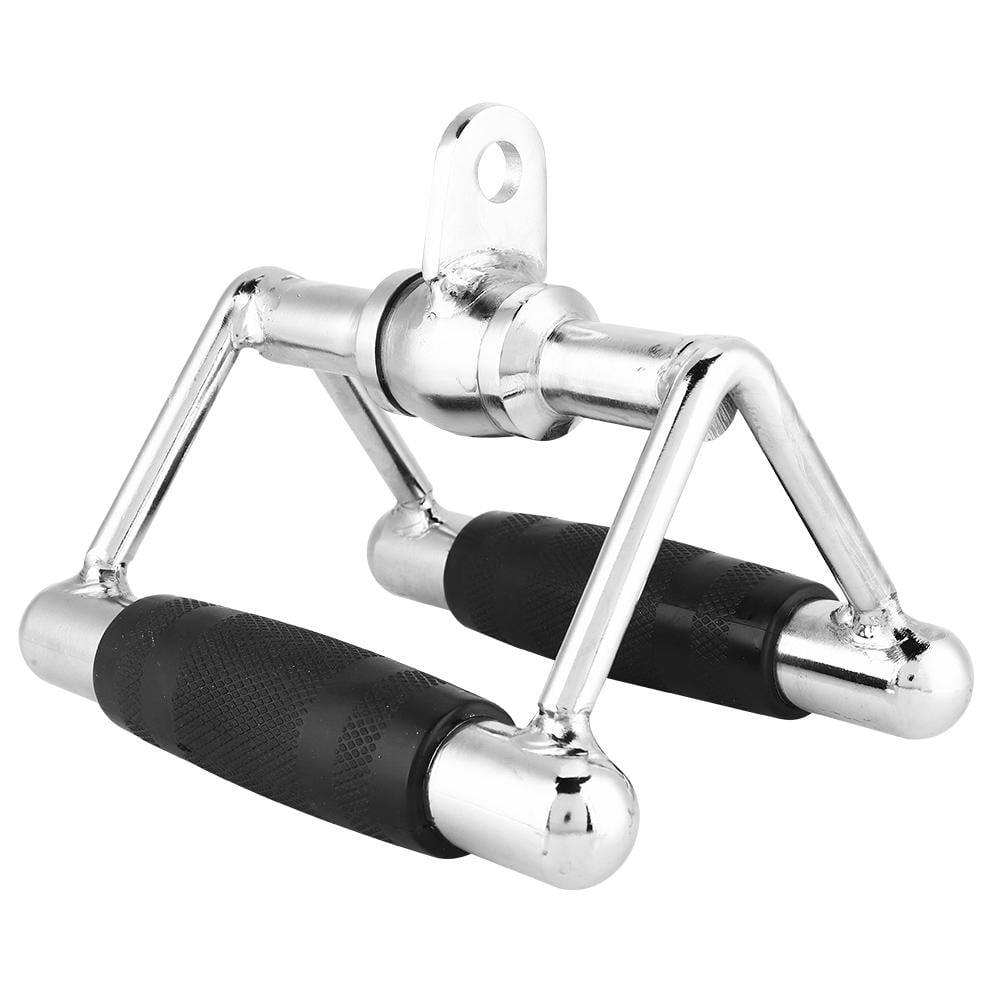
Seated row cable attachment is a machine that consists of a long cable, a weight stack, and a handle. You sit on a bench with your feet on the footrests and pull the handle towards your chest. The resistance is provided by the weight stack, which you can adjust to your desired level of difficulty.
How to Use Seated Row Cable Attachment?
Using the seated row cable attachment is relatively simple. Here's how you do it:
- Set the weight stack to your desired level of difficulty.
- Sit on the bench with your feet on the footrests.
- Grab the handle with an overhand grip and sit up straight.
- Pull the handle towards your chest, squeezing your shoulder blades together.
- Hold the position for a second or two and then slowly lower the handle back to the starting position.
- Repeat for desired reps.
It's important to maintain good form throughout the exercise. Keep your back straight, shoulders down, and core engaged. Don't use momentum to pull the handle, and don't let your shoulders shrug up towards your ears.
Benefits of Seated Row Cable Attachment

There are several benefits to using the seated row cable attachment:
- Strengthens the back muscles: The seated row cable attachment primarily targets the back muscles, which are essential for good posture and overall strength.
- Improves grip strength: Holding onto the handle requires grip strength, which can translate to other exercises and daily activities.
- Low-impact exercise: The seated row cable attachment is a low-impact exercise, making it suitable for people with joint issues or those who are recovering from an injury.
- Customizable resistance: You can adjust the weight stack to your desired level of difficulty, making it suitable for beginners and advanced lifters alike.
Variations of Seated Row Cable Attachment
There are several variations of the seated row cable attachment:
- Close-grip handle: This variation targets the middle back muscles more than the wider grip handle.
- Reverse grip handle: This variation targets the biceps and forearms more than the wider grip handle.
- Single-arm handle: This variation allows you to work on one side of your back at a time, which can help correct muscle imbalances.
Conclusion
The seated row cable attachment is a versatile piece of equipment that can help you strengthen your back muscles, improve grip strength, and provide a low-impact exercise option. By using proper form and adjusting the weight stack to your desired level of difficulty, you can reap the benefits of this exercise. Give it a try during your next gym session!
Related video of Seated Row Cable Attachment: A Comprehensive Guide

If you are looking for an exercise that can help you build strength and tone your entire body, look no further than the squat press with bar. This exercise is a combination of two of the most effective movements for building muscle and burning fat: the squat and the overhead press. By combining these two movements into one exercise, you can save time and get a full body workout in just a few minutes.
How to Do a Squat Press With Bar

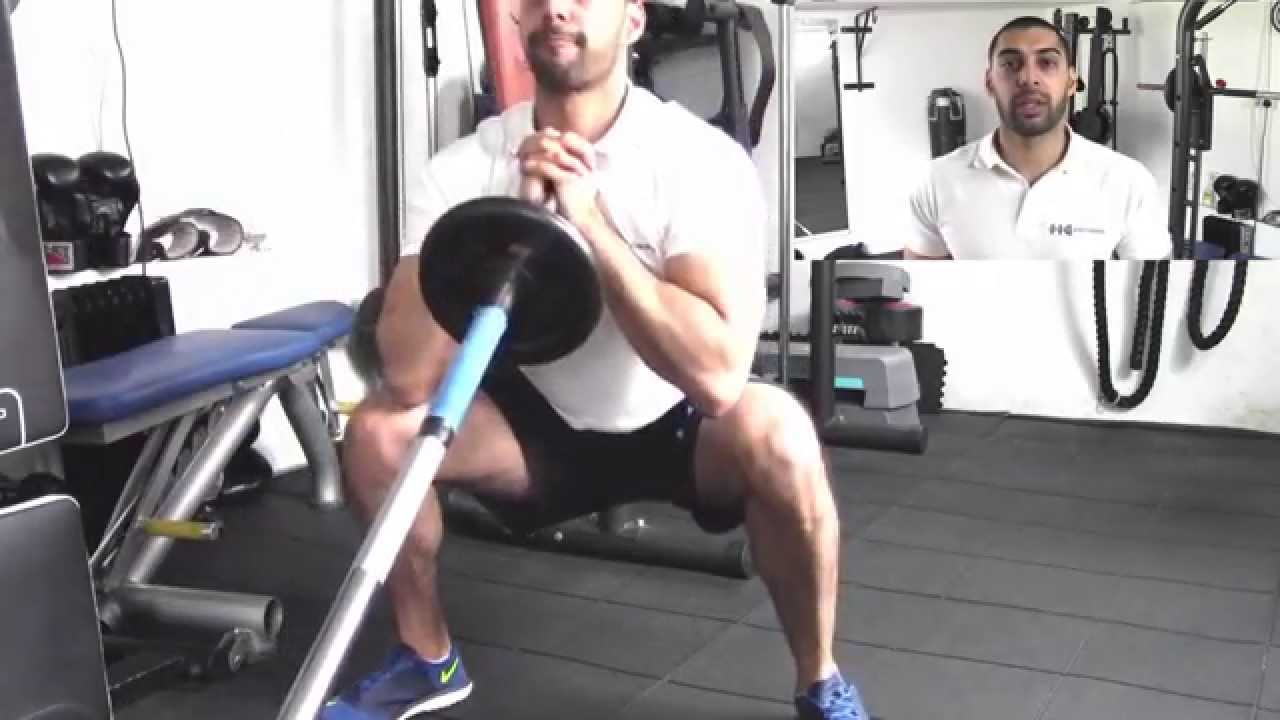
To perform a squat press with bar, you will need a barbell with weights. Start by standing with your feet shoulder-width apart and the barbell resting on your shoulders behind your neck. Squat down by bending your knees and lowering your hips until your thighs are parallel to the ground. As you stand back up, press the barbell overhead until your arms are fully extended. Lower the barbell back to your shoulders as you squat down again, then repeat the movement for the desired number of repetitions.
Benefits of Squat Press With Bar

The squat press with bar is a highly effective exercise for building strength and toning your entire body. Here are some of the key benefits of this exercise:
- Builds muscle: The squat press with bar targets your legs, glutes, shoulders, and arms, helping you build muscle and increase your overall strength.
- Burns fat: Because the squat press with bar is a full body exercise, it can help you burn more calories and lose fat faster than isolated exercises.
- Improves balance and coordination: The squat press with bar requires you to maintain balance and coordination throughout the movement, which can help improve your overall athletic performance.
Variations of Squat Press With Bar

If you want to mix up your workout routine, there are several variations of the squat press with bar that you can try:
- Single-leg squat press: Instead of squatting down with both legs, perform the movement with one leg at a time to challenge your balance and improve your stability.
- Sumo squat press: Take a wider stance and turn your toes out slightly to target your inner thighs and glutes.
- Front squat press: Instead of resting the barbell on your shoulders behind your neck, hold it in front of your body to target your quads and core.
Safety Precautions
Like any exercise, the squat press with bar can be dangerous if not performed correctly. Here are some safety precautions to keep in mind:
- Use proper form: Make sure you are using proper form throughout the movement to avoid injury. Keep your knees in line with your toes, don't let your knees cave in, and keep your back straight.
- Start with light weights: If you are new to the squat press with bar, start with light weights until you feel comfortable with the movement.
- Don't overdo it: Don't push yourself too hard and do more than you can handle. Listen to your body and stop if you feel any pain or discomfort.
Conclusion
The squat press with bar is an effective exercise for building strength and toning your entire body. By combining the squat and overhead press into one movement, you can save time and get a full body workout in just a few minutes. However, it's important to use proper form and start with light weights to avoid injury. With regular practice, the squat press with bar can help you achieve your fitness goals and build the body you've always wanted.
Related video of Squat Press With Bar: A Full Body Workout

Calf raises are a popular exercise that targets the calf muscles. This exercise is often included in lower body workouts, and is known to be an effective way to strengthen and tone the calf muscles. But what exactly are the calf muscles, and how do calf raises work to target them? In this article, we'll take a closer look at the calf muscles and the mechanics of calf raises.
The Calf Muscles

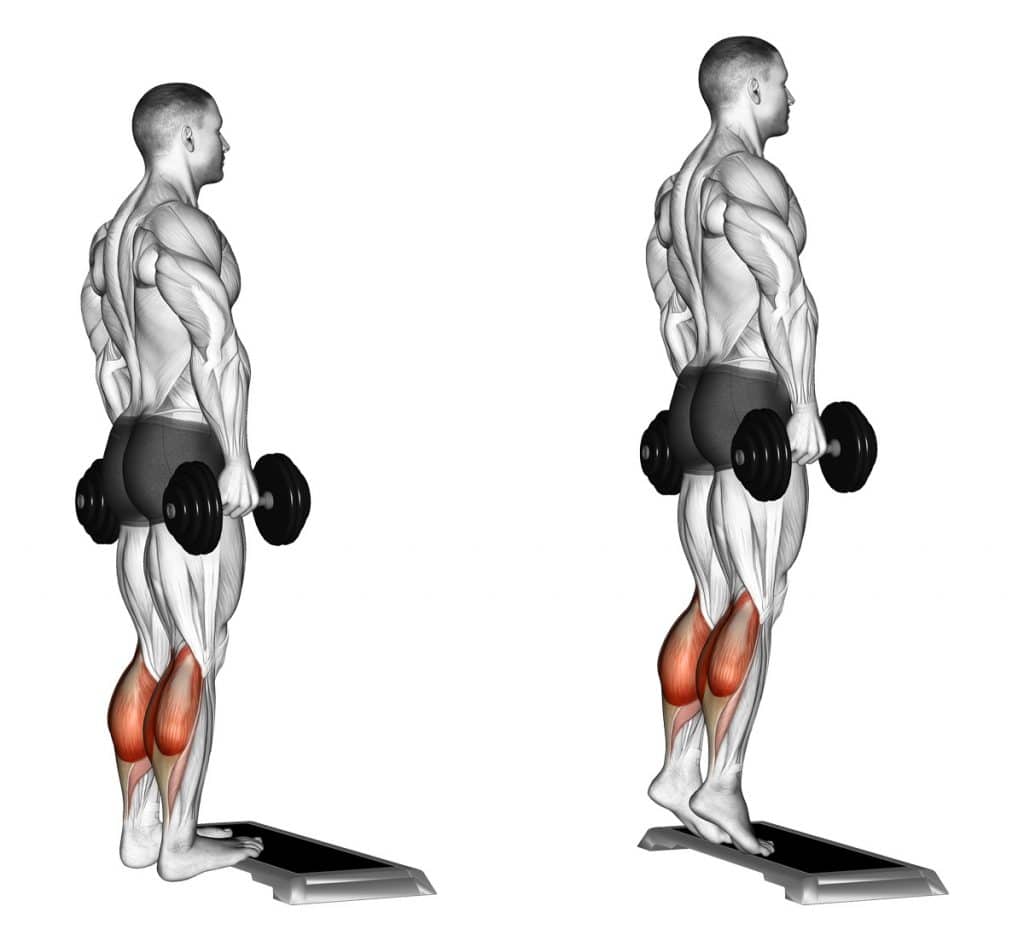
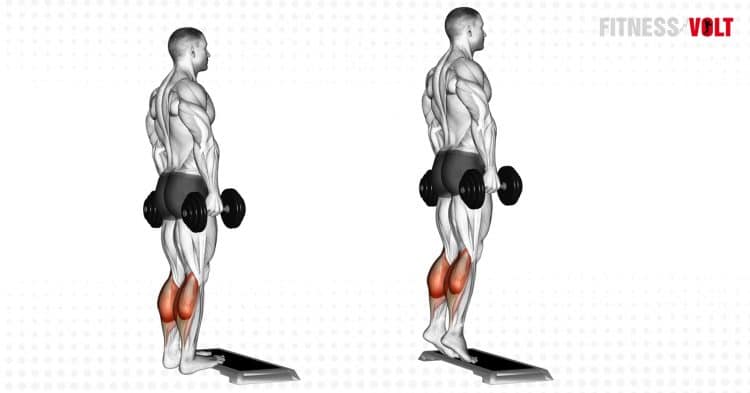
The calf muscles are a group of muscles located at the back of the lower leg. The two main muscles that make up the calf are the gastrocnemius and the soleus. The gastrocnemius muscle is the larger of the two, and is visible as the bulge at the back of the leg. The soleus muscle is located underneath the gastrocnemius, and is responsible for helping to support the body during standing and walking.
How Calf Raises Work

During a calf raise, the muscles of the calf are contracted to lift the heel off the ground. This movement primarily targets the gastrocnemius muscle, but also engages the soleus muscle to a lesser extent. As the heel is lifted, the calf muscles are stretched, and then contracted as the heel is lowered back down. This repeated contraction and relaxation of the calf muscles is what makes calf raises an effective exercise for strengthening and toning the calf muscles.
Variations of Calf Raises
There are several variations of calf raises that can be used to target different areas of the calf muscles. One common variation is the seated calf raise, which is performed while sitting down with the feet on a block or step. This variation primarily targets the soleus muscle. Another variation is the single-leg calf raise, which is performed with one foot at a time. This variation can help to improve balance and coordination, and also allows for greater focus on each individual calf muscle.
Benefits of Calf Raises
Calf raises offer several benefits beyond just strengthening and toning the calf muscles. They can also help to improve ankle stability and mobility, as well as enhance overall lower body strength. Additionally, calf raises can be performed with minimal equipment, making them a convenient exercise to add to any workout routine.
How to Perform Calf Raises

To perform a basic calf raise, start by standing with your feet hip-width apart and your hands resting on a wall or other stable surface for balance. Keeping your feet flat on the ground, slowly lift your heels off the ground as high as you can, then lower them back down. Repeat for several repetitions, focusing on contracting the calf muscles with each lift.
Conclusion
Calf raises are a simple yet effective exercise for targeting the calf muscles. By incorporating calf raises into your workout routine, you can help to strengthen and tone your lower legs, improve ankle stability and mobility, and enhance overall lower body strength. So why not give calf raises a try and see the results for yourself?
Related video of What Muscle Does Calf Raises Work
Are you looking for a way to spice up your chest workout routine? Look no further than the cable machine! Cable exercises are great for isolating and targeting specific muscle groups, and the chest is no exception. Here are some of the best chest exercises you can do with a cable machine.
Cable Chest Press
The cable chest press is a great variation of the traditional bench press. To perform this exercise, attach the handle to the cable machine at chest height. Stand facing away from the machine and grab the handles with an overhand grip. Step forward until your arms are fully extended in front of you. Bend your elbows and lower your body towards the handles, keeping your elbows close to your sides. Push the handles away from your body and extend your arms fully, squeezing your chest at the top of the movement.
Cable Fly

The cable fly is a great exercise for targeting the outer portion of your chest. To perform this exercise, attach the handles to the cable machine at shoulder height. Stand facing the machine and grab the handles with an overhand grip. Step forward until your arms are fully extended in front of you. Keeping your elbows slightly bent, bring your arms together in front of your chest, squeezing your chest at the top of the movement. Slowly return to the starting position and repeat.
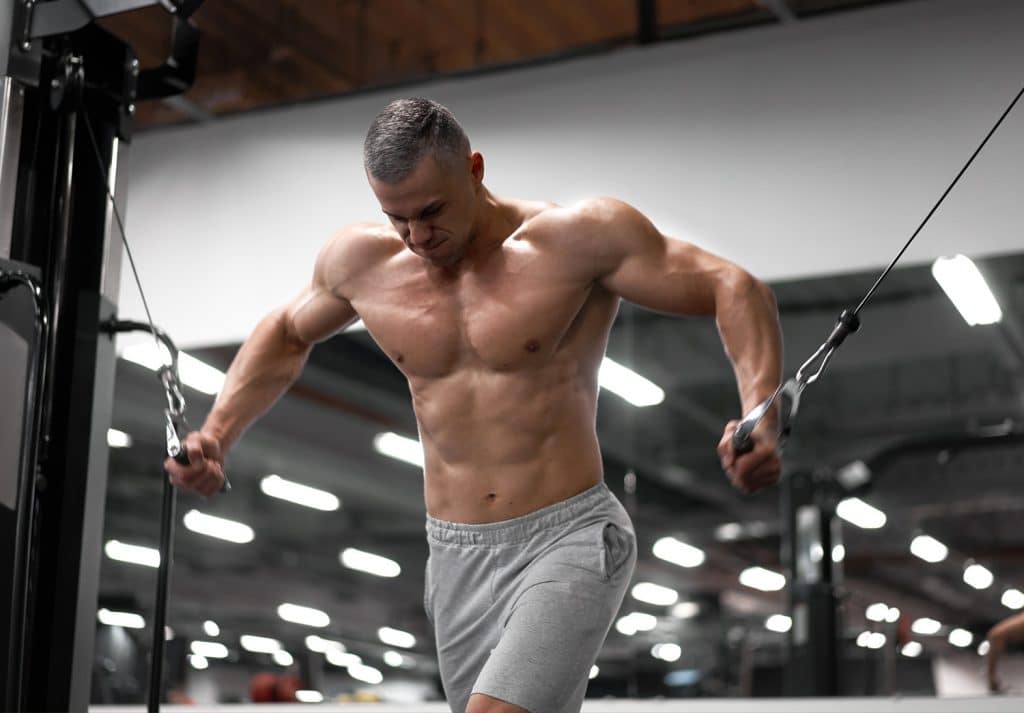
Cable Crossover

The cable crossover is a great exercise for targeting the entire chest. To perform this exercise, attach the handles to the cable machine at the highest setting. Stand facing the machine and grab the handles with an overhand grip. Step forward until your arms are fully extended in front of you. Keeping your elbows slightly bent, bring your arms down and across your body in a sweeping motion, squeezing your chest at the top of the movement. Slowly return to the starting position and repeat.
Single-Arm Cable Chest Press

The single-arm cable chest press is a great exercise for isolating each side of your chest. To perform this exercise, attach the handle to the cable machine at chest height. Stand facing away from the machine and grab the handle with one hand. Step forward until your arm is fully extended in front of you. Bend your elbow and lower your body towards the handle, keeping your elbow close to your side. Push the handle away from your body and extend your arm fully, squeezing your chest at the top of the movement. Repeat on the opposite side.
Standing Cable Chest Press

The standing cable chest press is a great exercise for targeting the upper portion of your chest. To perform this exercise, attach the handle to the cable machine at chest height. Stand facing away from the machine and grab the handle with one hand. Step forward until your arm is fully extended in front of you. Keeping your elbow close to your side, push the handle away from your body and extend your arm fully, squeezing your chest at the top of the movement. Repeat on the opposite side.
Conclusion
There you have it – five great exercises to add to your chest workout routine! Remember to focus on proper form and technique to get the most out of each exercise. Incorporating cable exercises into your chest workout can help you target specific areas of your chest and achieve better overall muscle definition.
Related video of Chest Workout With Cable
When it comes to building a well-rounded physique, it's important to target all muscle groups, including the rear delts. The rear delts are often neglected in training, but they play an important role in shoulder health and overall appearance. One effective way to train the rear delts is through cable exercises.
Why Cable Exercises?
There are several reasons why cable exercises are a great option for targeting the rear delts:
- Cables provide constant tension throughout the movement, which can lead to more muscle activation and growth.
- Cables allow for a greater range of motion, which can help to fully stretch and contract the rear delt muscles.
- Cables provide a variety of attachment points and handles, allowing for different angles and grips to target the rear delts from various directions.
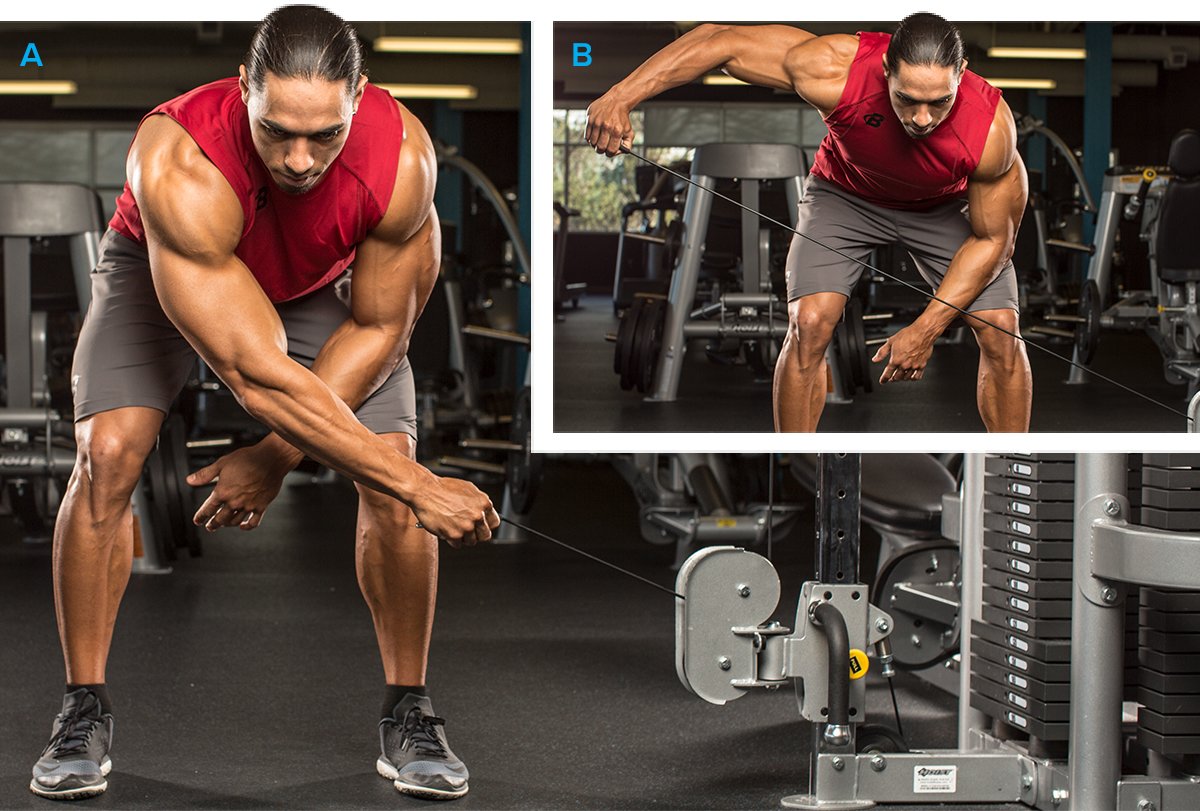
Cable Rear Delt Fly

The cable rear delt fly is a classic exercise that targets the rear delts. Here's how to perform it:
- Attach a D-handle to a low-pulley cable machine.
- Stand facing the machine and grab the handle with your right hand.
- Step back with your right foot and lean forward slightly, keeping your back straight.
- Extend your arm straight out to the side, with your elbow slightly bent.
- With control, bring your arm back in towards your body, squeezing your rear delt at the top of the movement.
- Repeat for desired reps, then switch sides.
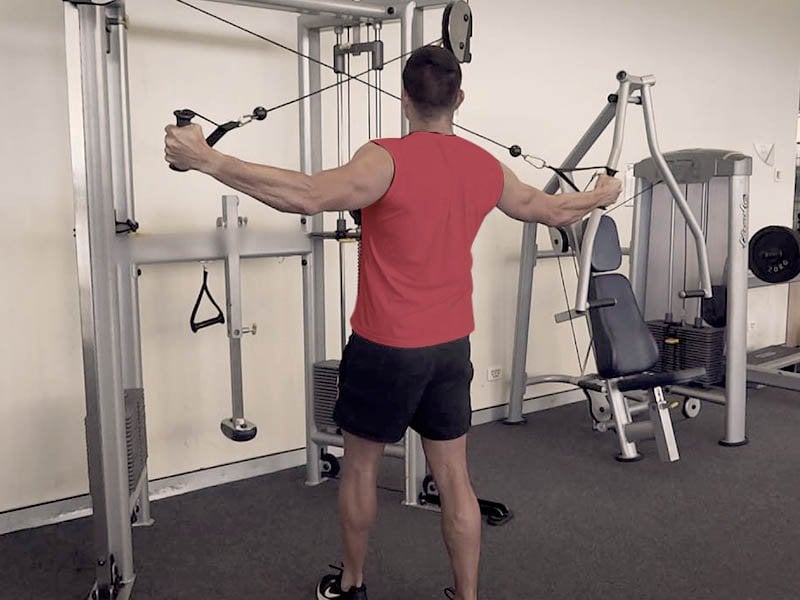
Cable Face Pulls

Cable face pulls are another effective exercise for targeting the rear delts, as well as the upper back and rotator cuff muscles. Here's how to perform them:
- Attach a rope to a high-pulley cable machine.
- Stand facing the machine and grab the rope with an overhand grip.
- Step back a few feet and lean back slightly, keeping your core engaged.
- Keeping your elbows high and out to the side, pull the rope towards your face.
- Squeeze your rear delts and upper back at the top of the movement.
- Lower the rope back down with control, then repeat for desired reps.
Cable Reverse Fly
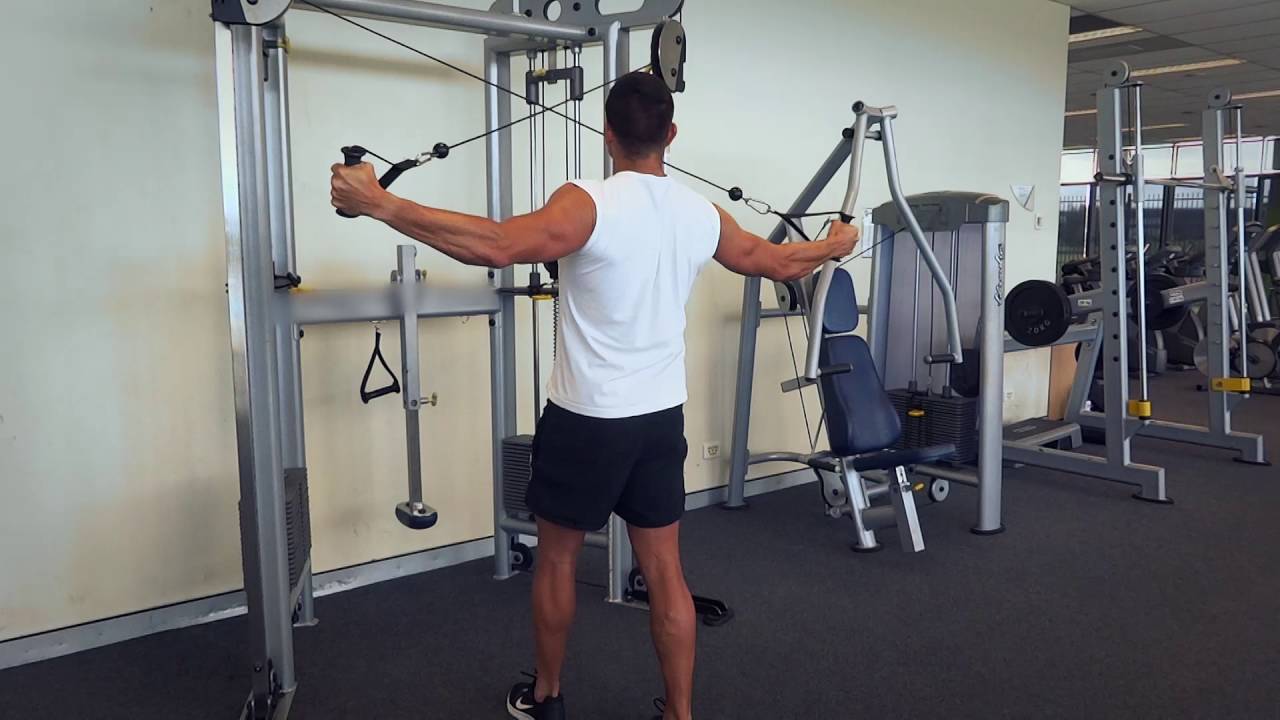
The cable reverse fly is a variation of the classic dumbbell exercise, and it can be a great way to isolate and target the rear delts. Here's how to perform it:
- Attach two D-handles to a low-pulley cable machine.
- Stand facing away from the machine, with one handle in each hand.
- Step forward slightly and lean forward, keeping your back straight.
- With your elbows slightly bent, raise your arms out to the sides and squeeze your rear delts at the top of the movement.
- Lower your arms back down with control, then repeat for desired reps.
Cable Pull-Aparts
Cable pull-aparts are a simple yet effective exercise for targeting the rear delts and improving posture. Here's how to perform them:
- Attach a rope to a low-pulley cable machine.
- Stand facing away from the machine and grab the rope with both hands, with your palms facing down.
- Extend your arms straight out in front of you, with your elbows slightly bent.
- Pull the rope apart, squeezing your rear delts and upper back at the end of the movement.
- Lower the rope back down with control, then repeat for desired reps.
Conclusion
Incorporating cable exercises into your training routine can be a great way to target the often-neglected rear delts. By using cables, you can provide constant tension, a greater range of motion, and a variety of angles and grips to fully stimulate the muscles. Give these cable exercises a try and see how they can improve your shoulder health and appearance.
Related video of Cable Exercise for Rear Delts

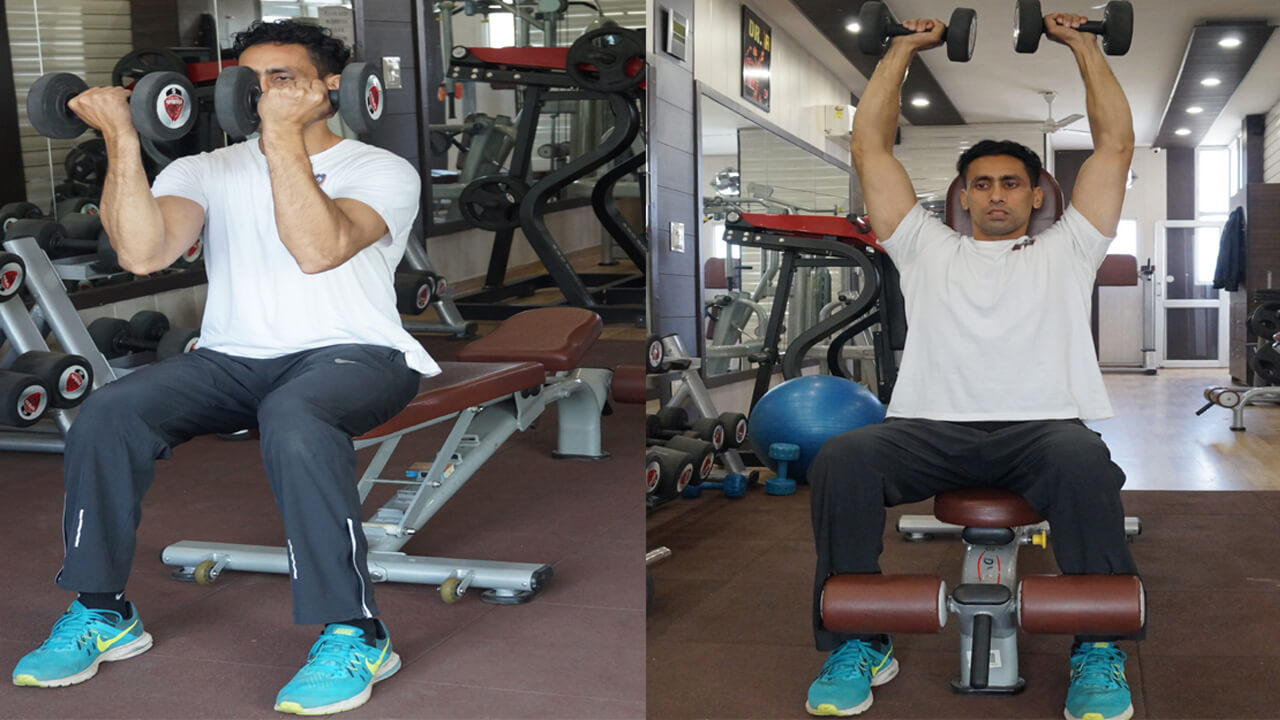
If you're looking to build massive shoulders and arms, then you need to add Arnold presses with dumbbells to your workout routine. This exercise is named after Arnold Schwarzenegger, who popularized it during his bodybuilding career. It's a compound movement that targets your deltoids, triceps, and biceps, making it one of the best exercises for building upper body strength and size.
How to Perform Arnold Presses
To perform Arnold presses, follow these steps:
- Stand upright with your feet shoulder-width apart and hold a dumbbell in each hand.
- Bend your elbows and bring the dumbbells to shoulder height with your palms facing towards you.
- As you press the dumbbells overhead, rotate your wrists so that your palms face forward at the top of the movement.
- Pause briefly at the top of the movement and then lower the dumbbells back to the starting position, rotating your wrists back to the starting position as you do so.
- Repeat for the desired number of reps.
It's important to keep your elbows close to your body and your core engaged throughout the movement. This will help you maintain proper form and maximize the effectiveness of the exercise.
Variations of Arnold Presses

There are several variations of Arnold presses that you can incorporate into your workouts to keep things interesting and challenge your muscles in different ways. Some popular variations include:
- Seated Arnold Presses
- Single-Arm Arnold Presses
- Standing Arnold Presses
- Alternating Arnold Presses
Each of these variations targets your shoulders and arms in slightly different ways, so experiment with them to find which ones work best for you.
Benefits of Arnold Presses

Arnold presses offer a wide range of benefits for your upper body, including:
- Building Shoulder and Arm Strength - Arnold presses are a compound movement that work multiple muscle groups at once, making them one of the most effective exercises for building upper body strength and size.
- Improving Shoulder Stability - The rotation of your wrists during the movement helps improve shoulder stability and reduce the risk of injury.
- Increasing Range of Motion - Arnold presses require a greater range of motion than traditional shoulder presses, which can help improve your flexibility and mobility over time.
- Challenging Your Muscles in New Ways - By incorporating different variations of Arnold presses into your workouts, you can challenge your muscles in new ways and prevent plateaus in your training.
Conclusion
Arnold presses with dumbbells are an excellent exercise for building upper body strength and size. By following proper form and incorporating different variations into your workouts, you can challenge your muscles in new ways and achieve your fitness goals faster. So, add Arnold presses to your workout routine today and start seeing the results for yourself!
Related video of Arnold Presses With Dumbbells: A Complete Guide

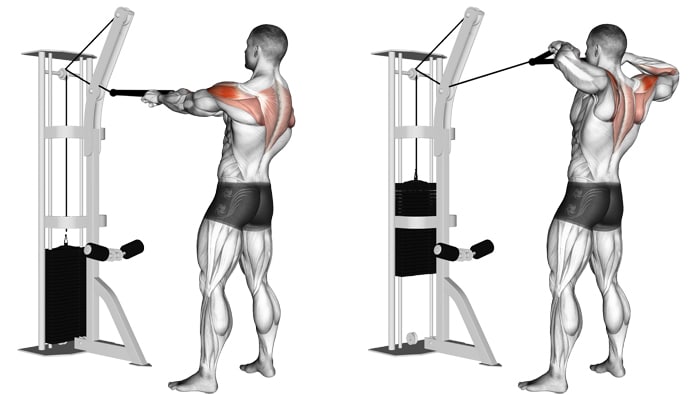
Cable face pulls are one of the best exercises you can do for your upper body. This exercise targets your shoulders, upper back, and neck muscles. It is an excellent exercise for those who want to improve their posture, strengthen their upper body, and prevent injuries.
Why You Should Do Cable Face Pulls
Cable face pulls are a great exercise for improving your posture. Poor posture can cause various problems, such as neck and back pain, headaches, and reduced mobility. By doing cable face pulls, you can strengthen the muscles that support your spine and improve your posture.
Cable face pulls are also an excellent exercise for strengthening your upper body. This exercise targets your shoulders, upper back, and neck muscles, which are essential for many daily activities, such as carrying groceries, lifting weights, and playing sports.
Finally, cable face pulls can help prevent injuries. By strengthening your upper body and improving your posture, you can reduce the risk of injuries caused by poor posture or weak muscles.
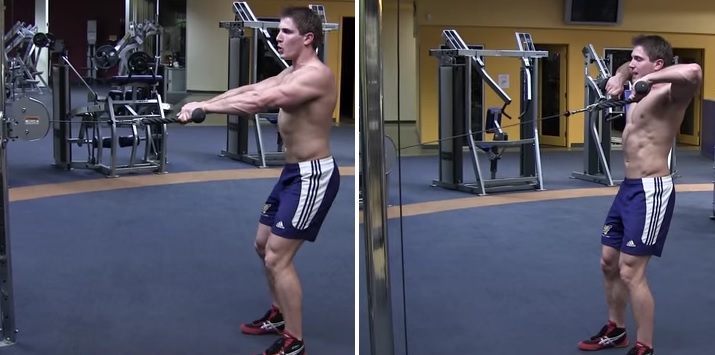
How To Do Cable Face Pulls

Here are the steps to do cable face pulls:
- Attach a rope attachment to a cable machine at chest height.
- Stand facing the cable machine and hold the rope with both hands.
- Step back a few feet so that there is tension on the cable.
- Keep your feet shoulder-width apart and your knees slightly bent.
- Keep your chest up and your shoulders down.
- Start the movement by pulling the rope towards your face.
- Keep your elbows high and your hands close to your face.
- Pause for a second at the end of the movement.
- Slowly lower the rope back to the starting position.
- Repeat for the desired number of reps.
Make sure to keep your elbows high and your hands close to your face throughout the movement. This will ensure that you are targeting the right muscles and getting the most out of the exercise.
How To Incorporate Cable Face Pulls Into Your Workout
Cable face pulls can be done as part of your warm-up or as an accessory exercise. Here are some ways to incorporate cable face pulls into your workout:
- Warm-up: Do 2-3 sets of 10-12 reps with light weight to activate your upper body muscles and improve your posture.
- Accessory exercise: Do 3-4 sets of 10-12 reps as part of your upper body workout to strengthen your shoulders, upper back, and neck muscles.
You can also vary the grip width and angle of the rope attachment to target different areas of your upper body.
Common Mistakes To Avoid

Here are some common mistakes to avoid when doing cable face pulls:
- Rounding your shoulders: Keep your shoulders down and your chest up throughout the movement.
- Using too much weight: Use a weight that allows you to do the exercise with proper form.
- Not keeping your elbows high: Keep your elbows high and your hands close to your face to target the right muscles.
Conclusion
Cable face pulls are an excellent exercise for improving your posture, strengthening your upper body, and preventing injuries. By following the proper form and incorporating this exercise into your workout routine, you can reap the benefits of cable face pulls.
Related video of How To Do Cable Face Pulls
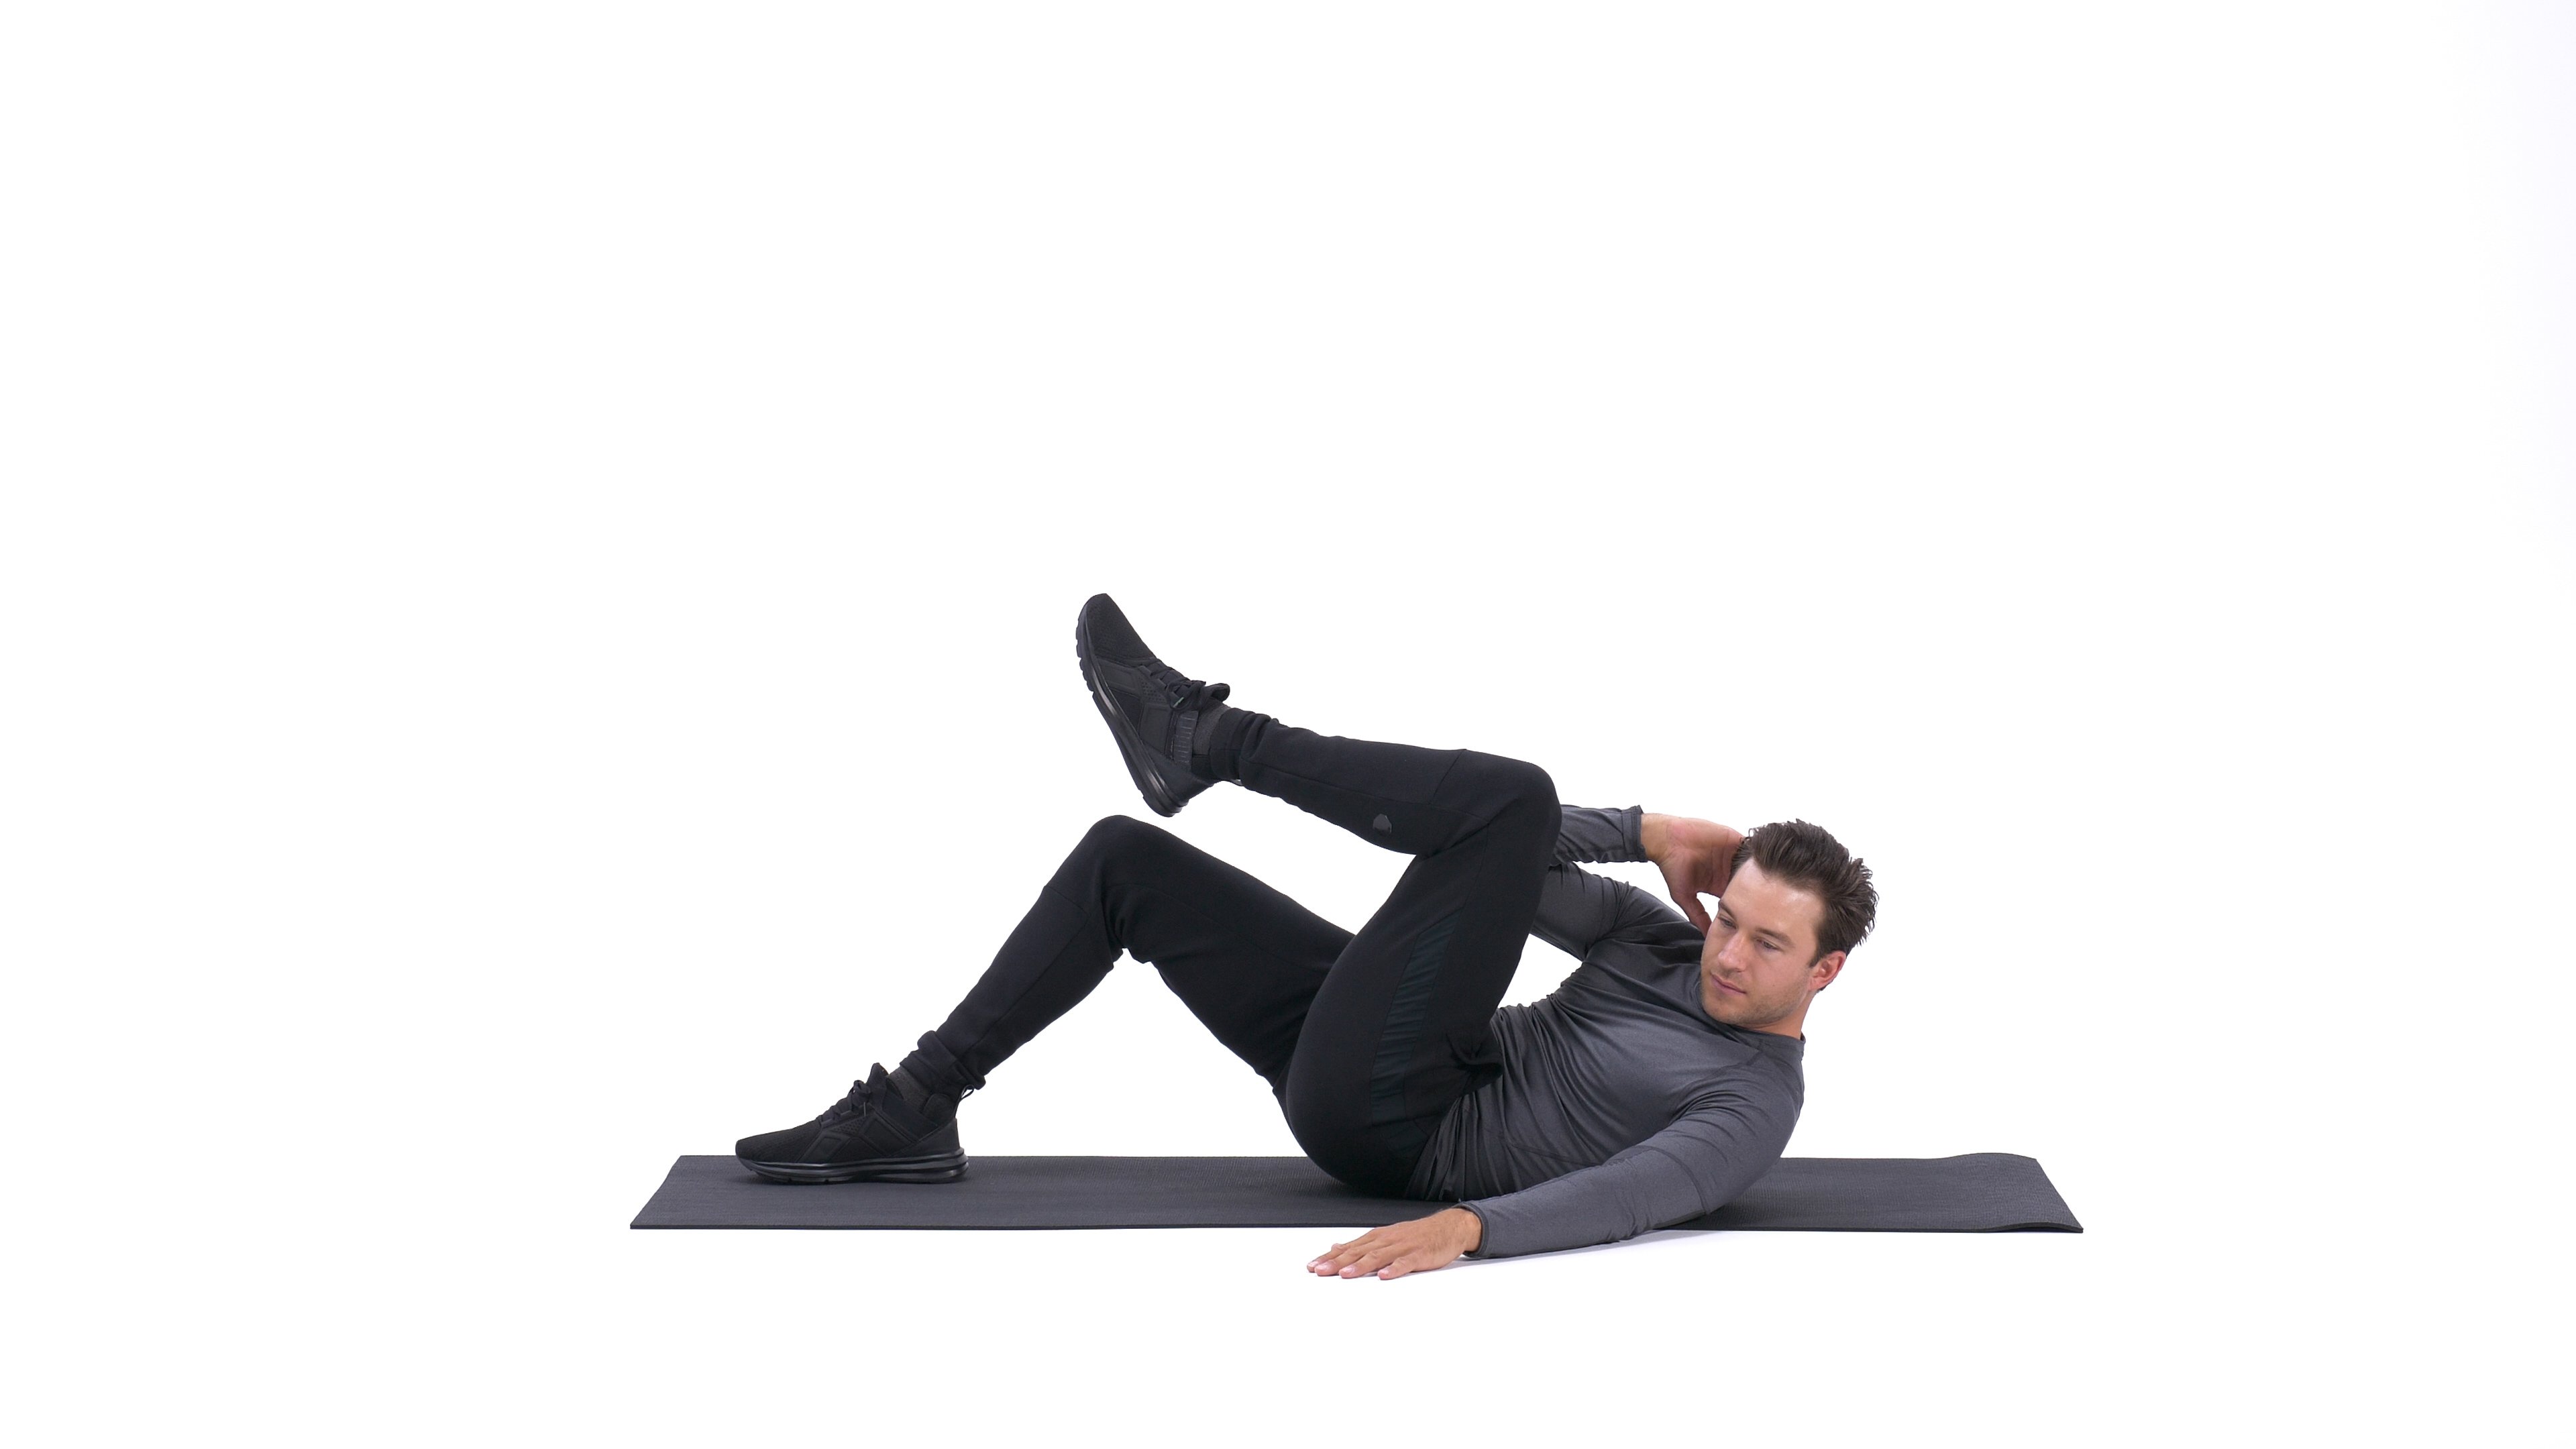
Are you looking for an effective core workout that targets your abs and obliques? Look no further than the elbow to knee crunch! This exercise is simple yet effective, and can be done anywhere with no equipment needed. In this article, we'll go over the proper form for elbow to knee crunches, the benefits of this exercise, and how to incorporate it into your workout routine.
How to Do Elbow to Knee Crunches
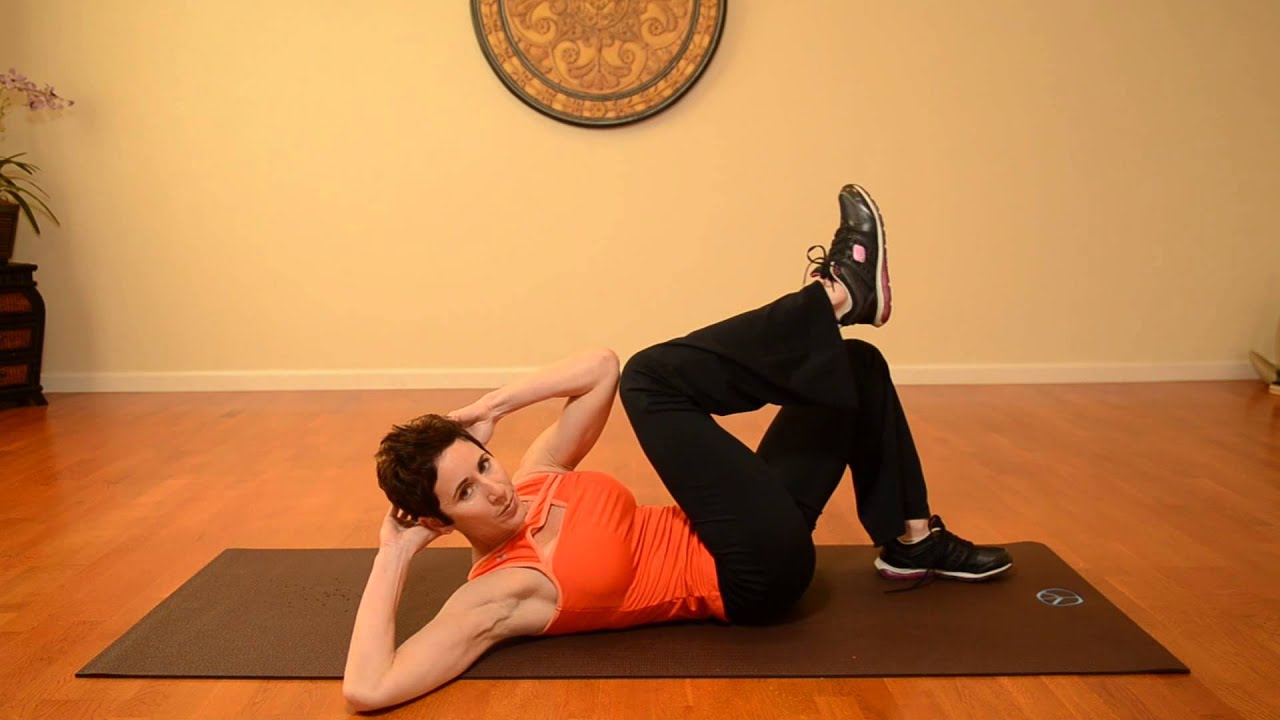
Start by lying on your back with your knees bent and your feet flat on the ground. Place your hands behind your head, with your elbows pointing out to the sides. Lift your head and shoulders off the ground, and bring your right elbow towards your left knee. At the same time, lift your left foot off the ground and bring your knee towards your chest. Return to the starting position and repeat on the other side. Continue alternating sides for the desired number of repetitions.
It's important to keep your movements slow and controlled, and to avoid pulling on your neck with your hands. You should feel the burn in your abs and obliques as you perform each rep.
Benefits of Elbow to Knee Crunches

Elbow to knee crunches are a great exercise for strengthening your core muscles. They target your rectus abdominis (six-pack muscles) as well as your obliques (side muscles). By performing this exercise regularly, you can improve your posture, balance, and overall core strength.
Another benefit of elbow to knee crunches is that they can help you burn belly fat. While no exercise can spot-reduce fat in a specific area, performing exercises that target your abs and obliques can help tone these muscles and make your midsection appear more defined.
Incorporating Elbow to Knee Crunches into Your Workout Routine

Elbow to knee crunches can be done as part of a full-body workout or as a standalone exercise. If you're incorporating them into a full-body workout, try doing 3 sets of 10-15 reps, resting for 30 seconds between sets. You can also add variations to the exercise, such as holding a dumbbell or medicine ball as you perform the crunches.
If you're short on time, you can also do a quick core workout by performing 3 sets of 30 elbow to knee crunches, resting for 10 seconds between sets. This will give your abs and obliques a quick but effective workout.
Conclusion
Elbow to knee crunches are a simple but effective exercise for strengthening your core muscles and burning belly fat. By incorporating them into your workout routine, you can improve your posture, balance, and overall core strength. Remember to focus on proper form and avoid pulling on your neck with your hands. Happy crunching!
Related video of Elbow To Knee Crunch: The Ultimate Core Workout

If you're looking to build stronger, more defined calves, then the standing barbell calf raise is the perfect exercise for you. This simple yet effective exercise targets the muscles in your calves, helping you to build size, strength, and endurance.
What Is the Standing Barbell Calf Raise?
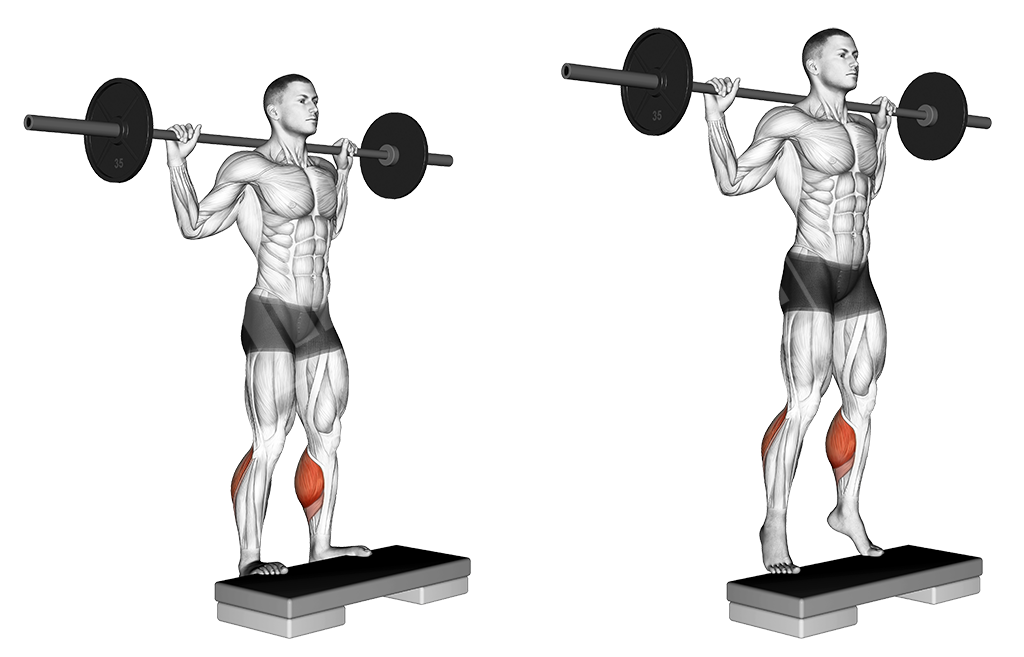
The standing barbell calf raise is a resistance exercise that involves standing on a raised surface with a barbell on your shoulders, and then raising your heels as high as possible. This movement targets the gastrocnemius and soleus muscles in your calves, which are responsible for plantar flexion of the ankle.
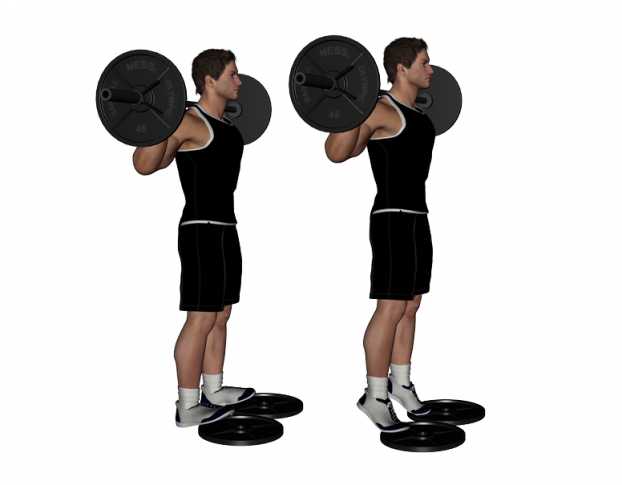
How to Perform the Standing Barbell Calf Raise

To perform the standing barbell calf raise, follow these steps:
- Place a barbell on your shoulders, positioning it behind your neck.
- Stand on a raised surface, such as a weight plate or step.
- Place the balls of your feet on the edge of the raised surface, with your heels hanging off the back.
- Slowly lower your heels as far as possible, feeling a stretch in your calves.
- Raise your heels as high as possible, squeezing your calves at the top.
- Repeat for 3-4 sets of 10-12 reps.
Tips for Performing the Standing Barbell Calf Raise

Here are some tips to help you perform the standing barbell calf raise correctly:
- Start with a light weight until you get comfortable with the movement.
- Keep your back straight and your core engaged throughout the exercise.
- Focus on squeezing your calves at the top of the movement.
- Avoid bouncing or jerking your movements.
- Use a full range of motion, lowering your heels as far as possible.
- Don't lock your knees at the top of the movement.
Variations of the Standing Barbell Calf Raise

The standing barbell calf raise can be performed in several variations to target different parts of your calves:
- Single-leg calf raise: Perform the exercise with one leg at a time.
- Seated calf raise: Sit on a calf raise machine and perform the exercise from a seated position.
- Donkey calf raise: Place a heavy weight on your lower back and perform the exercise with a partner holding your feet down.
The Benefits of the Standing Barbell Calf Raise
The standing barbell calf raise offers several benefits for your lower body:
- Builds size and strength in your calves.
- Improves ankle stability and mobility.
- Helps prevent injuries to your lower legs.
- Improves athletic performance in activities that require explosive lower body power.
Conclusion
The standing barbell calf raise is a simple yet effective exercise that can help you build stronger, more defined calves. By following the correct form and technique, you can target the muscles in your calves and see significant improvements in size, strength, and endurance. Incorporate this exercise into your lower body routine and watch as your calves become your strongest asset.
Related video of Standing Barbell Calf Raise: The Ultimate Exercise for Stronger Calves
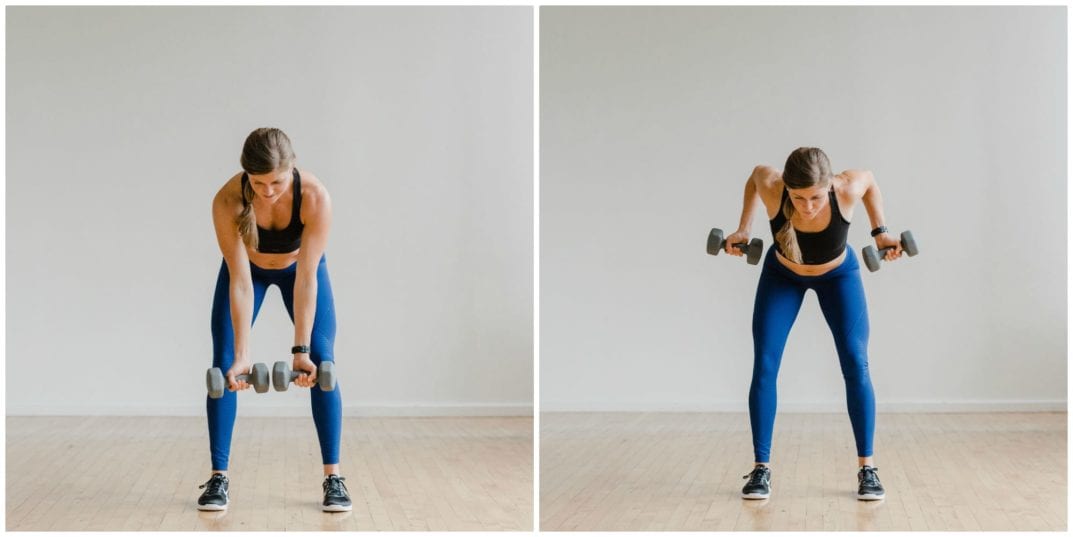
When it comes to building a strong and impressive back, few exercises are as effective as the reverse grip bent over row. This compound movement targets the lats, rhomboids, and traps, among other muscles, helping you achieve a well-rounded physique.
What Are Reverse Grip Bent Over Rows?

Reverse grip bent over rows are a variation of the traditional bent over row, in which you grip the bar with your palms facing down. With the reverse grip, your palms face up, which changes the angle of the movement and places more emphasis on the biceps and upper back muscles.
The Benefits of Reverse Grip Bent Over Rows
There are several benefits to including reverse grip bent over rows in your workout routine:
- Increased upper back strength and size
- Bigger biceps
- Better posture
- Improved grip strength
- Less strain on the lower back compared to barbell rows
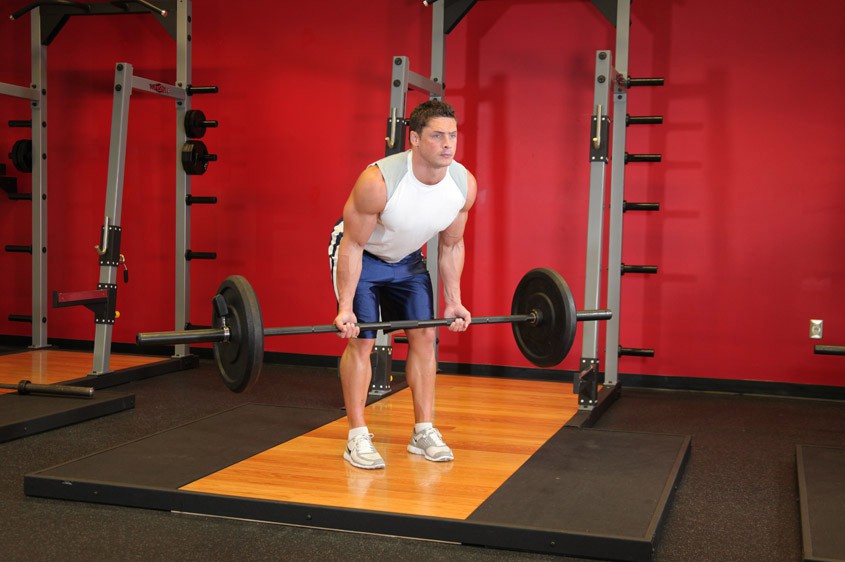
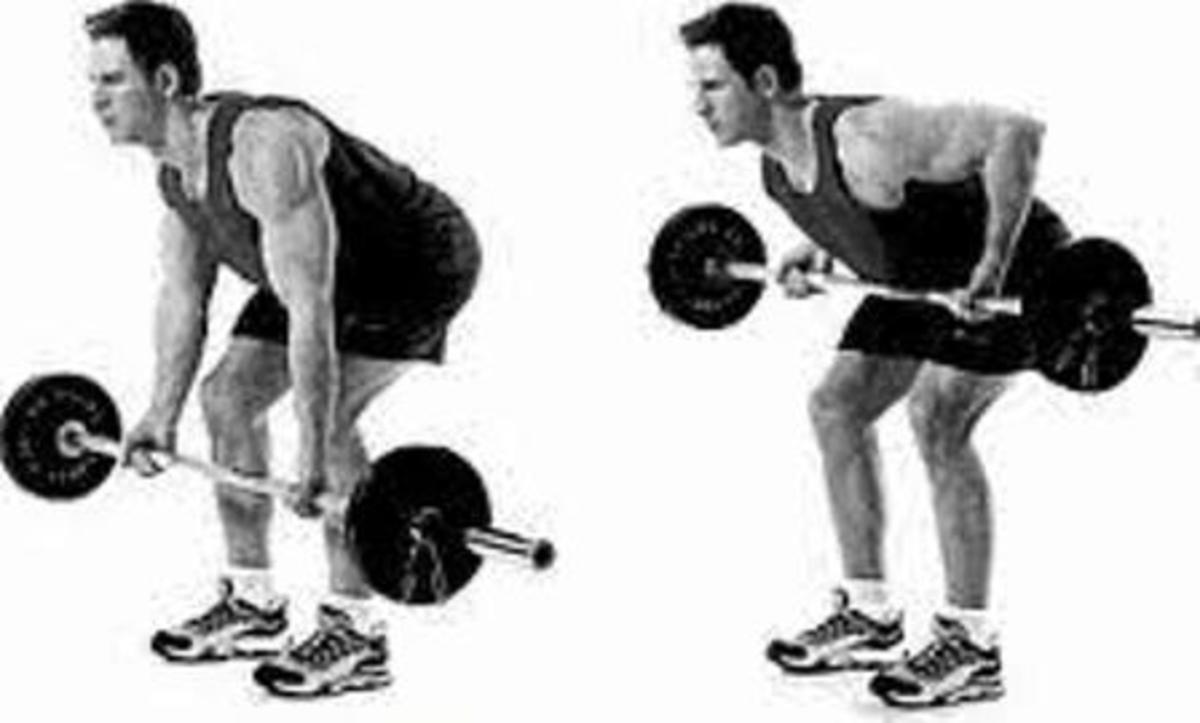
How to Perform Reverse Grip Bent Over Rows

To perform reverse grip bent over rows:
- Stand with your feet shoulder-width apart and grip the bar with an underhand grip.
- Bend your knees slightly and hinge your hips back, keeping your back straight and your chest up.
- Pull the bar up towards your chest, keeping your elbows close to your body.
- Lower the bar back down and repeat for your desired number of reps.
Tips for Proper Form

Proper form is essential to getting the most out of your reverse grip bent over rows:
- Keep your back straight and your chest up throughout the movement.
- Engage your core to maintain stability.
- Use a weight that allows you to perform the exercise with good form.
- Avoid jerking the weight up, instead focusing on a slow and controlled movement.
Variations of Reverse Grip Bent Over Rows

If you're looking to switch up your reverse grip bent over row routine, there are several variations you can try:
- Dumbbell reverse grip bent over rows
- Cable reverse grip bent over rows
- T-bar reverse grip bent over rows
- One-arm reverse grip bent over rows
Incorporating Reverse Grip Bent Over Rows into Your Workout Routine
Reverse grip bent over rows can be incorporated into your back workout routine in several ways:
- As a primary compound movement
- As a secondary movement after deadlifts or pull-ups
- As part of a superset with bicep curls
- As part of a full-body workout
Conclusion
Reverse grip bent over rows are an effective exercise for building a strong and impressive back, as well as improving grip strength and posture. By incorporating this movement into your workout routine and using proper form, you can reap the many benefits of this compound exercise.