
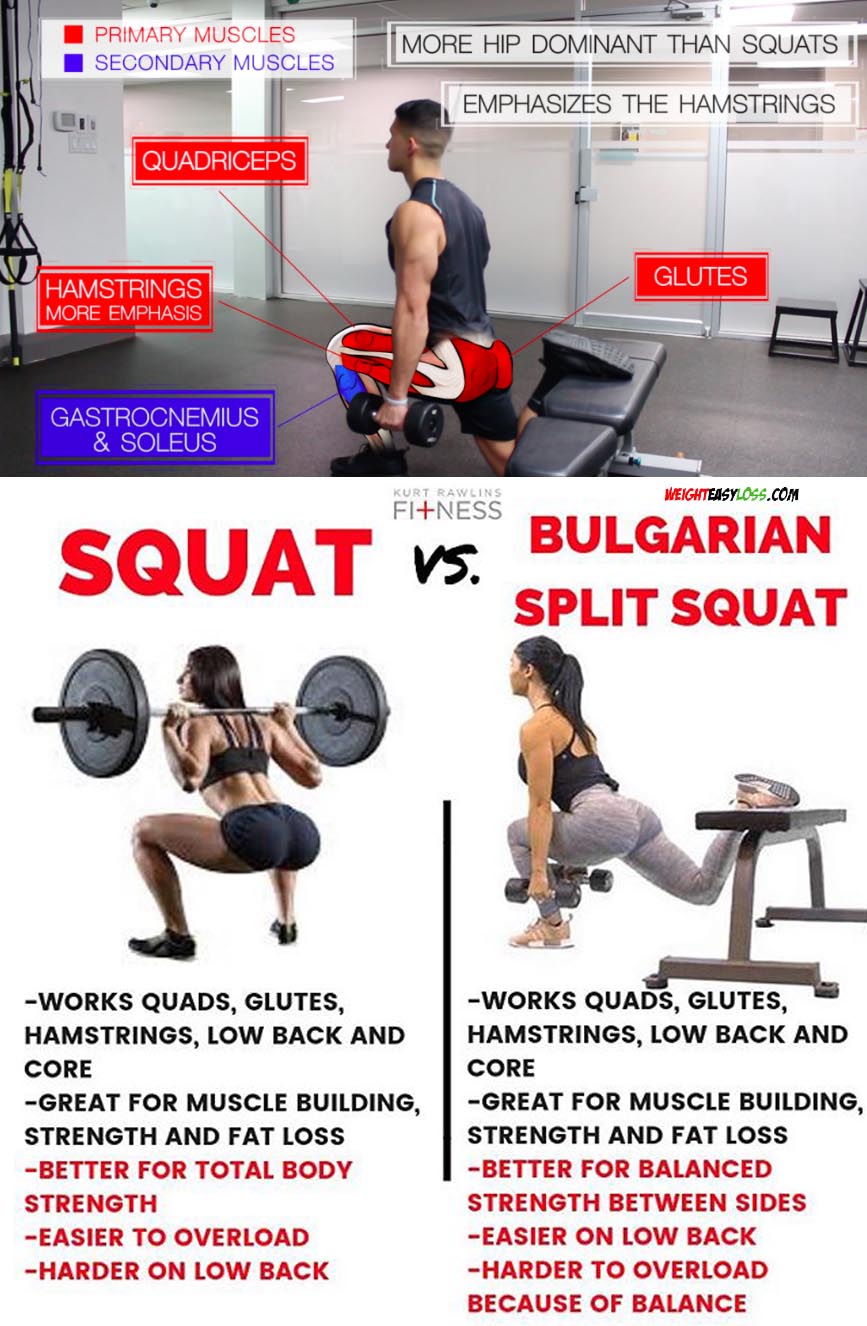
If you're looking for a challenging lower body exercise that targets your quads, glutes, and hamstrings, the Bulgarian split squat is worth considering. It's a variation of the traditional squat that involves placing one foot on an elevated surface behind you while you lower your body with the other foot.
Here's everything you need to know about the Bulgarian split squat workout:
Benefits of Bulgarian Split Squat Workout

One of the key benefits of the Bulgarian split squat is that it can help you improve your balance and stability. Since you're only using one leg to support your bodyweight, your core muscles and stabilizing muscles have to work harder to keep you upright.
In addition, the Bulgarian split squat can help you build strength and muscle mass in your lower body. By using a larger range of motion than traditional squats, you're targeting your muscles more effectively and challenging them to work harder.
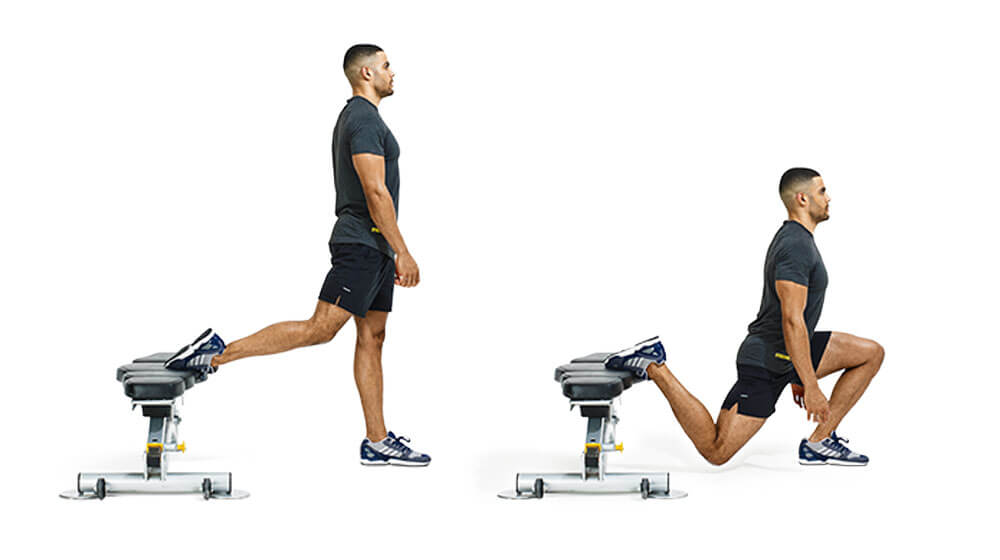
How to Do Bulgarian Split Squats

Here's a step-by-step guide on how to do Bulgarian split squats:
- Stand facing away from a bench or other elevated surface.
- Place the top of your left foot on the bench behind you.
- Step forward with your right foot and lower your body until your left knee touches the ground.
- Push through your right heel to raise your body back up to the starting position.
- Repeat for several repetitions before switching legs.
Variations of Bulgarian Split Squats
There are several variations of the Bulgarian split squat that you can try to make the exercise more challenging or to target different muscles:
- Weighted Bulgarian split squats: Hold a dumbbell or kettlebell in each hand to add resistance to the movement.
- Bulgarian split squats with a jump: After lowering your body, jump up explosively before returning to the starting position.
- Bulgarian split squats with a pulse: Lower your body halfway down and then pulse up and down several times before returning to the starting position.
- Bulgarian split squats with a twist: Rotate your torso to the right or left as you lower your body to engage your oblique muscles.
Bulgarian Split Squat Workout Plan
If you're interested in adding Bulgarian split squats to your workout routine, here's a sample workout plan to get you started:
- Warm-up with five minutes of light cardio.
- Do three sets of 10-12 reps of Bulgarian split squats on each leg.
- Rest for one minute between sets.
- Finish with five minutes of cool-down stretching.
Cautions for Bulgarian Split Squat
:max_bytes(150000):strip_icc()/60-4589307-Bulgarian-Split-Squat-GIF-e8bd4aa226ed4ddf978aa1a86b46359e.gif)
While the Bulgarian split squat is a safe and effective exercise for most people, there are a few cautions to keep in mind:
- If you have knee pain or a knee injury, check with a doctor or physical therapist before trying Bulgarian split squats.
- Start with bodyweight-only split squats before adding weights or variations to avoid injury.
- Make sure the elevated surface you're using is stable and secure before placing your foot on it.
Conclusion
The Bulgarian split squat is a challenging and effective lower body exercise that can help you improve your balance, stability, and strength. By following a proper form and gradually increasing the intensity, you can add this exercise to your workout routine and see results in no time.
Related video of Bulgarian Split Squat Workout: The Ultimate Guide

If you're looking to strengthen your triceps, lying down skull crushers are an excellent exercise to add to your routine. This exercise is also known as a lying triceps extension or French press, and it can be performed with either dumbbells or a barbell. In this article, we'll take a closer look at how to perform lying down skull crushers, the benefits of this exercise, and some tips to keep in mind.
How to Perform Lying Down Skull Crushers
The first step in performing lying down skull crushers is to select your weight. If you're using a barbell, start with a weight that you're comfortable with, and add more weight as you become stronger. If you're using dumbbells, start with a weight that you can comfortably lift over your head.
Lie down on a bench and hold the weight with your arms extended over your head. Your palms should be facing each other, and your elbows should be pointing toward the ceiling. This is the starting position.
Slowly lower the weight by bending your elbows until the weight is just above your forehead. Be sure to keep your elbows in place and your upper arms stationary throughout the movement.
Pause for a second, then press the weight back up to the starting position by extending your arms. This completes one repetition.
Perform three sets of 10-12 repetitions, resting for 30 seconds between each set.
The Benefits of Lying Down Skull Crushers
Lying down skull crushers target the triceps, which are often underutilized in many upper body exercises. Strengthening your triceps can help improve your overall arm strength, which is essential for activities like lifting and pushing.
In addition to strengthening your triceps, lying down skull crushers can also help improve your range of motion and flexibility in your elbows. This can be particularly helpful if you have tight or stiff joints.

Overall, lying down skull crushers are an effective exercise for targeting your triceps and improving your arm strength and flexibility.
Tips for Performing Lying Down Skull Crushers
As with any exercise, it's important to use proper form when performing lying down skull crushers. Here are some tips to keep in mind:
- Start with a weight that you can comfortably lift over your head.
- Keep your elbows in place and your upper arms stationary throughout the movement.
- Lower the weight slowly to avoid injury.
- Exhale as you extend your arms and inhale as you lower the weight.
- Rest for 30 seconds between each set.
By following these tips, you can perform lying down skull crushers safely and effectively.
Conclusion
Lying down skull crushers are an excellent exercise for strengthening your triceps and improving your arm strength and flexibility. By using proper form and following the tips outlined in this article, you can perform this exercise safely and effectively. So, add lying down skull crushers to your routine today and start seeing the benefits for yourself!
Related video of Lying Down Skull Crushers: How to Perform and Benefits
/GettyImages-470128454-5707f01b3df78c7d9ea4f8fb.jpg)
A hip lift is a type of exercise that targets the muscles in your hips, glutes, and lower back. This exercise is done by lying on your back with your knees bent and feet flat on the ground. You then lift your hips off the ground, squeezing your glutes and engaging your core. The hip lift is a great exercise for strengthening your lower body and improving your overall fitness.
The Benefits of Hip Lifts

There are many benefits to doing hip lifts, including:
- Improving your posture
- Strengthening your lower back and glutes
- Increasing your hip flexibility
- Reducing the risk of injury during physical activity
- Improving your overall fitness and strength
If you're looking to improve your lower body strength and flexibility, hip lifts are a great exercise to add to your routine.
How to Do a Hip Lift

To do a hip lift, follow these steps:
- Lie on your back with your knees bent and feet flat on the ground.
- Place your arms at your sides with your palms facing down.
- Engage your core and squeeze your glutes.
- Lift your hips off the ground, keeping your shoulders and feet on the ground.
- Hold for a few seconds, then lower your hips back down to the ground.
- Repeat for several repetitions.
Make sure to keep your core and glutes engaged throughout the exercise, and avoid arching your back or letting your knees fall to the side.
Variations of Hip Lifts

There are several variations of hip lifts that you can try to target different muscles and add variety to your workout:
- Single-leg hip lift: Lift one leg off the ground and perform the exercise with only one leg.
- Bridge hold: Lift your hips off the ground and hold the position for several seconds.
- Weighted hip lift: Hold a weight on your hips as you perform the exercise to add resistance.
These variations can be more challenging than the standard hip lift, so make sure to start with the basic exercise and gradually work your way up.
Conclusion
Hip lifts are a simple but effective exercise that can help improve your lower body strength, flexibility, and overall fitness. By incorporating hip lifts into your workout routine, you can target your glutes, hips, and lower back and see improvements in your posture, balance, and overall physical health.
Related video of What Is A Hip Lift

Introduction
Are you a music lover looking for a unique and unforgettable experience? If so, you won't want to miss The Hip Abduction Tour! This internationally acclaimed band has been captivating audiences around the world with their unique blend of world music, indie rock, and reggae.About The Hip Abduction
The Hip Abduction was formed in St. Petersburg, Florida in 2009. The band is known for their high-energy performances and unique sound, which combines elements of African, Latin, and Caribbean music with indie rock and reggae.Over the years, The Hip Abduction has released multiple albums and has been featured in major music festivals such as Bonnaroo and Electric Forest. The band has also toured extensively, performing in venues across the United States and around the world.The Hip Abduction Tour
The Hip Abduction Tour is a must-see experience for music lovers. The band's live performances are known for their energy and excitement, and fans can expect to hear their favorite songs as well as new material.The tour typically includes stops in major cities across the United States as well as international locations. Fans can check the band's website to see the latest tour dates and locations.What to Expect at a Hip Abduction Concert
At a Hip Abduction concert, fans can expect to be swept away by the band's unique sound and high-energy performances. The band's live shows are known for their danceable rhythms and catchy melodies, and fans can expect to hear a mix of new and old songs.The band's live performances also feature stunning visuals and lighting effects, making for a truly unforgettable experience.Reviews of The Hip Abduction Tour
Fans and critics alike have been raving about The Hip Abduction Tour. The band's live shows have been described as "electrifying" and "truly unforgettable."Critics have praised the band's unique sound and high-energy performances, with some calling them "one of the most exciting bands in the indie music scene today."How to Get Tickets for The Hip Abduction Tour
Tickets for The Hip Abduction Tour can be purchased through the band's website or through major ticketing websites such as Ticketmaster. Fans are encouraged to purchase tickets early, as shows often sell out quickly.Conclusion
If you're a music lover looking for a unique and unforgettable experience, be sure to check out The Hip Abduction Tour. With their unique blend of world music, indie rock, and reggae, and their high-energy performances, this is a band you won't want to miss.
Related video of The Hip Abduction Tour: A Must-See Experience for Music Lovers
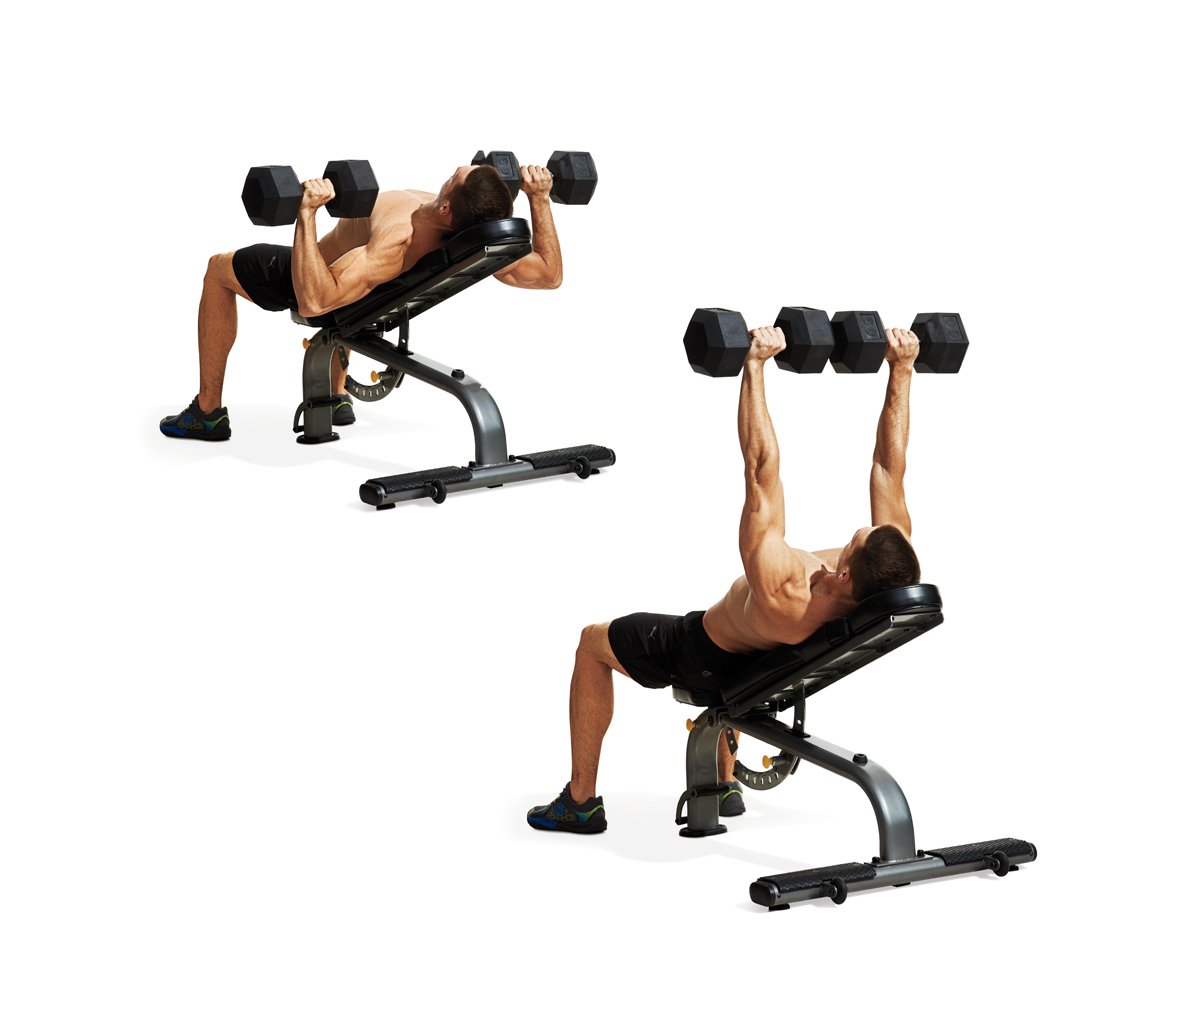
When it comes to building strength and muscle mass in your upper body, there are plenty of exercises to choose from. One move that many athletes and fitness enthusiasts swear by is the low angle dumbbell incline. This exercise is a variation on the classic incline press, and it has a number of benefits for your chest, shoulders, and triceps. Here's what you need to know about this exercise, including how to do it properly and why it's so effective.
What is the Low Angle Dumbbell Incline?

The low angle dumbbell incline is a variation on the traditional incline press, which is a chest exercise that involves lifting weights while lying on a bench that is set at an incline. In the low angle version, the bench is set at a lower angle than in the traditional exercise, which changes the angle of the movement and puts more emphasis on the upper portion of the chest muscles.
To perform the low angle dumbbell incline, you'll need a set of dumbbells and an incline bench. Lie back on the bench with your feet flat on the floor and your head and shoulders supported by the bench. Hold the dumbbells at shoulder height with your palms facing forward. Slowly lower the weights down towards your chest, keeping your elbows tight to your body. Pause for a moment at the bottom of the movement, then press the weights back up to the starting position.
Benefits of the Low Angle Dumbbell Incline

There are several reasons why the low angle dumbbell incline is such an effective exercise for building strength and muscle mass in your upper body. Here are just a few of the benefits:
- Increased upper chest activation: By adjusting the angle of the bench, you can target different areas of your chest muscles. The low angle dumbbell incline places more emphasis on the upper portion of the chest, which can help you build a more defined and sculpted chest.
- Improved shoulder strength: Because the low angle dumbbell incline involves pressing the weights up and away from your body, it also engages your shoulder muscles. Over time, this can help to increase your overall shoulder strength and stability.
- Greater triceps activation: In addition to working your chest and shoulders, the low angle dumbbell incline also engages your triceps. This can help you build stronger and more defined arms.
- Versatility: The low angle dumbbell incline can be performed with a variety of different weights and rep ranges, depending on your fitness goals. You can also use this exercise as part of a larger chest or upper body workout routine.
How to Incorporate the Low Angle Dumbbell Incline into Your Workout

If you're interested in incorporating the low angle dumbbell incline into your workout routine, there are a few things to keep in mind. Here are some tips for getting started:
- Start with a light weight: As with any new exercise, it's important to start with a weight that feels comfortable and manageable. Gradually increase the weight as you become more comfortable with the movement.
- Focus on form: Proper form is essential for getting the most out of the low angle dumbbell incline. Make sure to keep your elbows tight to your body and lower the weights down slowly and with control.
- Incorporate into your chest workout: The low angle dumbbell incline can be performed as part of a larger chest workout routine. Pair it with other exercises like push-ups, chest flyes, and dips for a comprehensive upper body workout.
- Add variety: To keep your workouts interesting and challenging, consider incorporating different variations of the low angle dumbbell incline. You can adjust the angle of the bench, use different weights, or perform the exercise with a single arm instead of two.
Conclusion
The low angle dumbbell incline is a highly effective exercise for building strength and muscle mass in your upper body. By adjusting the angle of the bench and using dumbbells, you can target your chest, shoulders, and triceps, and achieve a more sculpted and defined upper body. If you're interested in incorporating this exercise into your workout routine, start with a light weight and focus on proper form. With time and practice, you'll be able to increase the weight and reap the many benefits of this powerful exercise.
Related video of Low Angle Dumbbell Incline: Benefits and Techniques

The bench press is one of the most popular exercises in any gym. It is a compound exercise that works multiple muscle groups in the upper body. The primary muscles worked during the bench press are the chest muscles, but it also targets the triceps and shoulders. In this article, we will discuss the muscles worked during a bench press workout.
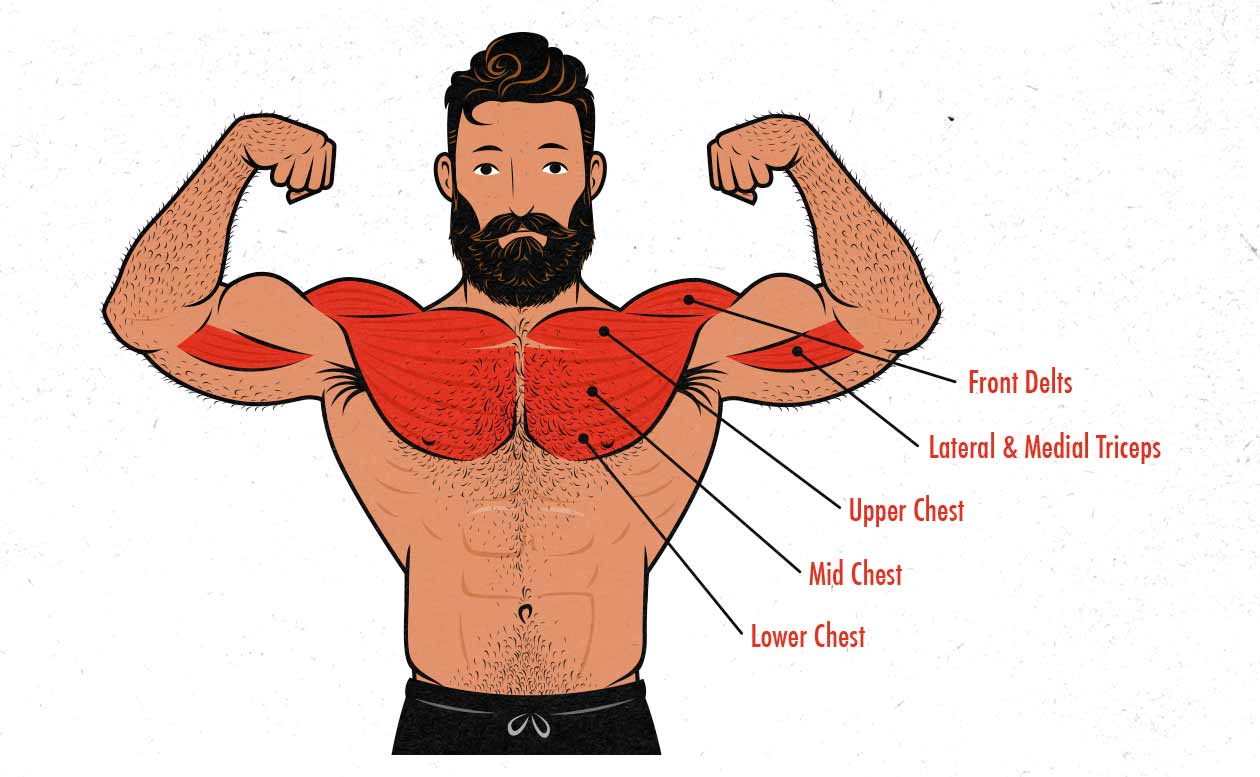
Chest Muscles

The chest muscles, also known as the pectoralis major and minor, are the primary muscles worked during a bench press. These muscles are responsible for pushing the weight away from the body. The pectoralis major is the larger of the two muscles and is located on the upper half of the chest. The pectoralis minor is located underneath the pectoralis major and is responsible for stabilizing the shoulder blade.
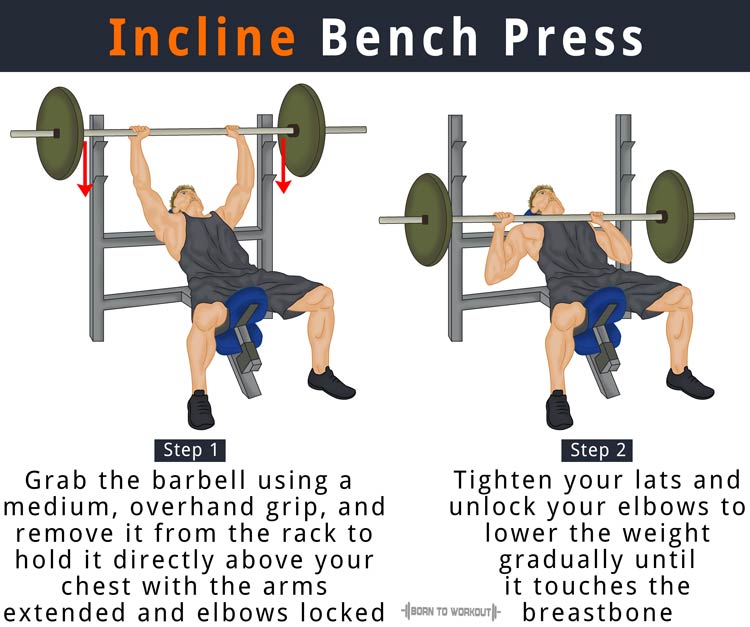
A flat bench press targets the entire chest, while an incline bench press targets the upper chest and a decline bench press targets the lower chest.
Triceps

The triceps, also known as the triceps brachii, are located on the back of the upper arm. They are responsible for extending the elbow joint. During a bench press, the triceps are activated to help push the weight away from the body. The triceps are worked more during a close-grip bench press than a wide-grip bench press.
Shoulders
The shoulders, also known as the deltoids, are responsible for the movement of the arm at the shoulder joint. During a bench press, the anterior (front) deltoids are worked the most. The medial (middle) deltoids and posterior (rear) deltoids are also activated to help stabilize the shoulder joint.
Other Muscles Worked

Although the bench press is primarily a chest exercise, it also works other muscle groups in the body. The back muscles, including the latissimus dorsi and the rhomboids, are activated to help stabilize the body during the exercise. The core muscles, including the abdominals and obliques, are also activated to help maintain proper form.
Bench Press Variations
There are several variations of the bench press that can be used to target different muscle groups. In addition to the flat, incline, and decline bench press, there are also close-grip, wide-grip, and dumbbell bench press variations. Each variation targets different muscles and can be used to add variety to your workout routine.
Proper Form

It is important to use proper form during a bench press to prevent injury and to target the intended muscle groups. To perform a bench press with proper form, lay down on the bench with your feet firmly planted on the ground. Grasp the barbell with your hands slightly wider than shoulder-width apart. Lower the barbell to your chest, keeping your elbows close to your body. Push the barbell back up until your arms are fully extended.
Conclusion
The bench press is a popular exercise that targets multiple muscle groups in the upper body. The primary muscles worked during a bench press are the chest muscles, triceps, and shoulders. Other muscle groups, including the back muscles and core muscles, are also activated during the exercise. Using proper form and incorporating different variations of the bench press into your workout routine can help you target different muscle groups and prevent injury.
Related video of Bench Press Workout What Muscles

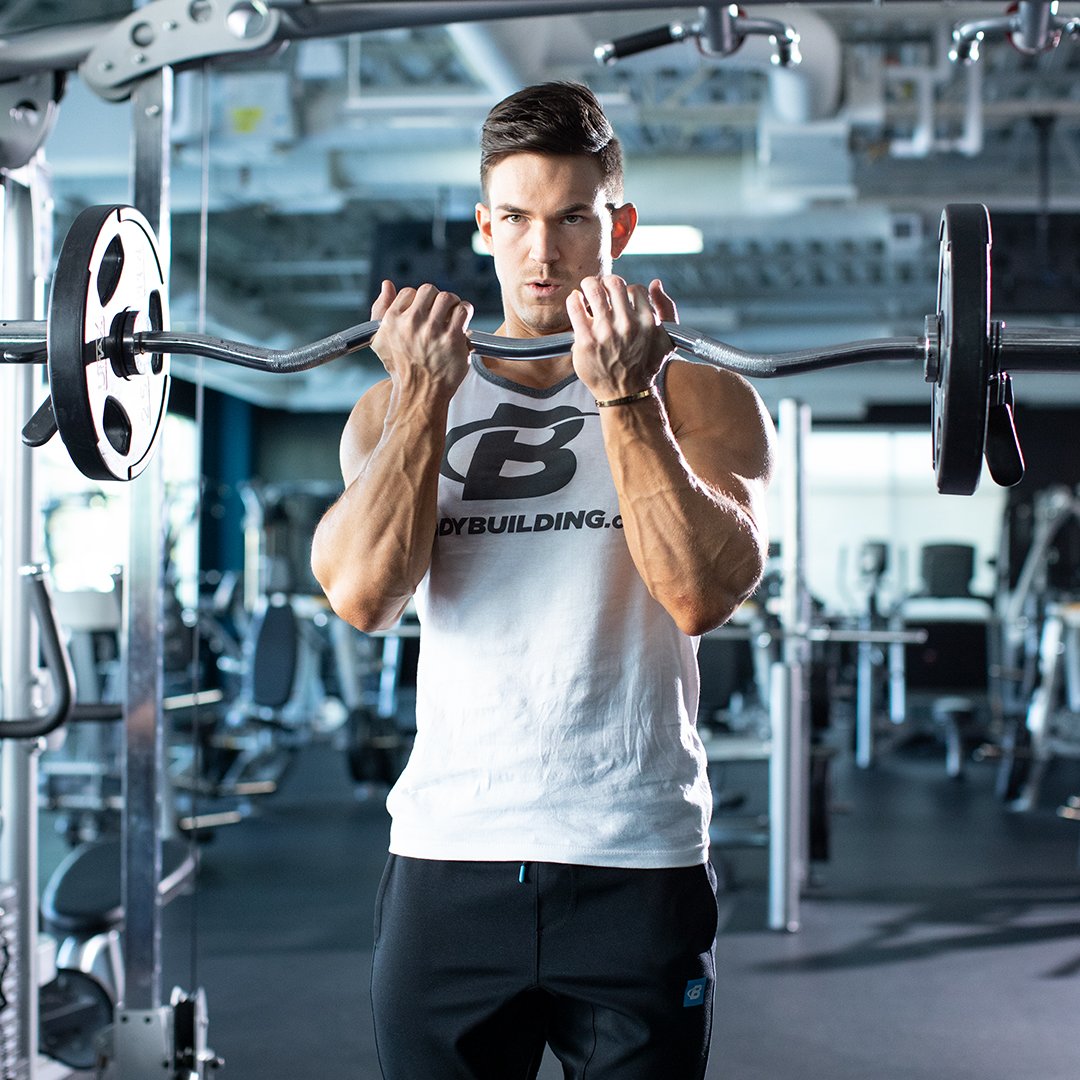
The Overhand Ez Bar Curl is one of the most effective exercises for developing biceps muscles. It is a variation of the regular bicep curl and has a unique grip that targets the outer head of the biceps muscle. This exercise is perfect for bodybuilders and fitness enthusiasts who want to add size and strength to their biceps.
How to Perform the Overhand Ez Bar Curl

To perform the Overhand Ez Bar Curl, follow these steps:
- Stand straight with your feet shoulder-width apart and grab the Ez bar with an overhand grip, with your palms facing down.
- Keep your elbows close to your body and slowly curl the bar up towards your shoulders. Make sure to keep your wrists straight throughout the movement.
- Once you have lifted the bar to your shoulders, pause for a second and squeeze your biceps muscles.
- Slowly lower the bar back to the starting position, keeping your elbows close to your body.
- Repeat for the desired number of repetitions.
Benefits of Overhand Ez Bar Curl

The Overhand Ez Bar Curl has several benefits, including:
- It targets the outer head of the biceps muscle, which is often neglected in traditional bicep exercises.
- It is a compound exercise that also works the forearms and brachialis muscles.
- It allows you to lift heavier weights than traditional bicep exercises, which can help you build more strength and size in your biceps.
- It is a versatile exercise that can be performed using different variations of the Ez bar, such as the straight bar or the cambered bar.
Common Mistakes to Avoid
When performing the Overhand Ez Bar Curl, it is important to avoid these common mistakes:
- Using too much weight, which can lead to poor form and injury.
- Swinging the bar to lift the weight, which takes the tension off the biceps muscles.
- Not keeping your elbows close to your body, which reduces the effectiveness of the exercise.
- Bending your wrists during the movement, which can cause pain and injury.
- Not squeezing your biceps muscles at the top of the movement, which reduces the intensity of the exercise.
Variations of Overhand Ez Bar Curl

The Overhand Ez Bar Curl can be performed using different variations of the Ez bar, such as:
- The straight bar, which is the most common variation and targets the entire biceps muscle.
- The cambered bar, which has a curve in the middle and allows for a more natural grip.
- The angled bar, which has angled grips and targets the biceps and forearms muscles.
Tips for Performing Overhand Ez Bar Curl

Here are some tips to help you perform the Overhand Ez Bar Curl correctly:
- Warm up your biceps muscles before performing the exercise to reduce the risk of injury.
- Start with a lighter weight and focus on maintaining proper form and technique.
- Keep your elbows close to your body throughout the movement to maximize the effectiveness of the exercise.
- Squeeze your biceps muscles at the top of the movement for maximum contraction.
- Lower the weight slowly to increase time under tension and stimulate muscle growth.
Conclusion
The Overhand Ez Bar Curl is a highly effective exercise for building size and strength in your biceps muscles. By following the correct form and technique, avoiding common mistakes, and using different variations of the Ez bar, you can maximize the benefits of this exercise and achieve your fitness goals.
Related video of Overhand Ez Bar Curl: A Comprehensive Guide
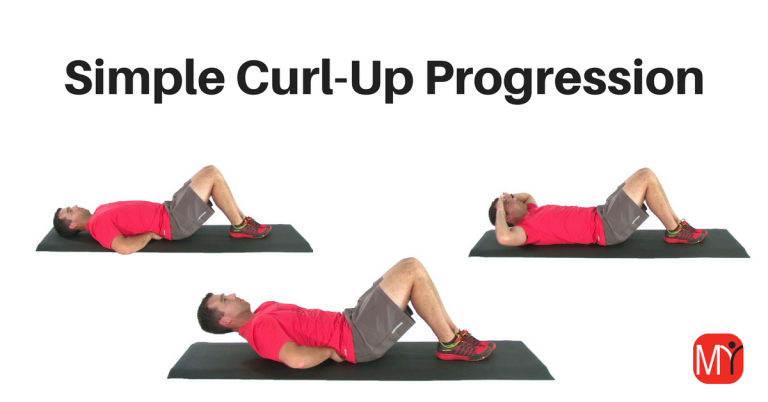
Curl ups, also known as crunches, are a popular exercise for strengthening the abdominal muscles. When done correctly, curl ups can be an effective way to tone and tighten the core. But what specific muscles do curl ups work? Let's take a closer look.

The Rectus Abdominis
The primary muscle worked during curl ups is the rectus abdominis, also known as the "six-pack" muscle. This muscle runs vertically down the front of the abdomen and is responsible for flexing the spine forward. By performing curl ups, you can effectively target and strengthen this muscle.

The Obliques
In addition to the rectus abdominis, curl ups also work the obliques. These muscles are located on the sides of the abdomen and are responsible for rotating and flexing the trunk. By performing curl ups with a twist, you can target the obliques even more.

The Transverse Abdominis
The transverse abdominis is a deep muscle that lies beneath the rectus abdominis. This muscle is responsible for stabilizing the spine and pelvis during movement. While curl ups primarily target the rectus abdominis and obliques, they can also engage the transverse abdominis to a certain degree.
The Hip Flexors
While not a muscle of the abdomen, the hip flexors are also worked during curl ups. These muscles are located at the front of the hips and are responsible for flexing the hip joint. During curl ups, the hip flexors are engaged to a certain degree to help lift the upper body off the ground.

Proper Curl Up Form
While curl ups can be an effective way to strengthen the abdominal muscles, it's important to use proper form to avoid injury and maximize results. Here are some tips for performing curl ups correctly:
- Lie on your back with your knees bent and your feet flat on the ground.
- Place your hands behind your head, but don't pull on your neck.
- Engage your core and lift your shoulders off the ground, keeping your lower back pressed into the floor.
- Exhale as you lift and inhale as you lower back down.
- Don't let your chin jut forward or your elbows pull in.
- Start with a small range of motion and gradually work your way up to a full curl up.

Other Abdominal Exercises
While curl ups are a popular exercise for strengthening the abdominal muscles, they're not the only exercise you can do. Here are some other effective abdominal exercises to try:
- Planks
- Side planks
- Mountain climbers
- Bicycle crunches
- Russian twists

In Conclusion
Curl ups are a great exercise for targeting and strengthening the abdominal muscles, particularly the rectus abdominis and obliques. By using proper form and incorporating other abdominal exercises into your routine, you can achieve a toned and tight core.
Related video of What Muscle Does Curl Ups Work

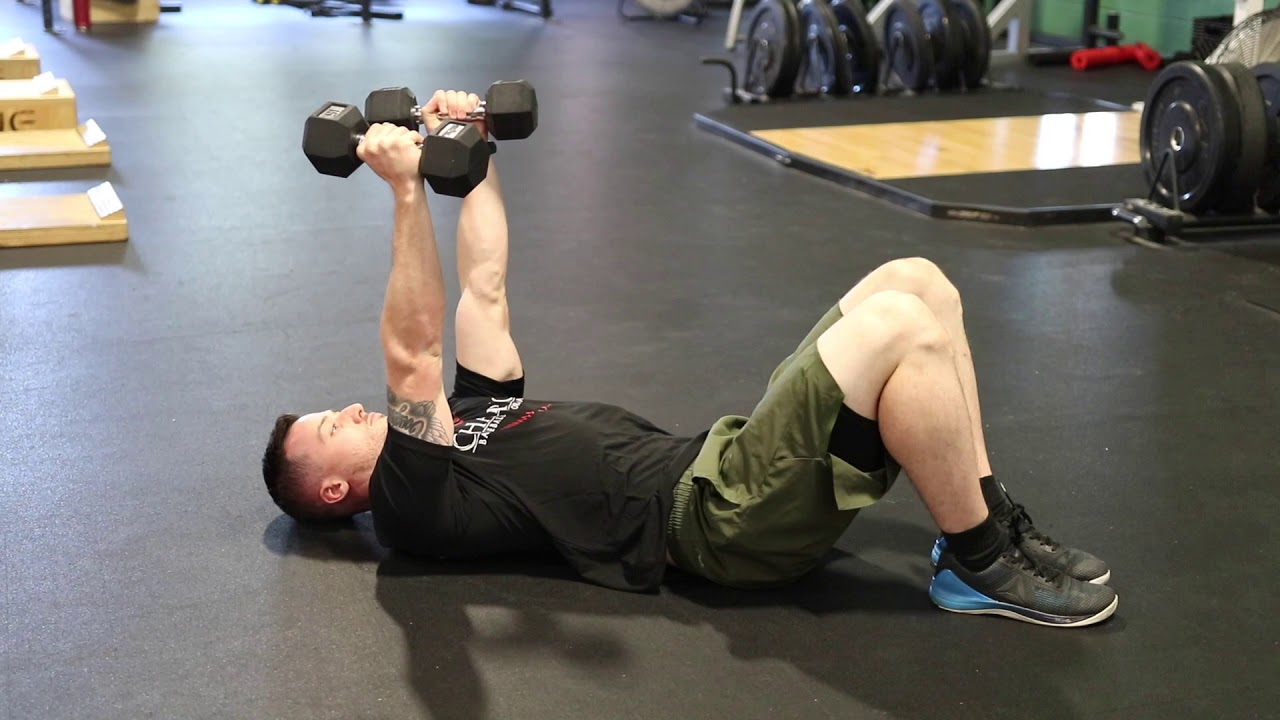
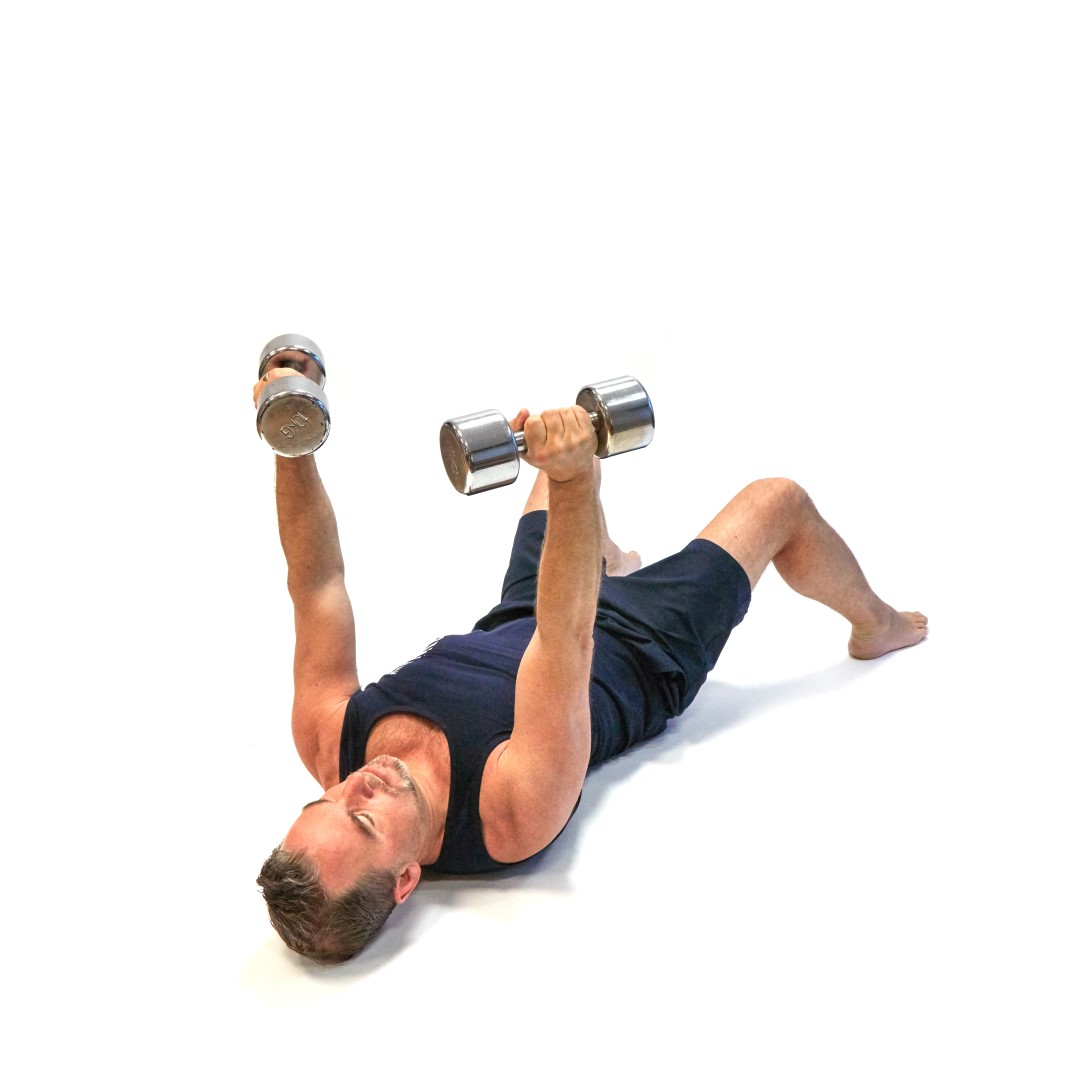
Are you looking for a great way to build your chest muscles without heading to the gym? Look no further than the dumbbell floor press chest exercise! This simple yet effective exercise can be done in the comfort of your own home, and is perfect for anyone looking to target their chest muscles, triceps, and shoulders.
The Benefits of the Dumbbell Floor Press Chest Exercise

One of the biggest benefits of the dumbbell floor press chest exercise is that it is a great way to build strength and muscle in your chest, triceps, and shoulders. This exercise is also great for improving your bench press, as it helps to build the necessary strength and muscle in your chest and triceps. Additionally, the dumbbell floor press chest exercise is a great way to improve your overall upper body strength, which can help to improve your performance in other exercises and activities.
How to Perform the Dumbbell Floor Press Chest Exercise

Performing the dumbbell floor press chest exercise is easy – all you need is a set of dumbbells and a flat surface to lie on. To perform the exercise, follow these simple steps:
- Lie on your back on a flat surface with your knees bent and your feet flat on the floor.
- Hold a dumbbell in each hand with your palms facing away from your body.
- Slowly lower the dumbbells down towards your chest, keeping your elbows close to your body.
- Once the dumbbells touch your chest, pause for a moment, then press them back up towards the ceiling.
- Repeat for the desired number of repetitions.
It is important to keep your elbows close to your body throughout the exercise, as this will help to target your chest muscles and prevent injury. It is also important to use a weight that is appropriate for your fitness level – start with a lighter weight and work your way up as you build strength and muscle.
Variations of the Dumbbell Floor Press Chest Exercise

There are a variety of ways to modify the dumbbell floor press chest exercise to make it more challenging or to target different muscle groups. Some variations you may want to try include:
- Increase the weight of the dumbbells
- Perform the exercise on a decline or incline bench
- Add a resistance band or chains to the exercise
- Perform the exercise with one arm at a time
By incorporating these variations into your workout routine, you can continue to challenge your muscles and improve your overall strength and fitness.
Tips for Getting the Most Out of the Dumbbell Floor Press Chest Exercise
If you want to get the most out of the dumbbell floor press chest exercise, there are a few tips you should keep in mind. These include:
- Start with a weight that is appropriate for your fitness level
- Focus on form and technique – keep your elbows close to your body and your back flat on the floor
- Breathe in as you lower the dumbbells down towards your chest, and exhale as you press them back up towards the ceiling
- Take your time – perform the exercise slowly and with control
- Incorporate the exercise into your workout routine 1-2 times per week
By following these tips, you can ensure that you are performing the exercise correctly and getting the maximum benefits for your muscles.
Conclusion
The dumbbell floor press chest exercise is a great way to build strength and muscle in your chest, triceps, and shoulders from the comfort of your own home. By incorporating this exercise into your workout routine and following the tips outlined in this article, you can continue to challenge your muscles and improve your overall strength and fitness.
Related video of Dumbbell Floor Press Chest: Build Amazing Pecs from the Comfort of Your Home

If you are looking for a new and challenging way to work your lower body, then you might want to try the squat on medicine ball. This exercise is great for strengthening your legs, glutes, and core, and it can also improve your balance and stability. In this article, we will discuss the benefits of squatting on a medicine ball, how to perform the exercise, and some common mistakes to avoid.
Benefits of Squatting on a Medicine Ball

One of the main benefits of squatting on a medicine ball is that it can increase the activation of your leg muscles. Because the ball is unstable, your body has to work harder to maintain balance and control, which can lead to greater muscle activation. This increased activation can help to build stronger and more defined legs.
In addition to targeting your leg muscles, squatting on a medicine ball can also engage your core and glutes. As you squat down and stand up, you will need to use your core muscles to maintain balance and stability. This can help to improve your posture and reduce your risk of injury.
Another benefit of squatting on a medicine ball is that it can be a low-impact exercise. Unlike traditional squats, which can put a lot of stress on your knees and hips, squatting on a medicine ball is gentler on your joints. This makes it a great exercise for people who have knee or hip problems.
How to Perform the Exercise

To perform the squat on a medicine ball, follow these steps:
- Stand with your feet shoulder-width apart and hold a medicine ball in front of your chest.
- Place the ball between your shoulder blades and lean back so that your torso is at a 45-degree angle.
- Squat down as low as you can while keeping your balance on the ball.
- Push through your heels and stand back up to the starting position.
- Repeat for 10-15 reps.
Make sure to keep your core engaged and your back straight throughout the exercise. You can also vary the difficulty of the exercise by holding a heavier medicine ball or by performing the exercise on one leg.
Common Mistakes to Avoid

When performing the squat on a medicine ball, it's important to avoid these common mistakes:
- Leaning too far back: If you lean too far back, you will lose your balance and fall off the ball. Keep your torso at a 45-degree angle to maintain balance.
- Not engaging your core: Your core muscles are essential for maintaining balance and stability during the exercise. Make sure to engage your core throughout the exercise.
- Not using proper form: Make sure to keep your back straight and your knees aligned with your toes. This will help to avoid injury and maximize the benefits of the exercise.
Conclusion
The squat on a medicine ball is a challenging and effective exercise that can help to strengthen your lower body, improve your balance and stability, and reduce your risk of injury. By following the proper form and avoiding common mistakes, you can safely incorporate this exercise into your workout routine. Try it out today and see the benefits for yourself!
Related video of Squat On Medicine Ball
If you are looking to build stronger and more defined triceps, then the reverse grip triceps pull down is an exercise that you should add to your workout routine. This exercise targets the triceps muscles, which are located on the back of your upper arm, and can help you achieve the toned and sculpted arms that you desire.
What is Reverse Grip Triceps Pull Down?

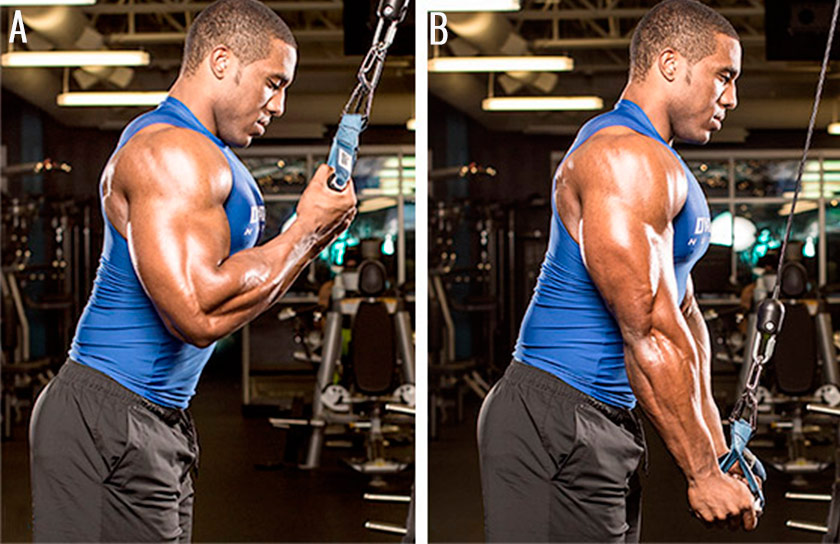
The reverse grip triceps pull down is an exercise that involves using a cable machine to target the triceps muscles. This exercise is performed by standing in front of the cable machine, grasping the handle with an underhand grip, and pulling the handle down towards your thighs while keeping your elbows close to your sides.
This exercise is a variation of the traditional triceps pull down, which is performed with an overhand grip. The reverse grip triceps pull down places more emphasis on the triceps muscles and can help you achieve greater gains in strength and size.
How to Perform Reverse Grip Triceps Pull Down

To perform the reverse grip triceps pull down, follow these steps:
- Attach a straight bar handle to the cable machine and adjust the weight to your desired resistance.
- Stand facing the cable machine and grasp the handle with an underhand grip, keeping your hands shoulder-width apart.
- Keep your elbows close to your sides and your upper arms stationary throughout the exercise.
- Exhale and pull the handle down towards your thighs, keeping your shoulders and chest stable.
- Pause for a moment at the bottom of the movement, squeezing your triceps muscles.
- Inhale and slowly return the handle to the starting position, maintaining control throughout the movement.
- Repeat for your desired number of repetitions.
Benefits of Reverse Grip Triceps Pull Down

The reverse grip triceps pull down offers a variety of benefits for those who incorporate it into their workout routine. Some of the benefits of this exercise include:
- Targeting the triceps muscles: The reverse grip triceps pull down places more emphasis on the triceps muscles, which can help you achieve greater gains in strength and size.
- Improving overall arm strength: By targeting the triceps muscles, the reverse grip triceps pull down can help you improve your overall arm strength and performance in other exercises.
- Reducing strain on the elbows: The underhand grip used in this exercise can help reduce strain on the elbows, making it a safer alternative to other triceps exercises.
- Improving muscle definition: The reverse grip triceps pull down can help you achieve more defined and toned triceps muscles, improving the overall appearance of your arms.
Precautions and Tips

As with any exercise, it is important to take precautions and use proper form when performing the reverse grip triceps pull down. Here are some tips to keep in mind:
- Start with a lighter weight: It is important to start with a lighter weight and gradually increase the resistance as you become more comfortable with the exercise.
- Maintain proper form: Keep your elbows close to your sides and your upper arms stationary throughout the exercise to target the triceps muscles effectively.
- Squeeze your triceps: Pause for a moment at the bottom of the movement and squeeze your triceps muscles to maximize the effectiveness of the exercise.
- Breathe properly: Exhale as you pull the handle down towards your thighs and inhale as you return to the starting position.
- Avoid using momentum: Use slow, controlled movements to avoid using momentum and to keep the focus on the triceps muscles.
Incorporating Reverse Grip Triceps Pull Down into Your Workout Routine

The reverse grip triceps pull down can be incorporated into your workout routine as an isolation exercise for the triceps muscles. Here is an example of how you can include this exercise in your workout:
- Warm up with 5-10 minutes of cardio exercise.
- Perform 3 sets of 10-12 reps of reverse grip triceps pull down.
- Follow with 3 sets of 10-12 reps of biceps curls.
- Finish with 3 sets of 10-12 reps of shoulder presses.
- Cool down with stretching exercises.
Conclusion
The reverse grip triceps pull down is an effective exercise for targeting the triceps muscles and achieving greater gains in strength and size. By incorporating this exercise into your workout routine and following proper form and precautions, you can improve your overall arm strength and achieve more defined and toned triceps muscles.