
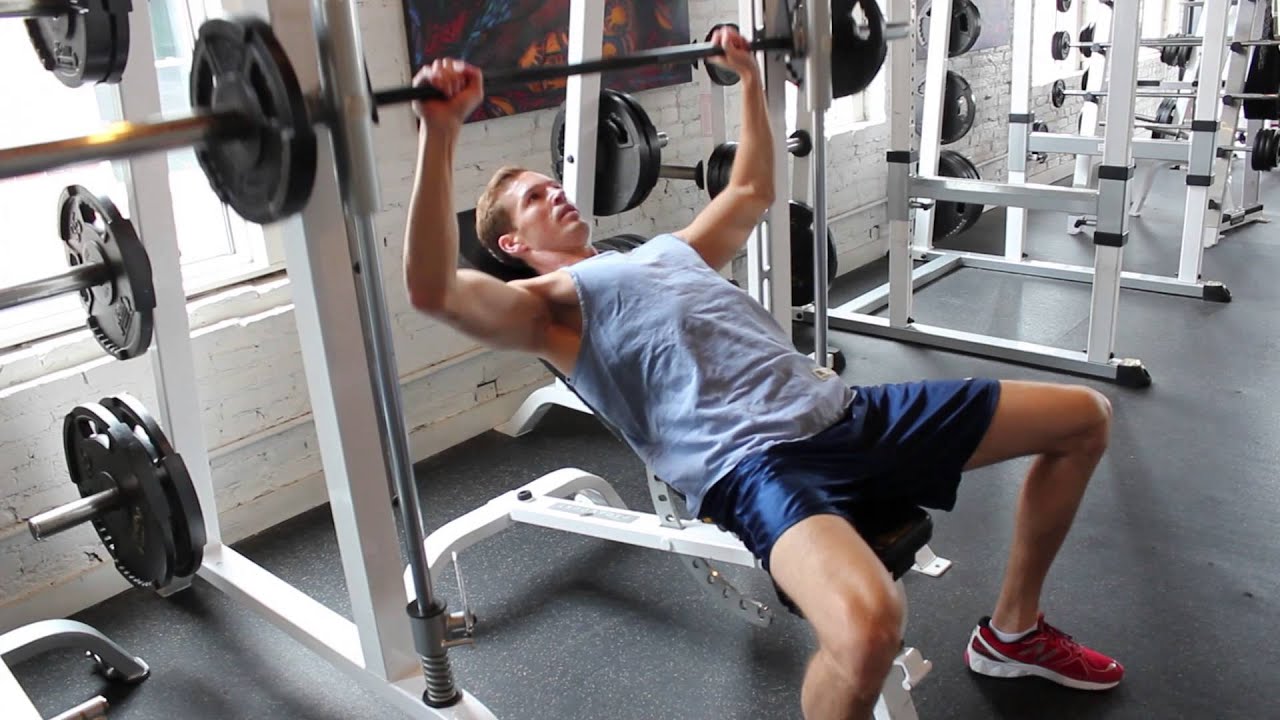
The Incline Smith Chest Press is a powerful exercise that targets the chest muscles. It is a variation of the traditional bench press, but with the added benefit of targeting the upper chest. The incline angle of the bench allows for a greater range of motion, which engages the upper chest muscles more effectively.
How to Perform the Incline Smith Chest Press

To perform the Incline Smith Chest Press, follow these steps:
- Set the incline bench to a comfortable angle, typically between 30 and 45 degrees.
- Load the bar with an appropriate weight, ensuring that it is secure on the Smith machine.
- Lie on the bench with your feet flat on the ground and your back firmly against the bench. Grip the bar with a slightly wider than shoulder-width grip.
- Lower the bar down to your chest, keeping your elbows tucked in close to your body.
- Press the bar back up to the starting position, keeping your chest puffed out and your shoulder blades squeezed together throughout the movement.
- Repeat for the desired number of repetitions.
Benefits of the Incline Smith Chest Press

The Incline Smith Chest Press has numerous benefits, including:
- Targeting the upper chest muscles more effectively than the traditional bench press.
- Providing a greater range of motion, which can lead to greater muscle activation.
- Stabilizing the movement with the Smith machine, reducing the risk of injury.
- Allowing for heavier weights to be lifted due to the stability of the Smith machine.
Variations of the Incline Smith Chest Press
There are several variations of the Incline Smith Chest Press that can be used to further target specific areas of the chest:
- Close-grip Incline Smith Chest Press: This variation involves bringing your hands closer together on the bar, which targets the inner chest muscles.
- Reverse-grip Incline Smith Chest Press: This variation involves using a reverse grip on the bar, which targets the upper chest and front deltoids.
- Incline Dumbbell Fly: This exercise involves lying on an incline bench and performing a fly motion with dumbbells, which targets the outer chest muscles.
- Incline Push-up: This exercise involves performing a push-up with your hands on an incline bench, which targets the upper chest muscles.
Conclusion
The Incline Smith Chest Press is a highly effective exercise for targeting the upper chest muscles. It provides a greater range of motion and stability than the traditional bench press, while also allowing for heavier weights to be lifted. By incorporating variations of this exercise into your workout routine, you can further target specific areas of the chest for a well-rounded and balanced physique.
Related video of Incline Smith Chest Press

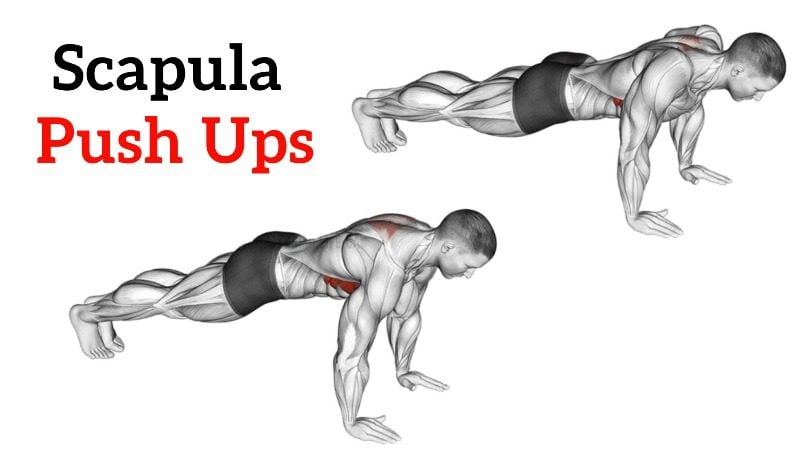
Scapula push ups are a great exercise for improving posture, upper body strength, and shoulder mobility. They target the muscles around the scapula, which are often neglected in traditional push up exercises. Here's a step-by-step guide on how to do scapula push ups.
Step 1: Get into a high plank position
Start in a high plank position with your hands shoulder-width apart and your body in a straight line from head to heels. Your feet should be hip-width apart and your toes should be pointed towards the ground.
Step 2: Lower your body towards the ground

Lower your body towards the ground by bending your elbows. Keep your elbows close to your body and your core engaged. Your shoulders should stay away from your ears.
Step 3: Push your shoulder blades apart

At the bottom of the push up, push your shoulder blades apart as if you are trying to touch the walls behind you. This movement will activate the muscles around the scapula and improve your posture.
Step 4: Bring your shoulder blades together

As you push your body up, bring your shoulder blades together as if you are trying to pinch a pencil between them. This movement will further engage the muscles around the scapula and improve your shoulder mobility.
Step 5: Repeat for desired reps

Repeat steps 2-4 for the desired number of reps. Start with 10 reps and gradually increase as you get stronger.
Common mistakes to avoid

Here are some common mistakes to avoid when doing scapula push ups:
- Letting your shoulders hunch up towards your ears
- Flaring your elbows out to the sides
- Letting your lower back sag towards the ground
Benefits of scapula push ups

Scapula push ups offer several benefits, including:
- Improved posture
- Stronger upper body
- Better shoulder mobility
- Reduced risk of shoulder injuries
Conclusion
Scapula push ups are a simple yet effective exercise for improving posture, upper body strength, and shoulder mobility. By following these steps and avoiding common mistakes, you can maximize the benefits of this exercise and take your fitness to the next level.
Related video of How To Do Scapula Push Ups

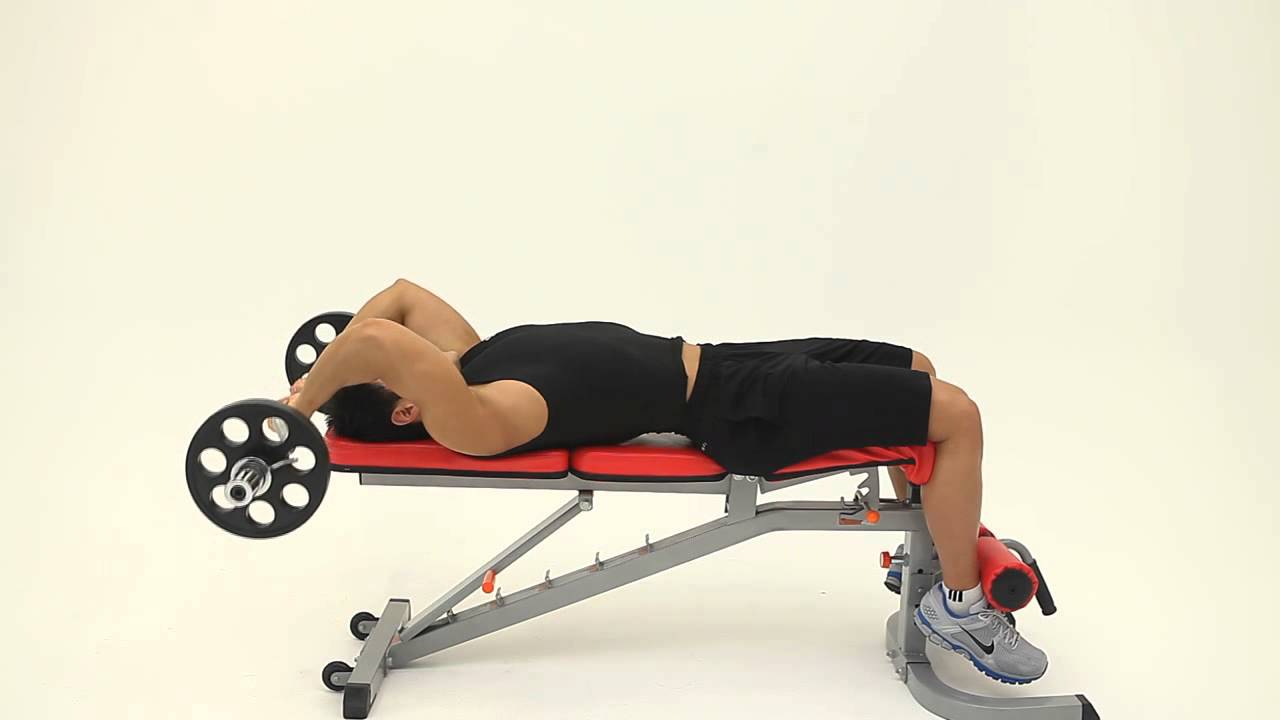
The lying tricep extension barbell, also known as the skull crusher, is a popular exercise for building and toning the triceps muscles. This exercise targets the three heads of the triceps and is an effective way to increase strength and size in this area. In this article, we'll take a closer look at how to perform the lying tricep extension barbell and some tips for getting the most out of this exercise.
How to Perform the Lying Tricep Extension Barbell

To perform the lying tricep extension barbell, you'll need a barbell and a flat bench. Here are the steps:
- Lie down on the bench with your feet flat on the ground and your head at the end of the bench.
- Grasp the barbell with an overhand grip and hold it straight up in the air, with your arms fully extended.
- Slowly lower the barbell towards your forehead, keeping your elbows stationary and your upper arms perpendicular to the ground.
- Pause when the barbell is just above your forehead, then slowly lift it back up to the starting position.
- Repeat for the desired number of repetitions.
It's important to keep your elbows stationary and your upper arms perpendicular to the ground throughout the exercise to target the triceps muscles effectively. You should also use a weight that is challenging but allows you to maintain proper form.
Variations of the Lying Tricep Extension Barbell
There are a few variations of the lying tricep extension barbell that you can try to target different areas of the triceps:
- Narrow grip: Use a narrow grip on the barbell to target the long head of the triceps.
- EZ bar: Use an EZ bar instead of a straight barbell to reduce strain on the wrists and target the triceps more effectively.
- Incline bench: Perform the exercise on an incline bench to target the upper portion of the triceps.
Tips for Getting the Most out of the Lying Tricep Extension Barbell

Here are some tips for getting the most out of the lying tricep extension barbell:
- Warm up properly before starting the exercise to prevent injury.
- Use a spotter if you're lifting heavy weights.
- Focus on keeping your elbows stationary and your upper arms perpendicular to the ground throughout the exercise.
- Breathe out as you lift the weight and breathe in as you lower it.
- Use a weight that is challenging but allows you to maintain proper form.
Conclusion

The lying tricep extension barbell is an effective exercise for building and toning the triceps muscles. By following the steps outlined in this article and incorporating some of the variations and tips, you can get the most out of this exercise and see results in no time.
Related video of Lying Tricep Extension Barbell: A Comprehensive Guide

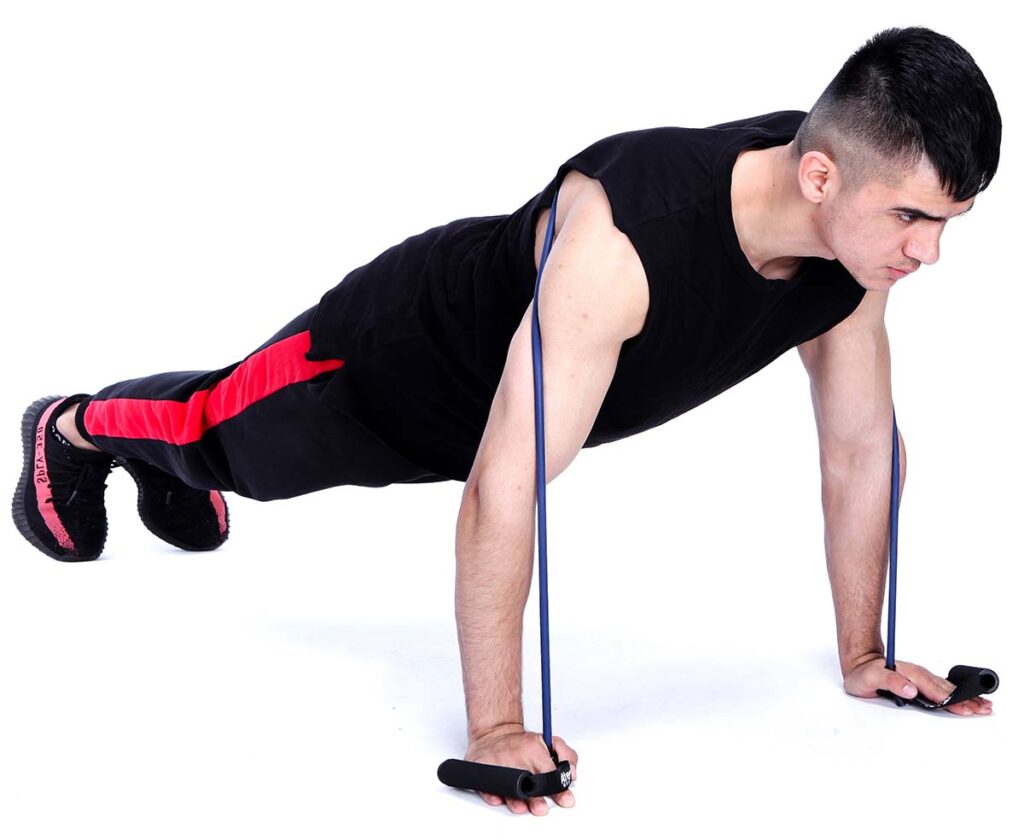
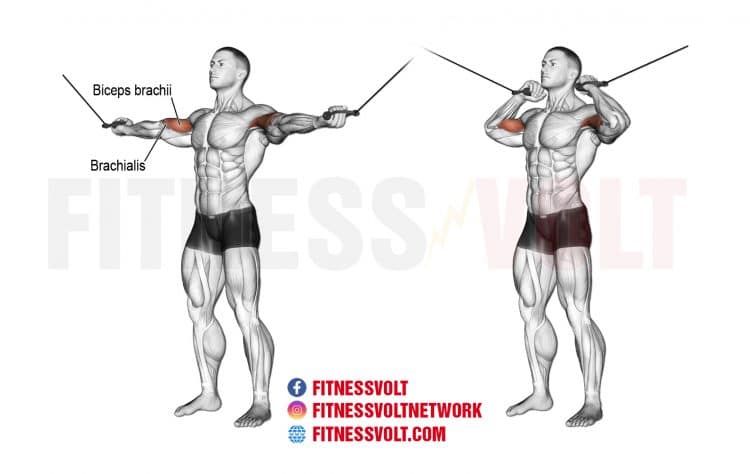
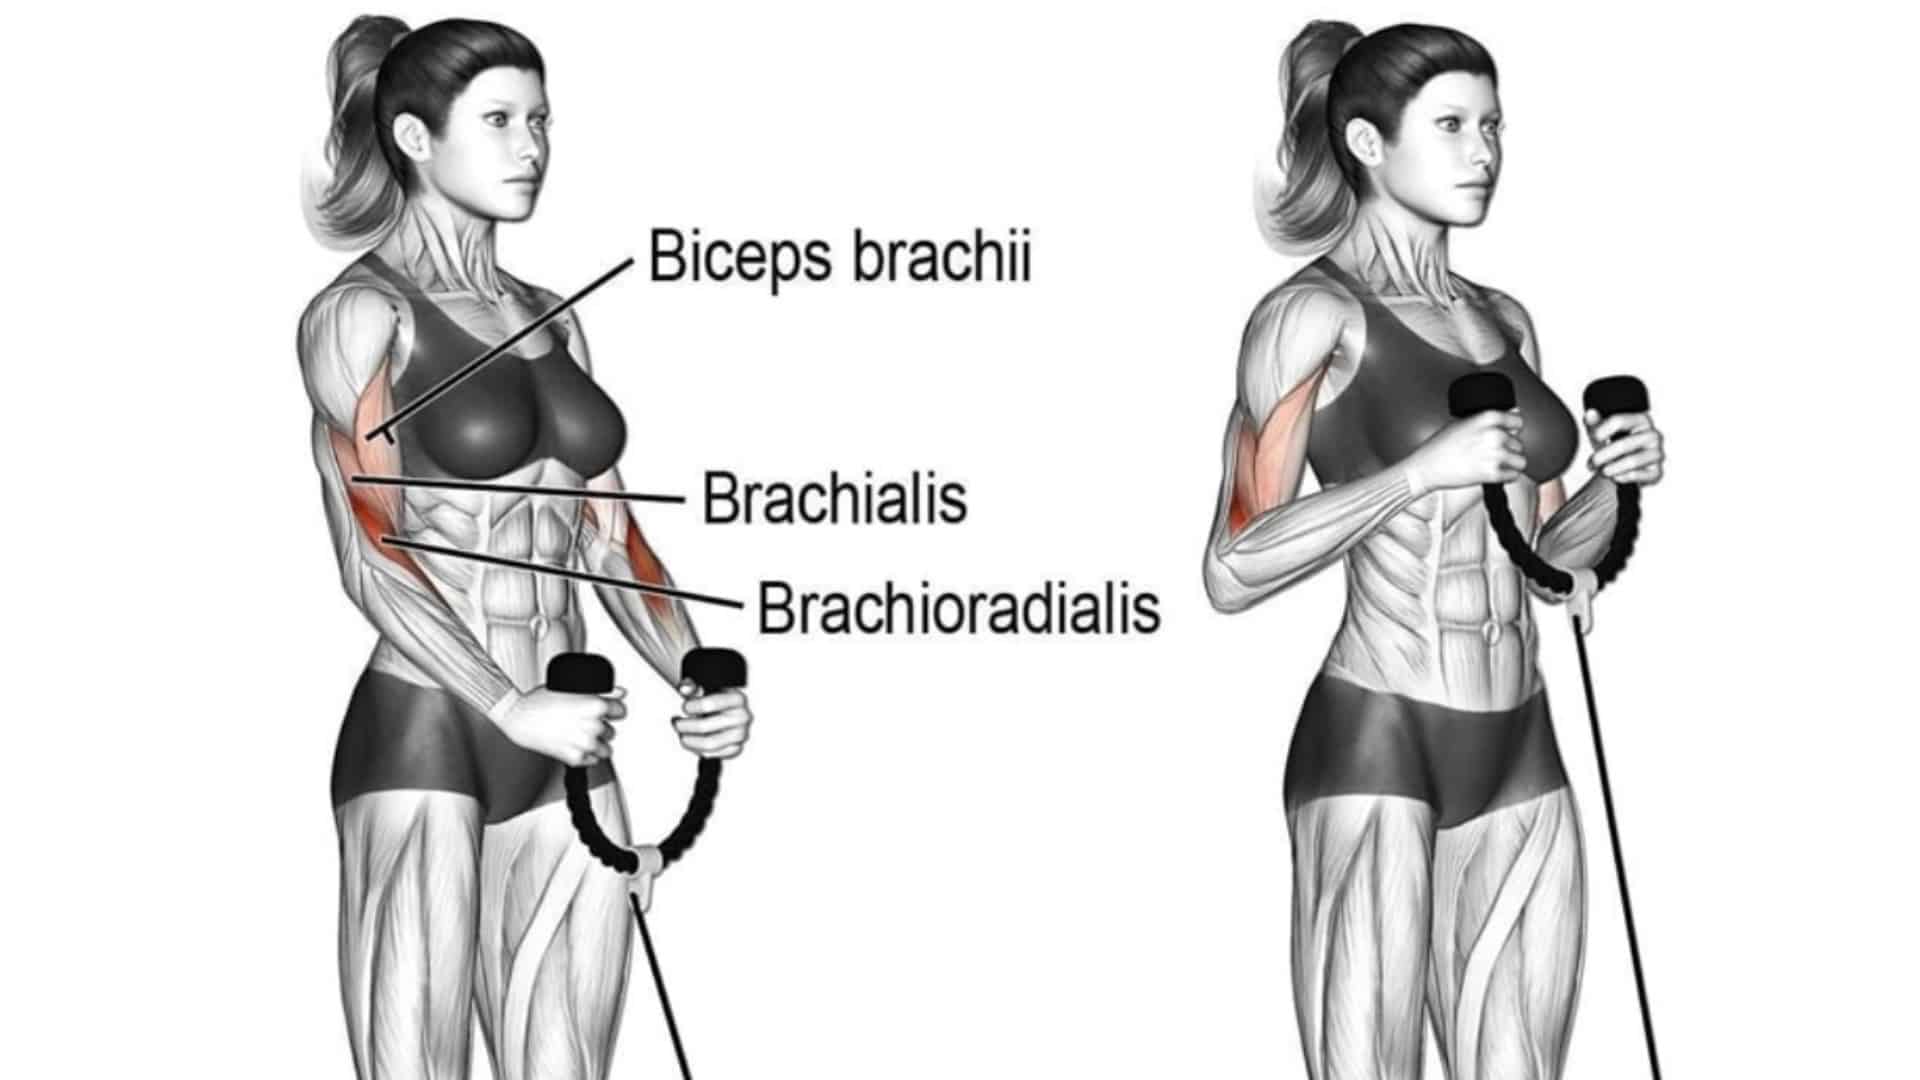
Resistance bands are a versatile and affordable piece of equipment that can help you achieve a full-body workout. One of the exercises that you can perform with resistance bands is the chest press. This exercise targets your chest, shoulders, and triceps, helping you build strength and lean muscle mass. In this article, we will discuss the proper form and technique for performing the resistance bands chest press.
What are Resistance Bands?

Resistance bands are long, elastic bands that come in different levels of resistance. They are made of high-quality rubber or latex material and can be used for a variety of exercises. Resistance bands are lightweight, portable, and easy to use, making them a popular choice for home workouts, travel workouts, and gym workouts. They are also an affordable alternative to traditional gym equipment.
How to Perform the Resistance Bands Chest Press
To perform the resistance bands chest press, follow these steps:
- Anchor the resistance band to a sturdy object, such as a door frame or a weight bench.
- Stand facing away from the anchor point, holding the resistance bands in each hand.
- Position your feet shoulder-width apart and bend your knees slightly.
- Bring your hands up to shoulder level, with your elbows bent and your palms facing forward.
- Push the resistance bands forward until your arms are fully extended.
- Slowly lower the resistance bands back to the starting position.
- Repeat for the desired number of repetitions.
Tips for Performing the Resistance Bands Chest Press

Here are some tips to help you perform the resistance bands chest press with proper form and technique:
- Choose the appropriate level of resistance for your fitness level.
- Keep your core engaged and your back straight throughout the exercise.
- Exhale as you push the resistance bands forward and inhale as you lower them back to the starting position.
- Avoid locking your elbows at the top of the movement.
- Focus on squeezing your chest muscles as you push the resistance bands forward.
Variations of the Resistance Bands Chest Press

Here are some variations of the resistance bands chest press that you can try:
- Single-arm chest press: Perform the chest press with one arm at a time, alternating between right and left.
- Incline chest press: Lie on an incline bench and perform the chest press with the resistance bands.
- Decline chest press: Lie on a decline bench and perform the chest press with the resistance bands.
Benefits of the Resistance Bands Chest Press

The resistance bands chest press offers several benefits, including:
- Improved upper body strength: The chest press targets your chest, shoulders, and triceps, helping you build strength in your upper body.
- Increased muscle mass: The resistance bands provide constant tension throughout the movement, helping you increase muscle mass and definition.
- Improved posture: The chest press can help improve your posture by strengthening your chest and shoulder muscles.
- Convenience: Resistance bands are lightweight and portable, making them a convenient option for home workouts, travel workouts, and gym workouts.
- Affordability: Resistance bands are an affordable alternative to traditional gym equipment, making them accessible to people on a budget.
Conclusion
The resistance bands chest press is a simple and effective exercise that can help you build upper body strength and muscle mass. By following proper form and technique, you can perform the exercise safely and effectively. Whether you're a beginner or an experienced fitness enthusiast, resistance bands are a valuable addition to your workout routine.
Related video of Resistance Bands Chest Press
Cable curls are one of the most effective exercises for targeting the biceps. This exercise involves using a cable machine to perform curls, which helps to isolate the biceps and build strength and size in this muscle group. In this article, we will discuss the muscles worked during cable curls.

Biceps Brachii
The primary muscle worked during cable curls is the biceps brachii. This muscle is located on the front of the upper arm and is responsible for bending the elbow and rotating the forearm. Cable curls target the biceps brachii by placing tension on the muscle as you curl the weight towards your shoulder.
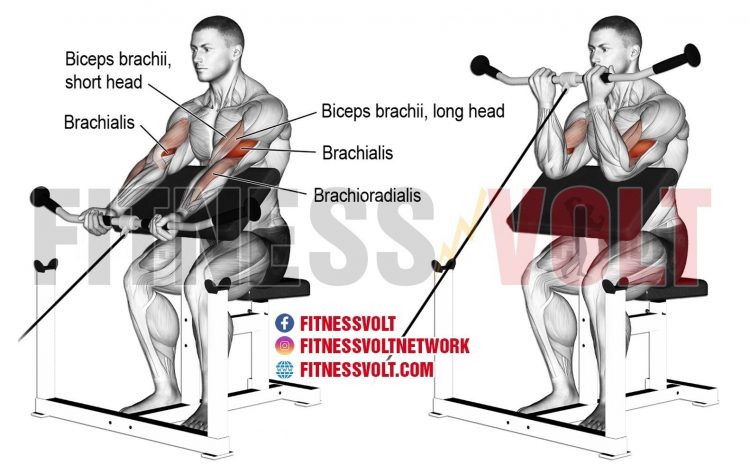
Brachialis
The brachialis is a smaller muscle located underneath the biceps brachii. This muscle is responsible for flexing the elbow and is also worked during cable curls. The brachialis is important to target for overall arm development and to improve the appearance of the biceps.
Forearms
The forearms also play a role during cable curls. As you curl the weight towards your shoulder, your forearms must work to stabilize the weight and maintain proper form. This helps to improve grip strength and overall forearm development.

Stabilizer Muscles
In addition to the primary and secondary muscles worked during cable curls, there are several stabilizer muscles that are also activated. These muscles include the deltoids, trapezius, and rotator cuff muscles. These muscles work to stabilize the shoulder joint and prevent injury during the exercise.
Benefits of Cable Curls
Cable curls are an excellent exercise for building strength and size in the biceps. This exercise is also great for improving grip strength and overall arm development. Cable curls are a safer alternative to traditional barbell curls as they place less stress on the wrists and elbows. Additionally, cable curls allow for a greater range of motion, which can help to target the muscles more effectively.
How to Perform Cable Curls
To perform cable curls, begin by setting up a cable machine with a straight bar attachment. Stand facing the machine with your feet shoulder-width apart and grasp the bar with an underhand grip. Keep your elbows close to your body and curl the weight towards your shoulders. Slowly lower the weight back down to starting position and repeat for desired reps.

Tips for Cable Curls
To get the most out of your cable curls, there are a few tips to keep in mind. First, make sure to keep your elbows close to your body throughout the exercise. This will help to isolate the biceps and reduce stress on the shoulders. Additionally, focus on using a controlled movement and avoid swinging the weight. Finally, consider using a variety of grips and attachments to target different areas of the biceps.
Conclusion
Cable curls are an effective exercise for targeting the biceps and improving overall arm development. By understanding the muscles worked during cable curls, you can better target these muscles and get the most out of your workout. Incorporate cable curls into your routine for stronger, more defined biceps.
Related video of Cable Curls Muscles Worked
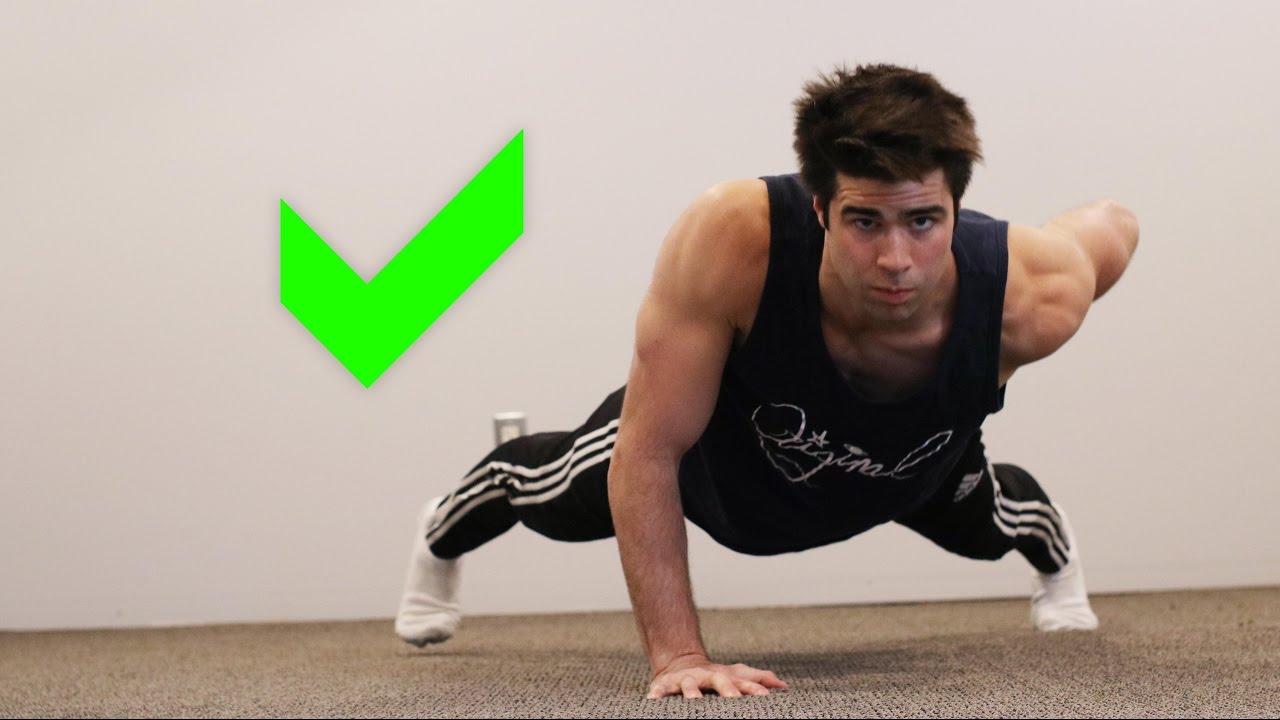
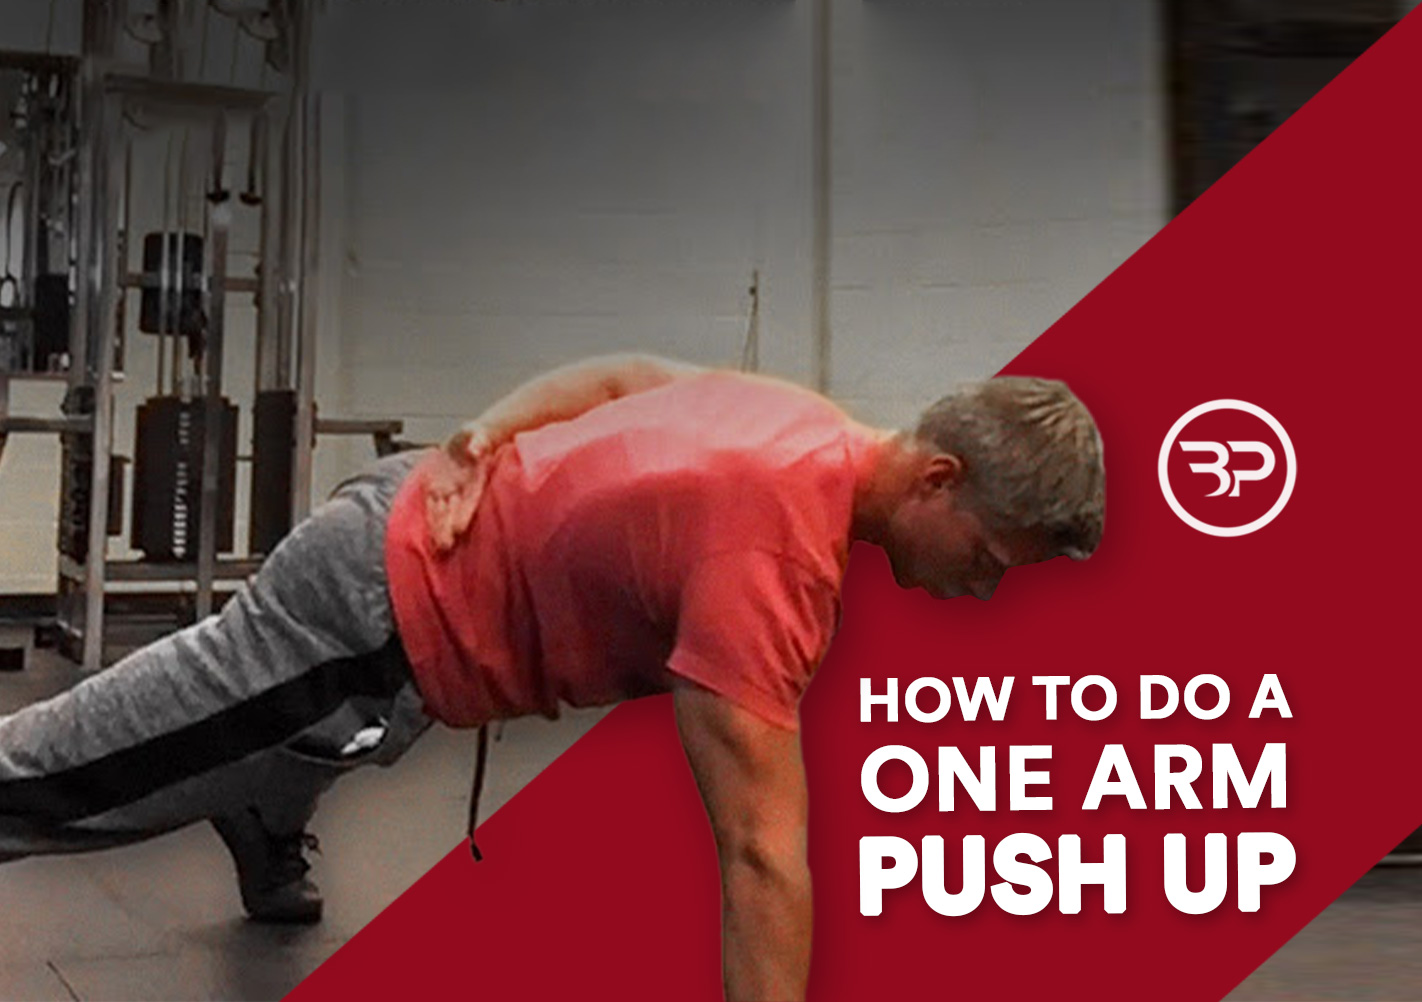
A one hand pushup is a popular exercise that requires immense strength, balance, and stability. It’s an impressive feat of strength that not only looks cool but also helps to build upper body strength and endurance. If you’re looking to master the one hand pushup, here’s a step-by-step guide to help you get started.
Step 1: Build Upper Body Strength

The first step to mastering the one hand pushup is to build up your upper body strength. This can be done through a variety of exercises like pushups, pull-ups, and dips. Focus on building strength in your chest, shoulders, and triceps.
Step 2: Master The Standard Pushup

The next step is to master the standard pushup. This exercise will help you develop the necessary strength and endurance you need to perform a one hand pushup. Make sure to keep your body in a straight line, engage your core, and lower your body until your chest touches the ground.
Step 3: Progress To One Arm Pushups

Once you’ve mastered the standard pushup, it’s time to progress to one arm pushups. Start by placing one hand on a raised surface like a bench or step. Lower yourself down as far as you can, then push yourself back up. As you get stronger, gradually decrease the height of the surface until you can perform a one arm pushup on the ground.
Step 4: Master The One Hand Plank

In addition to building strength, you need to develop balance and stability to perform a one hand pushup. The one hand plank is a great exercise to help you achieve this. Start by getting into a plank position with your feet shoulder-width apart and one hand on the ground. Hold this position for 30-60 seconds, then switch hands. As you get stronger, increase the duration of the hold.
Step 5: Practice One Hand Pushups

Once you’ve built up sufficient strength, balance, and stability, it’s time to start practicing one hand pushups. Start by placing one hand slightly wider than shoulder-width apart and the other hand behind your back. Lower yourself down as far as you can, then push yourself back up. Aim to perform 3-5 reps on each side, gradually increasing the number of reps as you get stronger.
Step 6: Tips For Success
Here are some tips to help you succeed in your quest to master the one hand pushup:
- Focus on proper form and technique
- Engage your core to maintain stability
- Start with elevated one arm pushups and gradually progress to ground-level pushups
- Practice regularly and be patient
Conclusion
Mastering the one hand pushup takes time and dedication, but it’s a great way to build upper body strength and impress your friends. Follow these steps and tips to help you achieve your goal.
Related video of How To Do A One Hand Pushup

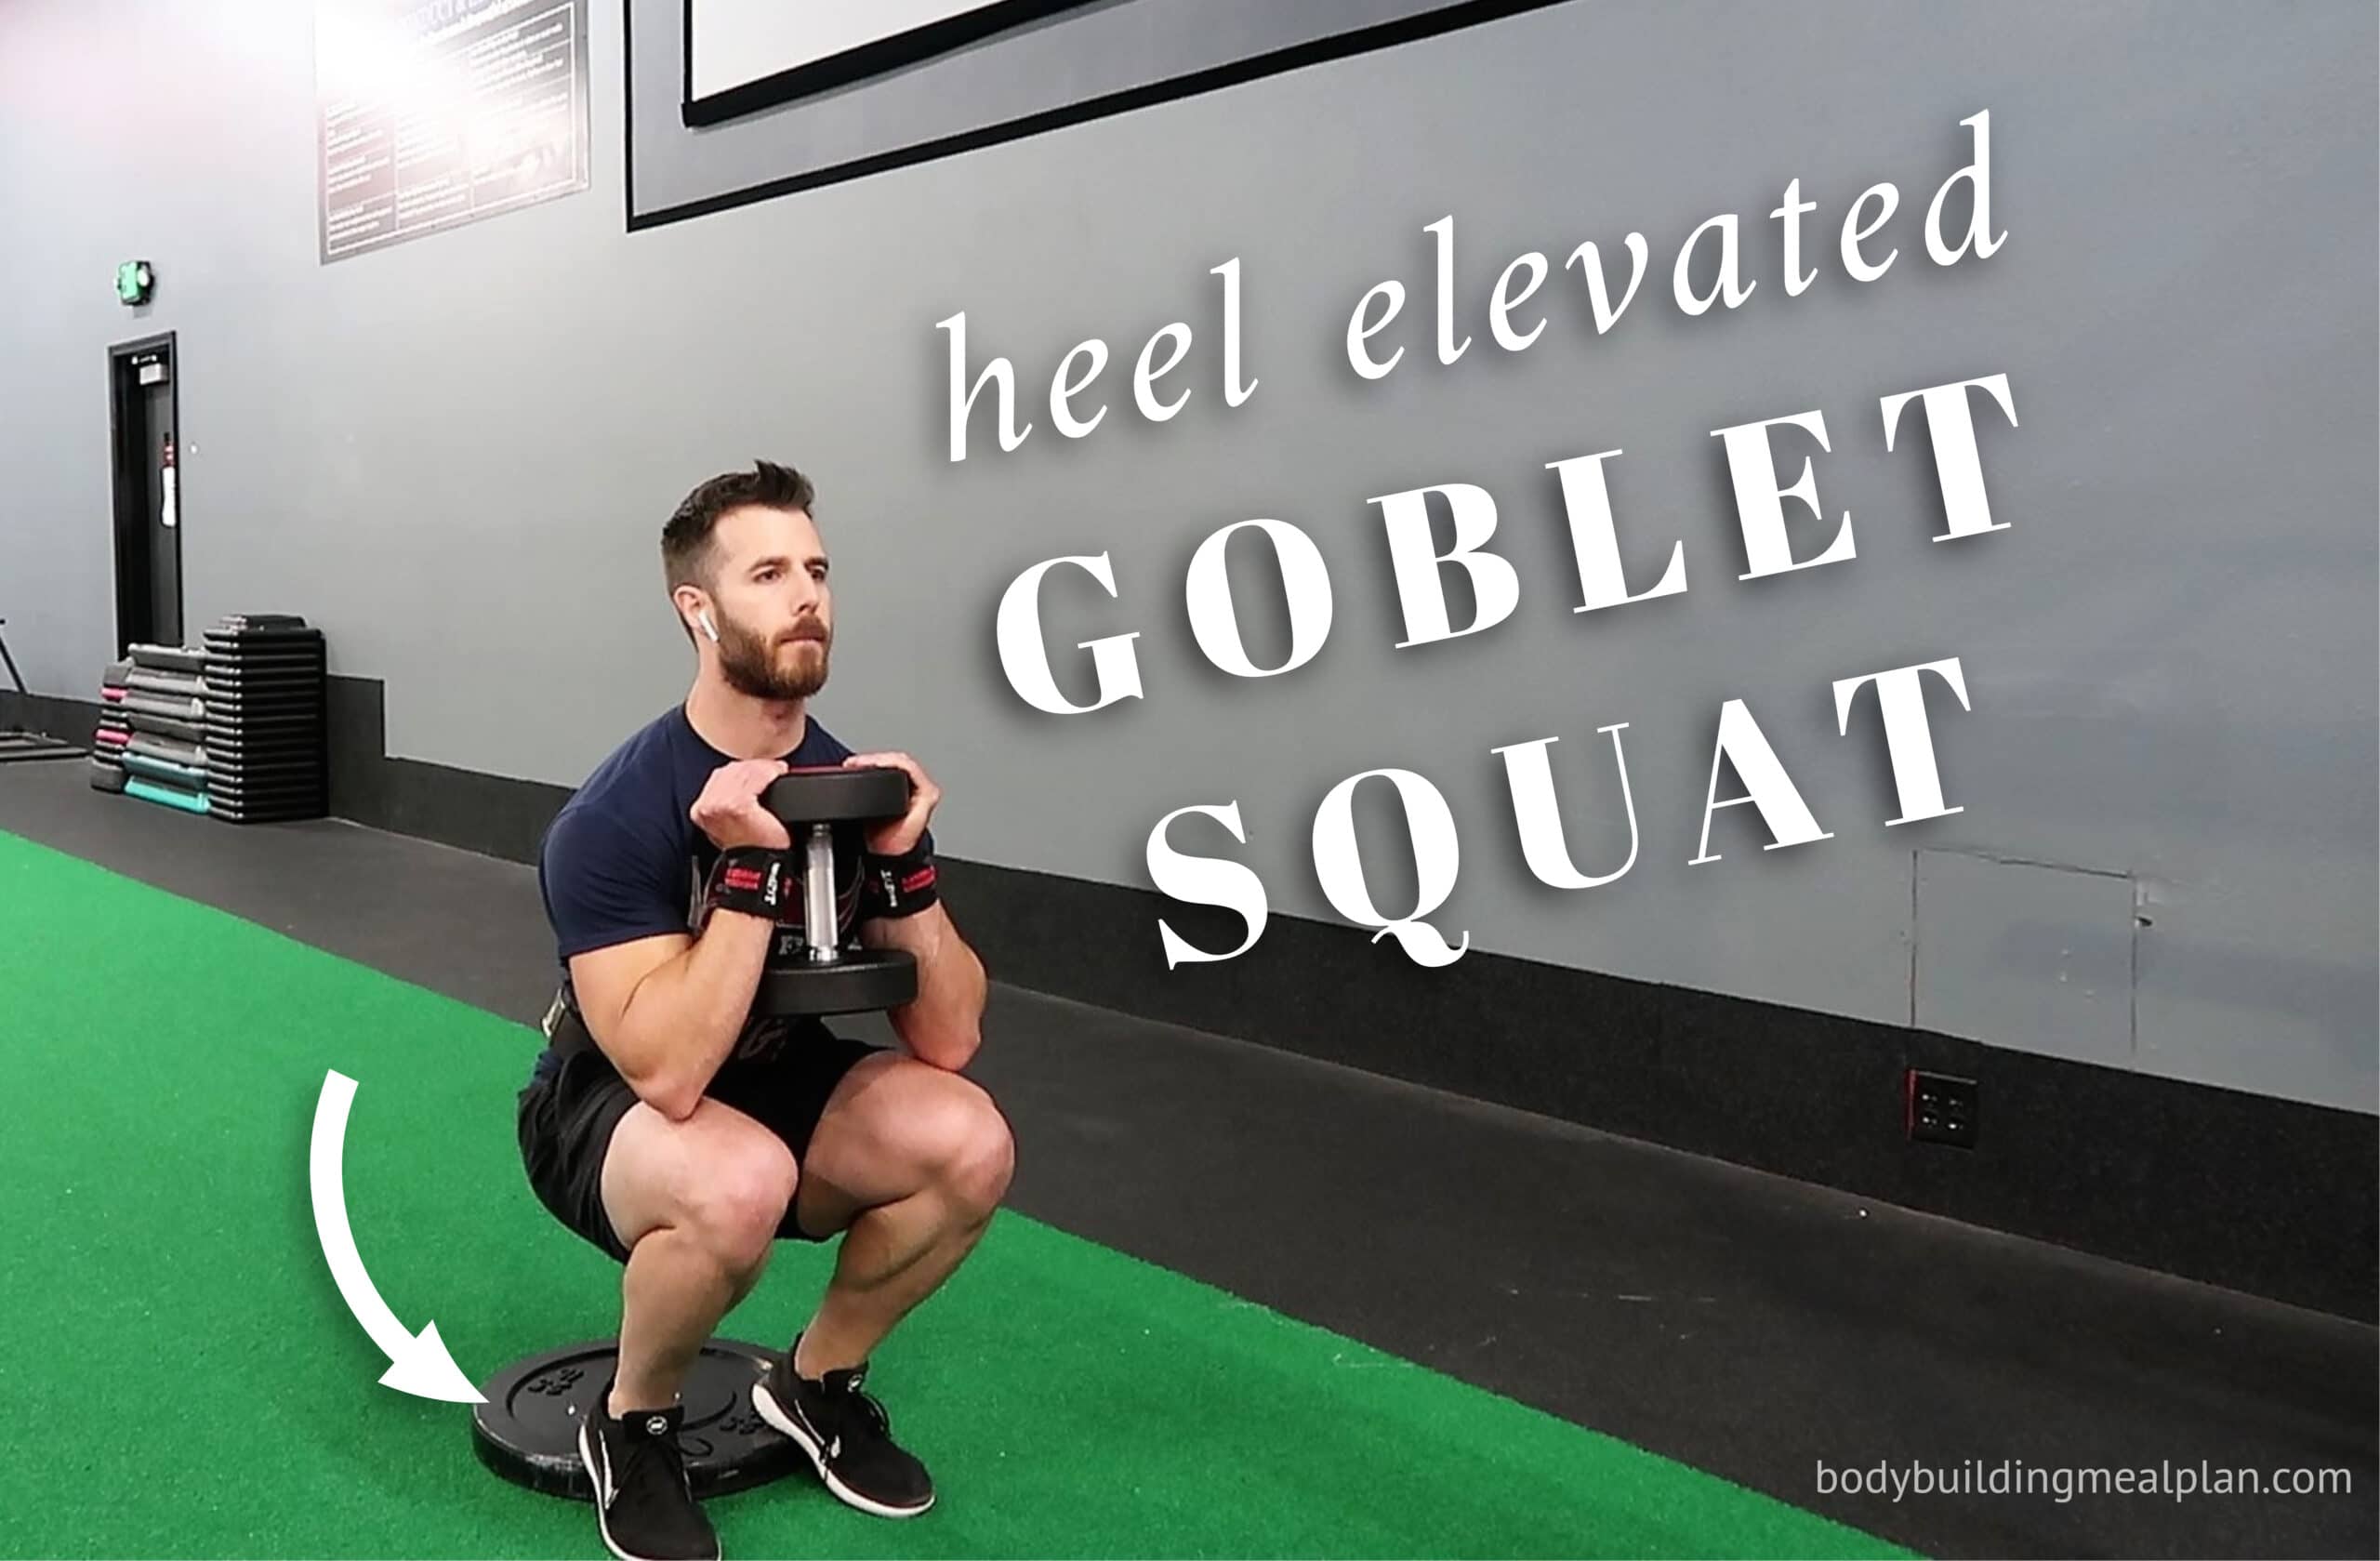
If you're looking for a full-body workout, then elevated goblet squats are one of the best exercises to add to your routine. Not only do they work your legs, but they also target your core and upper body, making them a great all-around exercise.
What are Elevated Goblet Squats?

Elevated goblet squats are a variation of the traditional goblet squat. Instead of standing on the ground, you stand on an elevated surface, such as a bench or a box. This extra height increases the range of motion, making the exercise more challenging and effective.
What Muscles Do Elevated Goblet Squats Work?

Elevated goblet squats work a variety of muscles in your body. They primarily target your quads, glutes, and hamstrings, which are the muscles in your legs. However, they also work your core, back, and shoulders, as you need to maintain good posture and balance throughout the exercise.
Benefits of Elevated Goblet Squats
There are several benefits to adding elevated goblet squats to your workout routine:
- Increased lower body strength
- Improved balance and stability
- Increased range of motion
- Better posture and alignment
- Engages multiple muscle groups at once
How to Perform Elevated Goblet Squats

Here are the steps to perform elevated goblet squats:
- Choose an elevated surface, such as a bench or a box, that is sturdy and secure.
- Hold a weight, such as a dumbbell or a kettlebell, in front of your chest with your elbows bent.
- Place one foot on the elevated surface and step the other foot back so that you are in a lunge position.
- Lower your body down into a squat, keeping your weight in your front leg and your back foot on the ground.
- Pause at the bottom of the squat and then push back up to the starting position.
- Repeat for several reps on one side before switching to the other side.
Tips for Performing Elevated Goblet Squats

Here are some tips to help you perform elevated goblet squats correctly:
- Choose an appropriate weight that challenges you but still allows you to maintain good form.
- Make sure your front knee stays in line with your toes and does not go past them.
- Keep your core engaged and your back straight throughout the exercise.
- Use your glutes and quads to push yourself up to the starting position.
- Keep your weight evenly distributed between your front and back foot.
Conclusion
Elevated goblet squats are a great exercise to add to your workout routine. They work multiple muscle groups at once, which makes them an efficient and effective exercise. By following the tips above, you can perform elevated goblet squats correctly and safely.
Related video of What Do Elevated Goblet Squats Work?

Are you looking for an exercise that can help you strengthen your glutes, hamstrings, and lower back muscles? Look no further than the banded quadruped hip extension. This exercise is simple, effective, and can be done anywhere with a resistance band. In this article, we'll explore the benefits of banded quadruped hip extension, how to perform it correctly, and some variations you can try.
Benefits of Banded Quadruped Hip Extension

Banded quadruped hip extension is a great exercise for strengthening your posterior chain, which includes your glutes, hamstrings, and lower back muscles. By targeting these muscles, you can improve your overall strength and stability, reduce your risk of injury, and even enhance your athletic performance. Additionally, this exercise can help you improve your posture, which can reduce your risk of developing back pain and other postural issues.
How to Perform Banded Quadruped Hip Extension

To perform banded quadruped hip extension, you'll need a resistance band and a mat or a soft surface to kneel on. Here are the steps:
- Begin on all fours with your hands directly under your shoulders and your knees directly under your hips.
- Loop the resistance band around your right foot, and hold onto the ends of the band with your hands.
- Engage your core and glutes, and slowly extend your right leg back behind you, keeping it straight.
- Pause briefly at the top of the movement, then slowly lower your leg back down to the starting position.
- Repeat for 10-15 repetitions, then switch to your left leg.
It's important to maintain proper form throughout the exercise. Keep your core engaged, your back flat, and your neck neutral. Avoid arching your back or letting your hips sag.
Variations of Banded Quadruped Hip Extension

Once you've mastered the basic banded quadruped hip extension, you can try some variations to challenge your muscles in different ways. Here are a few ideas:
- Banded quadruped hip extension with pulses: Instead of lowering your leg all the way back down to the starting position, pulse it a few inches off the ground before beginning the next repetition.
- Banded quadruped hip extension with abduction: As you extend your leg back behind you, lift it out to the side slightly to engage your outer glutes.
- Banded quadruped hip extension with knee flexion: As you extend your leg back behind you, bend your knee to engage your hamstrings.
Conclusion
Banded quadruped hip extension is a simple yet effective exercise for strengthening your glutes, hamstrings, and lower back muscles. By adding this exercise to your workout routine, you can improve your overall strength and stability, reduce your risk of injury, and even enhance your athletic performance. Remember to maintain proper form and try some variations to keep your muscles challenged.
Related video of Banded Quadruped Hip Extension: Benefits, Technique, and Variations

An inchworm is a caterpillar that belongs to the family Geometridae, which is known for its unique way of moving. The name inchworm comes from the way the caterpillar moves, which is by contracting and extending its body in a looping motion, making it appear like it is measuring an inch at a time. This motion is also called "looping movement" or "spanning gait."
Life Cycle of an Inchworm

An inchworm undergoes four stages of metamorphosis: egg, larva, pupa, and adult. The female lays her eggs on the underside of leaves, and the eggs hatch into larvae, which are the inchworms. The larvae feed on the leaves of plants and trees and grow into pupae, where they undergo metamorphosis into adults. The adult inchworms are moths, and they mate and lay eggs to start the life cycle all over again.
Types of Inchworms

There are various types of inchworms, and they come in different colors and sizes. Some of the common types of inchworms include the Green Geometer, the Small Engrailed, the Mottled Umber, and the Winter Moth. The Green Geometer is one of the most common types of inchworms and is found in North America. It is green in color and feeds on the leaves of trees.
What Do Inchworms Eat?

Inchworms eat the leaves of plants and trees. They are herbivores and feed on a wide range of plants, including apple trees, oak trees, maple trees, and many more. The inchworms use their mandibles to chew the leaves and consume as much as they can to grow and develop into their next stage of life.
Are Inchworms Harmful?

Inchworms are not harmful to humans, and they do not pose any significant threat to plants or trees. However, they can be harmful to crops and gardens if their population is not controlled. Large populations of inchworms can defoliate trees and plants, causing significant damage to crops and vegetation. Farmers and gardeners often use pesticides and other methods to control the population of inchworms.
Interesting Facts About Inchworms

Here are some interesting facts about inchworms:
- Inchworms are also called "measuring worms" because of the way they move.
- Inchworms have a unique defense mechanism where they drop from a tree and suspend themselves on a silk thread to escape predators.
- Inchworms can regenerate their legs if they lose them.
- The silk produced by inchworms is not as strong as the silk produced by spiders.
- Inchworms are an important food source for birds and other animals.
Conclusion
Inchworms are fascinating creatures that play an essential role in the ecosystem. They are harmless to humans but can be harmful to crops and gardens if their population is not controlled. Understanding the life cycle and habits of inchworms can help farmers and gardeners protect their crops and vegetation.