
The hip flexors are a group of muscles that play an important role in the movement of the lower body. These muscles are responsible for the movement of the hips, thighs, and knees. Tight hip flexors can lead to various problems such as lower back pain, poor posture, and reduced mobility. One of the best ways to stretch the hip flexors is through the lunge stretch. In this article, we will discuss the lunge stretch for hip flexors, its benefits, and how to perform it correctly.
Benefits of Lunge Stretch For Hip Flexors
:max_bytes(150000):strip_icc()/Verywell-02-3567179-Lunge02-046-ed5aa2fd6652460aa2d534076d66f9dc.jpg)
The lunge stretch is an effective exercise for stretching the hip flexors. Here are some of the benefits of the lunge stretch for hip flexors:
- Reduces hip flexor tightness.
- Relieves lower back pain.
- Improves posture.
- Increases flexibility and range of motion in the hips.
- Enhances athletic performance.
How To Perform Lunge Stretch For Hip Flexors
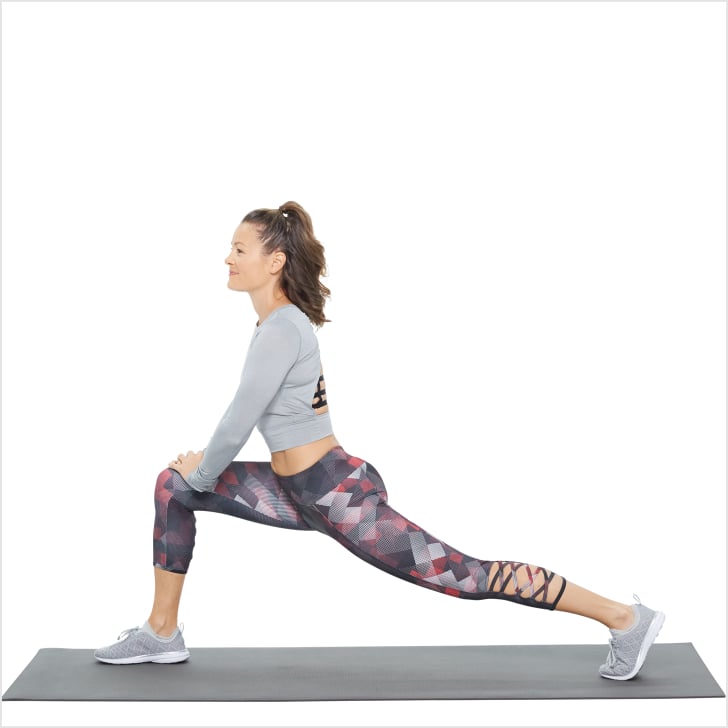
To perform the lunge stretch for hip flexors, follow these steps:
- Begin in a kneeling position on the ground with your hands on your hips.
- Step your right foot forward and place it flat on the ground.
- Bend your right knee and shift your weight forward, keeping your left knee on the ground.
- Keep your chest up and your back straight.
- Hold the stretch for 30 seconds.
- Repeat on the other side.
Tips For Performing Lunge Stretch For Hip Flexors
Here are some tips for performing the lunge stretch for hip flexors:
- Keep your front knee directly above your ankle.
- Keep your back knee on the ground.
- Engage your core to maintain proper form.
- Breathe deeply throughout the stretch.
- Do not force the stretch beyond your comfort level.
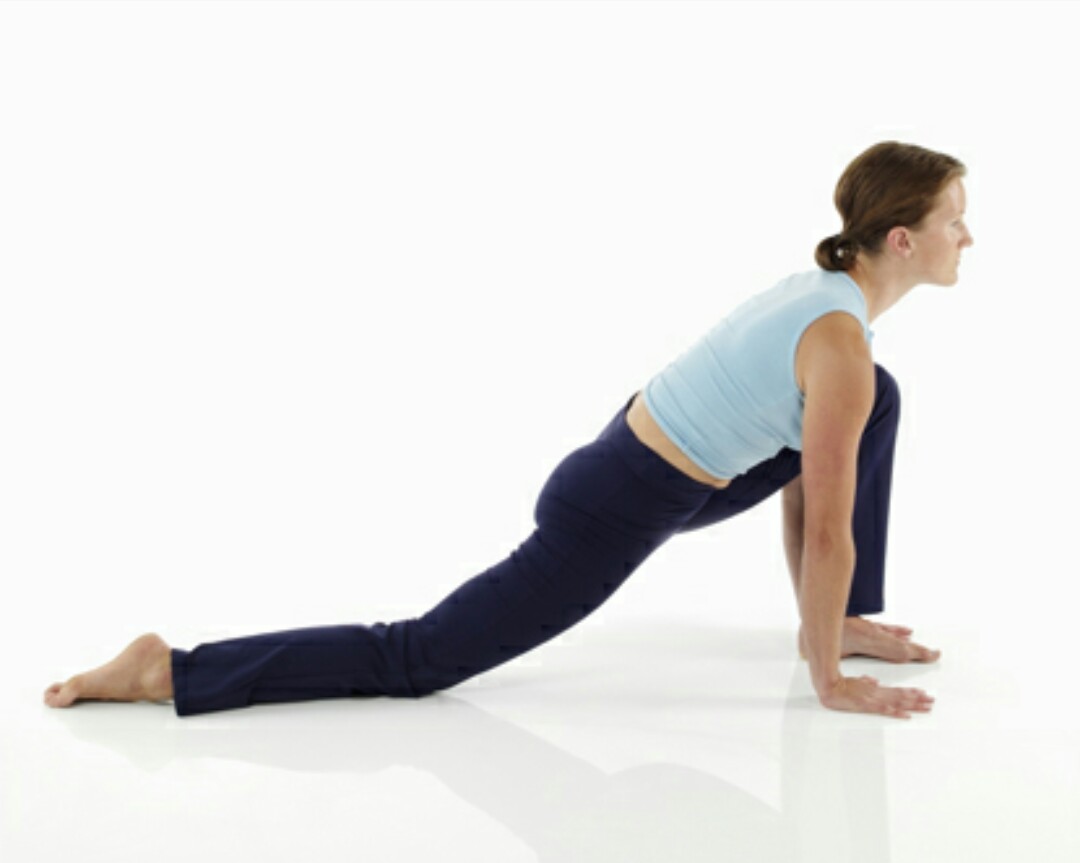
When To Perform Lunge Stretch For Hip Flexors
:max_bytes(150000):strip_icc()/standinglungestretch-d85003f162a9407e8112b91de42bf022.jpg)
The lunge stretch for hip flexors can be performed as part of your warm-up or cool-down routine. It can also be done on its own as a standalone stretch. Incorporate this stretch into your daily routine to improve hip flexor flexibility and prevent tightness.
Conclusion
The lunge stretch for hip flexors is a simple yet effective exercise that can help improve hip flexor flexibility and prevent tightness. It can also help relieve lower back pain and improve posture. Incorporate this stretch into your daily routine to reap its benefits.
Related video of Lunge Stretch For Hip Flexors

Flat Straight Leg Raise is a low-impact exercise that targets the hip flexors, lower abdominal muscles, and quadriceps. It is an excellent workout for people who want to improve their core strength, balance, and flexibility. Unlike other exercises that require gym equipment, you can do this exercise at home without any equipment.
Benefits of Flat Straight Leg Raise

The Flat Straight Leg Raise is a simple yet effective exercise that offers numerous benefits, including:
- Strengthening the hip flexors, quadriceps, and lower abdominal muscles
- Improving balance and stability
- Increasing flexibility in the hips and lower back
- Reducing the risk of lower back pain and injuries
- Enhancing sports performance and daily activities
How to Do Flat Straight Leg Raise

Follow these simple steps to perform the Flat Straight Leg Raise:
- Lie on your back with your legs straight and your arms at your sides.
- Tighten your abdominal muscles and press your lower back into the floor.
- Squeeze your glutes and lift your legs a few inches off the floor.
- Hold this position for a few seconds and then lower your legs back to the starting position.
- Repeat this exercise for 10-15 repetitions.
Tips for Doing Flat Straight Leg Raise

Here are some tips to help you perform the Flat Straight Leg Raise safely and effectively:
- Keep your legs straight and your toes pointed towards the ceiling throughout the exercise.
- Avoid lifting your legs too high, as this can strain your lower back.
- Breathe naturally and avoid holding your breath.
- Engage your core muscles to stabilize your lower back.
- Start with a few repetitions and gradually increase the number as you get stronger.
Modifications for Flat Straight Leg Raise

If you find the Flat Straight Leg Raise too challenging, you can modify the exercise by doing the following:
- Bend your knees slightly to reduce the strain on your lower back.
- Place your hands under your hips for support.
- Lower one leg at a time instead of lifting both legs together.
Precautions for Flat Straight Leg Raise

While the Flat Straight Leg Raise is a safe exercise for most people, it may not be suitable for those with certain conditions, such as:
- Lower back pain or injuries
- Abdominal hernia
- Pregnancy
- Recent surgery or injury to the hips, knees or ankles
If you have any of these conditions, consult your healthcare provider before attempting this exercise.
Conclusion
The Flat Straight Leg Raise is a simple yet effective exercise that can help you improve your core strength, balance, and flexibility. By following the tips and modifications mentioned in this article, you can perform this exercise safely and effectively. However, if you have any concerns or medical conditions, consult your healthcare provider before attempting this exercise.
Related video of Flat Straight Leg Raise: Benefits, How to Do It, and More
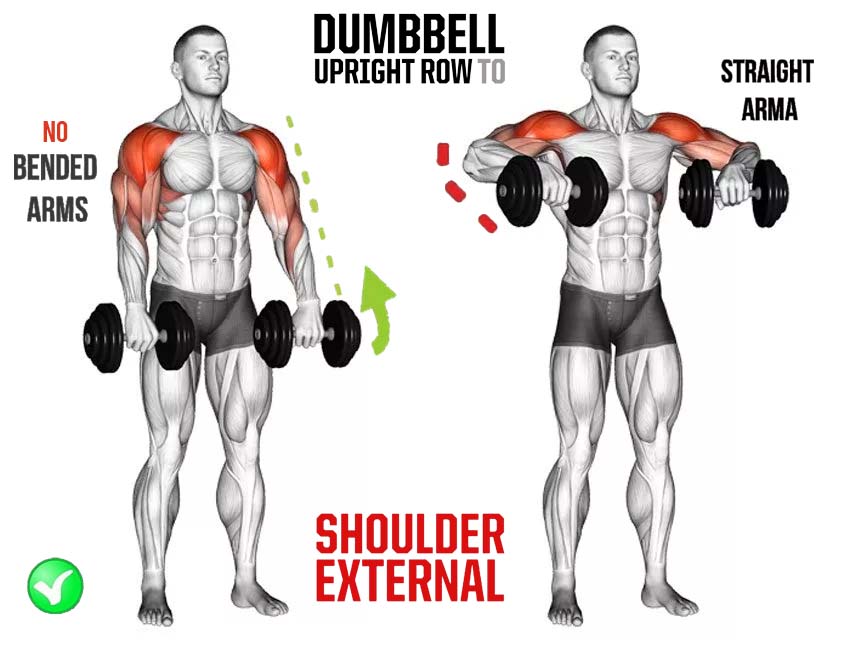
Upright dumbbell row is one of the most effective shoulder exercises that you can do. This exercise targets the muscles in your shoulder and upper back, helping you to build strength and improve your posture. The upright dumbbell row is a great way to work the muscles that are responsible for lifting and rotating your shoulder blade. This exercise is also a great way to work your traps, as well as your deltoids.
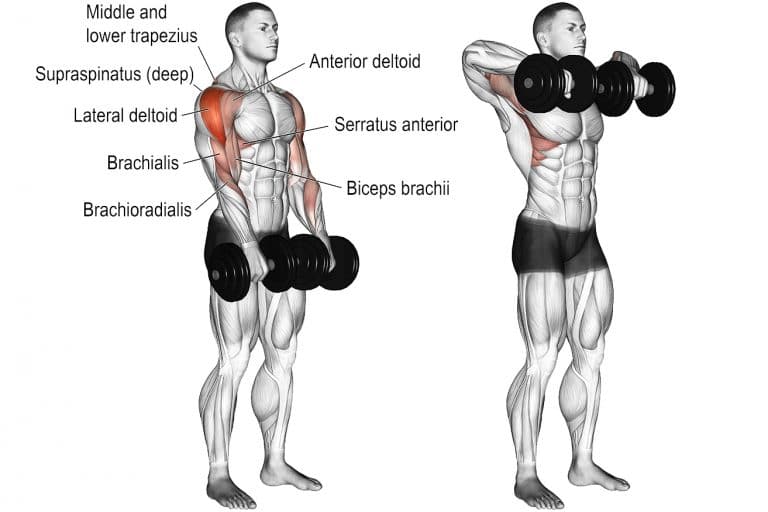
Shoulder Muscles Worked
The primary muscles worked during the upright dumbbell row are the deltoids, which are located on the top of your shoulder. These muscles are responsible for lifting your arms up and out to the sides. The deltoids are divided into three sections: the anterior deltoid, the medial deltoid, and the posterior deltoid. The anterior deltoid is responsible for lifting your arms up and out to the front, while the medial deltoid is responsible for lifting your arms out to the sides. The posterior deltoid is responsible for pulling your arms back.
In addition to the deltoids, the upright dumbbell row also works your trapezius muscles, which are located on your upper back. These muscles are responsible for rotating and pulling your shoulder blades back.
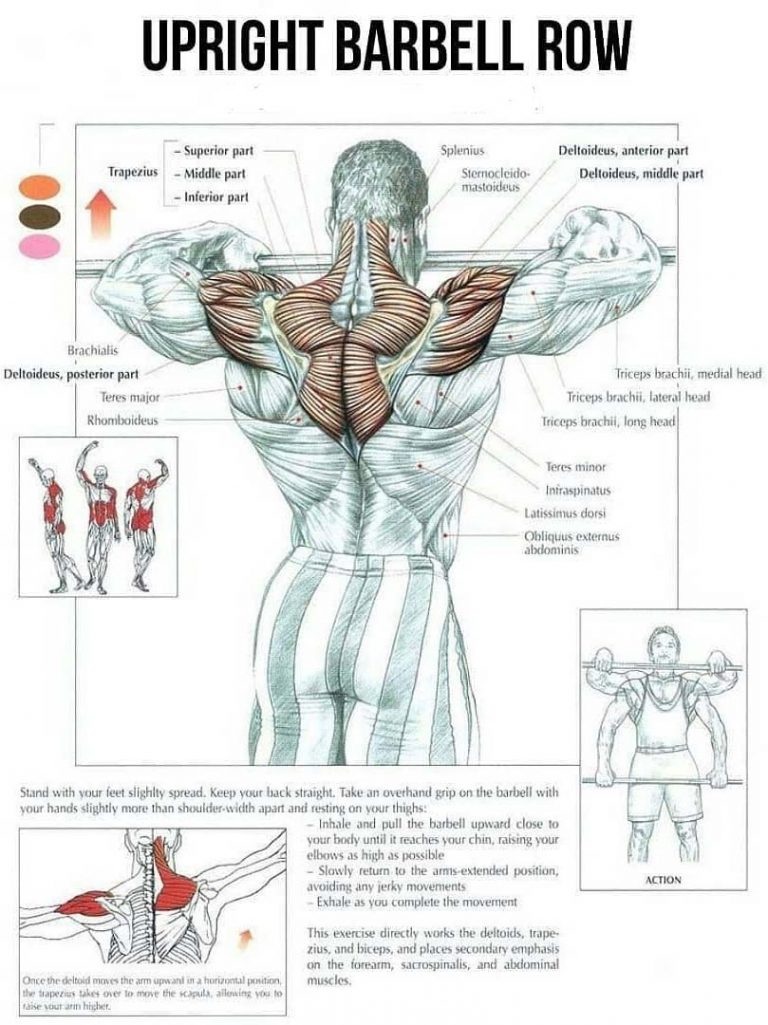
Trapezius Muscles Worked
There are three parts to the trapezius muscles: the upper, middle, and lower trapezius. The upper trapezius is responsible for lifting your shoulders up, while the middle trapezius is responsible for pulling your shoulder blades back. The lower trapezius is responsible for pulling your shoulder blades down and in towards your spine. All three of these muscles are worked during the upright dumbbell row.
How to Do Upright Dumbbell Row
To perform an upright dumbbell row, stand up straight with your feet shoulder-width apart. Hold a dumbbell in each hand with your palms facing your body. Lift the dumbbells up towards your shoulders, keeping your elbows close to your body. Pause at the top of the movement and then slowly lower the dumbbells back down to the starting position. Repeat for a desired number of repetitions.
Tips for Doing Upright Dumbbell Row
Here are some tips to help you get the most out of your upright dumbbell row:
- Keep your elbows close to your body throughout the movement.
- Use a weight that allows you to complete the desired number of repetitions with good form.
- Focus on squeezing your shoulder blades together at the top of the movement.
- Avoid arching your back or leaning forward during the exercise.
Conclusion
The upright dumbbell row is a highly effective exercise for working your shoulder and upper back muscles. By incorporating this exercise into your workout routine, you can improve your posture, build strength, and reduce your risk of injury. Remember to use proper form and start with a weight that is appropriate for your fitness level.
Related video of Upright Dumbbell Row Muscles Worked

The dumbbell bench press is a popular exercise among gym-goers, and for good reason. It is a compound exercise that targets multiple muscle groups, including the chest, triceps, and shoulders. However, to get the most out of this exercise, it is important to use proper form and technique. One variation of the dumbbell bench press is the neutral grip, which can provide unique benefits for your upper body strength and overall fitness.
What is the Db Bench Press Neutral Grip?

The db bench press neutral grip is performed by lying down on a bench with a pair of dumbbells in your hands. Instead of using a traditional grip, where your palms face forward, you will grip the dumbbells with your palms facing each other. This grip variation is often used to reduce strain on the shoulders and wrists, making it a great option for those with pre-existing injuries or discomfort.
Benefits of Db Bench Press Neutral Grip

Using a neutral grip in the db bench press can provide unique benefits for your upper body strength and overall fitness. Here are some benefits:
- Reduced strain on the wrists and shoulders
- Increased activation of the chest muscles
- Improved stability and balance during the exercise
- Strengthening of the triceps and shoulder muscles
- Variation in your workout routine
How to Perform Db Bench Press Neutral Grip
To perform the db bench press neutral grip, follow these steps:
- Lie down on a bench with your back flat against the bench and your feet flat on the floor.
- Hold a pair of dumbbells with your palms facing each other and your elbows bent at a 90-degree angle.
- Press the dumbbells up towards the ceiling, extending your arms fully.
- Lower the dumbbells back down to your chest, keeping your elbows close to your body.
- Repeat for the desired number of repetitions.
Tips for Proper Form

Using proper form is essential for getting the most out of the db bench press neutral grip. Here are some tips to keep in mind:
- Keep your back flat against the bench throughout the exercise.
- Breathe in as you lower the dumbbells and breathe out as you press them up.
- Keep your elbows close to your body to engage your chest muscles.
- Use a weight that is challenging but manageable for your fitness level.
- Perform the exercise in a slow and controlled manner.
Precautions and Modifications

As with any exercise, it is important to take precautions and make modifications as needed. Here are some things to keep in mind:
- If you have pre-existing shoulder or wrist injuries, consult with a doctor or physical therapist before attempting this exercise.
- If you are new to this exercise, start with a lighter weight and gradually increase as you become more comfortable.
- If you don't have access to a bench, you can perform this exercise on the floor or on a stability ball.
- If you want to target your triceps more, you can perform the exercise with your arms closer to your body.
Conclusion
The db bench press neutral grip is a great exercise for improving your upper body strength and overall fitness. By using proper form and technique, you can reduce strain on your shoulders and wrists while increasing activation of your chest muscles. Remember to start with a weight that is appropriate for your fitness level, and make modifications as needed to ensure a safe and effective workout.
Related video of Db Bench Press Neutral Grip: A Guide to Proper Form and Benefits
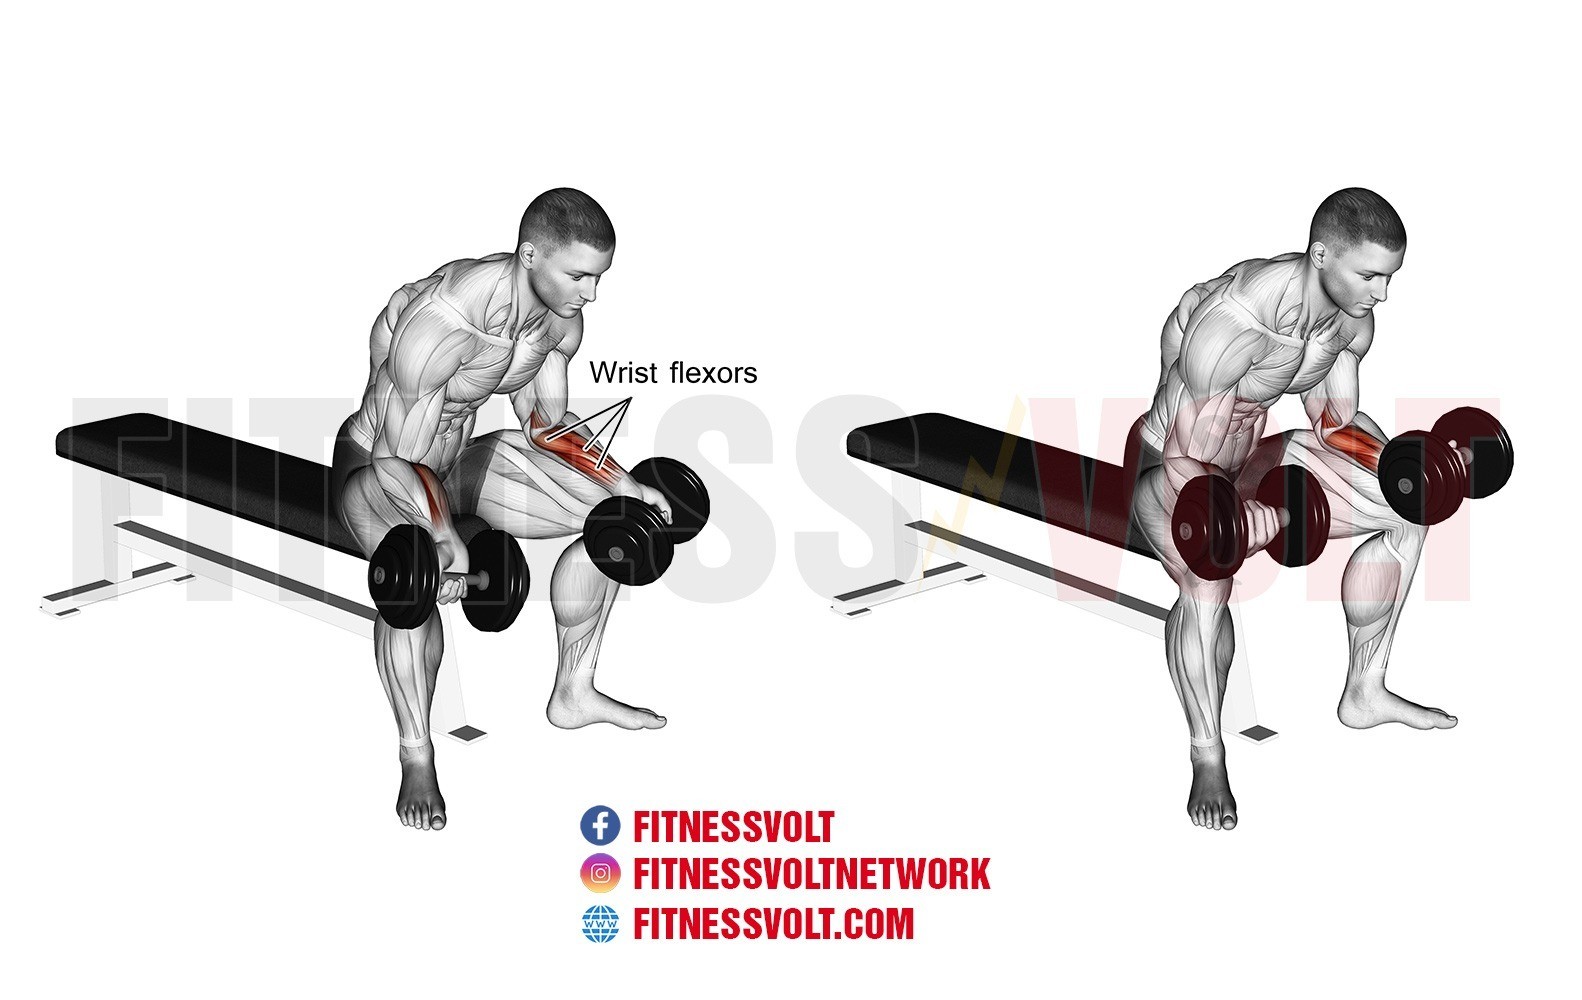
If you're looking to build up your forearms, wrist curls are an effective exercise to include in your workout routine. This exercise targets the muscles in your forearms, including the wrist flexors and extensors, which are responsible for bending and extending your wrists.
What Are Wrist Curls?
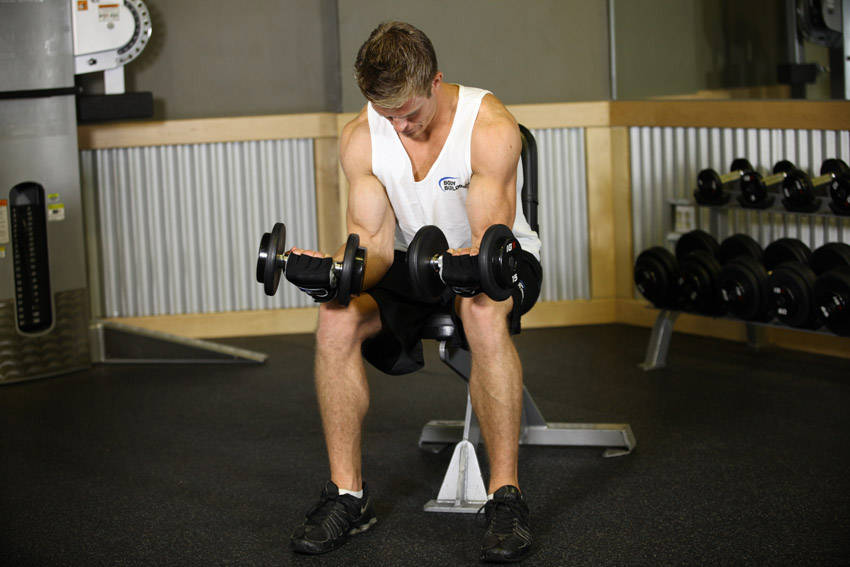
Wrist curls are a strength training exercise that involve holding a weight in your hand and curling your wrist up and down. This exercise can be performed with a dumbbell, barbell, or cable machine.
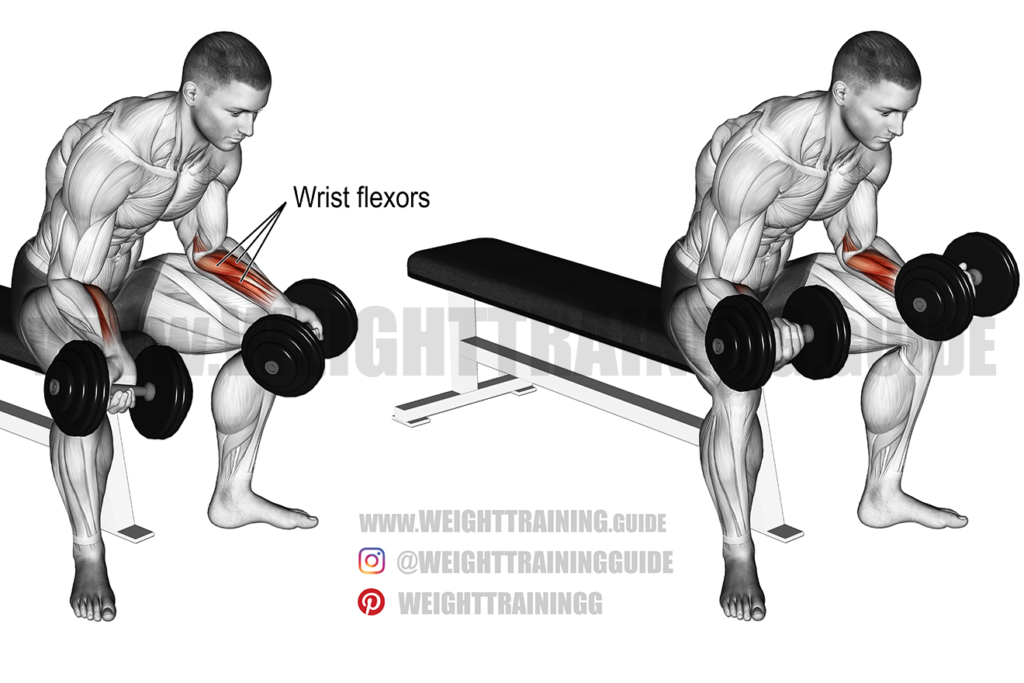
To perform a wrist curl with a dumbbell, sit on a bench with your forearm resting on the bench and your wrist hanging over the edge. Hold a dumbbell in your hand with your palm facing up, and slowly curl your wrist up towards your forearm. Pause at the top of the movement, then slowly lower the weight back down to the starting position.
What Muscles Do Wrist Curls Work?

Wrist curls primarily work the muscles in your forearms, including the wrist flexors and extensors. These muscles are responsible for bending and extending your wrists, and are often used in gripping and holding exercises.
By performing wrist curls, you can strengthen these muscles and improve your grip strength, which can be beneficial in sports that involve gripping, such as tennis, golf, and weightlifting.
Benefits of Wrist Curls

Wrist curls offer a number of benefits, including:
- Improved grip strength
- Stronger forearms
- Better wrist stability
- Reduced risk of wrist injuries
By strengthening the muscles in your forearms and wrists, you can improve your overall upper body strength and reduce your risk of injury during physical activity.
Variations of Wrist Curls

There are several variations of wrist curls that you can try to target different areas of your forearms:
- Reverse Wrist Curls: This variation targets the wrist extensors, or the muscles on the back of your forearm. To perform reverse wrist curls, hold a dumbbell in your hand with your palm facing down, and curl your wrist up towards your forearm.
- Behind-The-Back Wrist Curls: This variation targets the wrist flexors and extensors, as well as the muscles in your upper back. To perform behind-the-back wrist curls, stand with your arms behind your back and hold a dumbbell in each hand. Slowly curl your wrists up towards your shoulders.
- Barbell Wrist Curls: This variation can be performed with a barbell or EZ bar. Hold the bar with an underhand grip, and curl your wrists up towards your forearms.
Tips for Performing Wrist Curls
When performing wrist curls, it's important to use proper form to avoid injury and maximize the benefits of the exercise:
- Start with a light weight and gradually increase the weight as you get stronger.
- Keep your elbow and forearm stable throughout the movement.
- Avoid using momentum to lift the weight - focus on using your forearm muscles.
- Perform wrist curls slowly and with control.
- Don't overdo it - perform wrist curls 2-3 times per week to allow your muscles to rest and recover.
Conclusion
Wrist curls are an effective exercise for building forearm strength and improving grip strength. By targeting the muscles in your forearms, wrist curls can help you perform better in sports that involve gripping and reduce your risk of injury during physical activity.

Related video of What Do Wrist Curls Work?

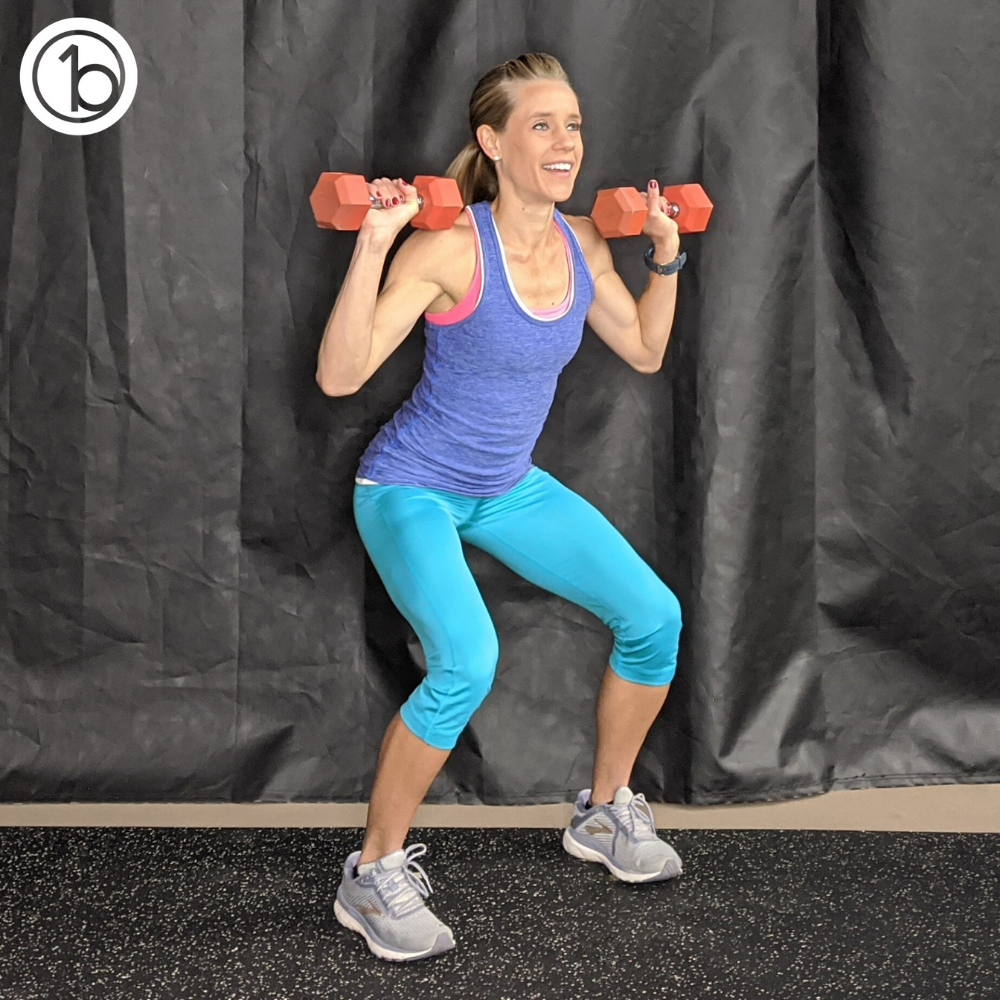
If you're looking for a workout that targets multiple muscle groups at once, look no further than the squat with overhead press. This exercise combines two of the most effective movements in fitness to give you a full-body workout that will leave you feeling strong and energized.
What is the Squat With Overhead Press?
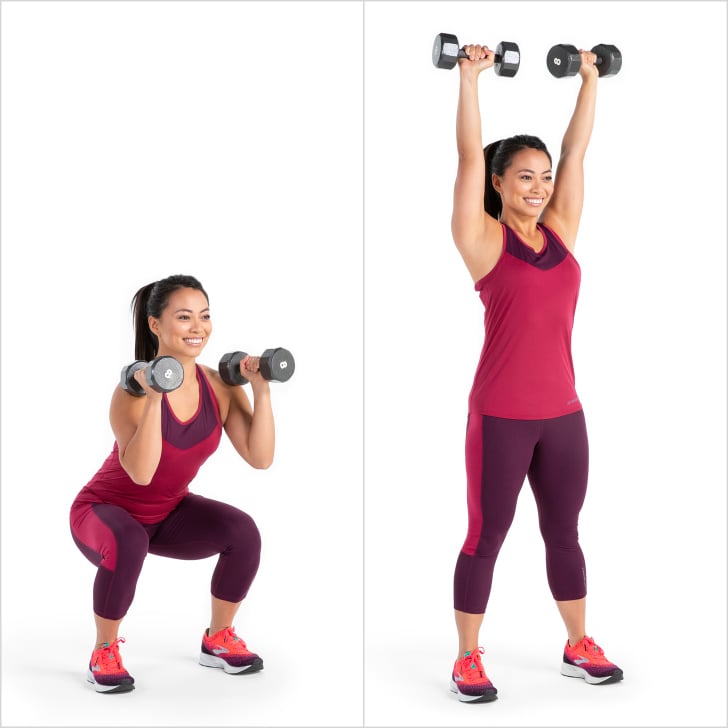
The squat with overhead press is a compound exercise that combines a squat with an overhead press. It's often done with dumbbells or a barbell, and it involves squatting down while holding the weight at shoulder height, and then standing up and pressing the weight overhead.
What Muscles Does the Squat With Overhead Press Work?

The squat with overhead press is a full-body exercise that works your legs, glutes, core, back, shoulders, and arms. It's a great way to target multiple muscle groups at once and burn more calories than isolation exercises.
How to Do the Squat With Overhead Press

To do the squat with overhead press, follow these steps:
- Stand with your feet shoulder-width apart and hold a dumbbell or barbell at shoulder height.
- Squat down as if you're sitting in a chair, keeping your weight in your heels and your chest up.
- As you stand up, press the weight overhead, keeping your core engaged and your arms straight.
- Lower the weight back to shoulder height and repeat for the desired number of reps.
Benefits of the Squat With Overhead Press

The squat with overhead press has many benefits, including:
- Targets multiple muscle groups at once
- Increases strength and muscle mass
- Burns more calories than isolation exercises
- Improves balance and coordination
- Increases cardiovascular endurance
Variations of the Squat With Overhead Press

If you're looking to switch up your workout routine, try these variations of the squat with overhead press:
- Single-leg squat with overhead press
- Sumo squat with overhead press
- Reverse lunge with overhead press
- Split squat with overhead press
- Side lunge with overhead press
Precautions When Doing the Squat With Overhead Press
While the squat with overhead press is a safe and effective exercise, there are a few precautions you should take:
- Start with a light weight and gradually increase as you get stronger
- Keep your core engaged and your back straight to avoid injury
- Avoid locking your knees or hyperextending your back
- If you have any injuries or medical conditions, consult with your doctor before doing this exercise
Conclusion
The squat with overhead press is a versatile and effective exercise that targets multiple muscle groups at once. It's a great way to increase strength, muscle mass, and cardiovascular endurance, while burning more calories than isolation exercises. With proper form and precautions, this exercise can be safely performed by people of all fitness levels.
Related video of Squat With Overhead Press: The Ultimate Full-Body Workout

Introduction
Straight bar triceps extension is a simple yet highly effective exercise that targets the triceps muscles in the arms. It is a great exercise for beginners who are looking to tone their arms and build some muscle mass. In this article, we will discuss everything you need to know about straight bar triceps extension, including its benefits, how to perform it correctly, and some common mistakes to avoid.
Benefits of Straight Bar Triceps Extension

Straight bar triceps extension is a compound exercise that engages multiple muscle groups in the arms, including the triceps, biceps, and forearms. Some of the key benefits of this exercise are:
- Increased strength and muscle mass in the triceps
- Improved arm definition and tone
- Better overall upper body strength and stability
- Reduced risk of injury in the arms and shoulders
How to Perform Straight Bar Triceps Extension

To perform straight bar triceps extension, you will need a straight bar and a weight bench. Follow these steps to perform the exercise correctly:
- Lie on a weight bench with your feet firmly planted on the floor and your back and head resting comfortably on the bench.
- Hold the straight bar with an overhand grip, with your hands slightly wider than shoulder-width apart.
- Extend your arms straight up towards the ceiling, with the bar directly above your chest.
- Bend your elbows and lower the bar down towards your forehead, keeping your upper arms stationary and close to your head.
- Pause briefly at the bottom of the movement, then extend your arms back up to the starting position.
- Repeat for the desired number of reps.
Common Mistakes to Avoid

Straight bar triceps extension is a relatively simple exercise, but there are a few common mistakes that beginners should avoid to ensure they are getting the most out of the exercise:
- Using too much weight: It is important to start with a light weight and gradually increase the weight as you become stronger.
- Flaring your elbows: Keep your elbows close to your head throughout the movement to engage your triceps effectively.
- Lowering the bar too far: Lower the bar until it is just above your forehead, but not so low that it puts unnecessary strain on your neck and shoulders.
- Using momentum: Focus on using your triceps muscles to lift and lower the bar, rather than swinging the weight with momentum.
Variations of Straight Bar Triceps Extension

There are several variations of straight bar triceps extension that you can try to add variety to your workout and target your triceps muscles from different angles. Some popular variations include:
- Close-grip straight bar triceps extension: Use a close grip on the bar to target the inner triceps muscles.
- Reverse-grip straight bar triceps extension: Use an underhand grip on the bar to target the outer triceps muscles.
- Single-arm straight bar triceps extension: Hold the bar with one hand and perform the exercise one arm at a time to isolate each triceps muscle individually.
Conclusion
Straight bar triceps extension is a simple and effective exercise that can help beginners build strength and muscle mass in their triceps muscles. By following the correct form and avoiding common mistakes, you can maximize the benefits of this exercise and achieve your fitness goals. Try incorporating straight bar triceps extension into your workout routine and see the results for yourself!
Related video of Straight Bar Triceps Extension: A Comprehensive Guide for Beginners
Incorporating the clamshell exercise into your workout routine can be a great way to target and strengthen specific muscle groups in your body. This exercise primarily works the muscles in your hips and glutes, making it an ideal addition to any lower body workout. In this article, we will explore the benefits of the clamshell exercise and the muscles it targets.
What is the Clamshell Exercise?

The clamshell exercise is a simple, yet effective movement that targets the muscles in your hips and glutes. To perform the exercise, you will need to lie on your side with your legs bent at a 90-degree angle. Your feet should be stacked on top of each other, and your knees should be in line with your hips.
Next, lift your top knee while keeping your feet together. Make sure to engage your glutes and keep your core tight throughout the movement. Lower your knee back down to the starting position, and repeat for several reps before switching sides.
Muscles Worked

The clamshell exercise primarily targets the muscles in your hips and glutes. Specifically, it works the gluteus medius and minimus, which are important muscles responsible for stabilizing the hip joint and supporting your pelvis and spine.
These muscles are often neglected in traditional lower body exercises, which can lead to imbalances in your body and potentially cause injuries. Incorporating the clamshell exercise into your workout routine can help to strengthen these muscles and reduce your risk of injury.
Benefits of the Clamshell Exercise

In addition to targeting specific muscle groups, the clamshell exercise offers a range of benefits for your body. Some of these benefits include:
- Improved hip stability
- Reduced risk of injury
- Increased glute strength
- Better posture
- Improved athletic performance
By incorporating the clamshell exercise into your workout routine, you can experience these benefits and improve your overall fitness and well-being.
Variations of the Clamshell Exercise

There are several variations of the clamshell exercise that you can incorporate into your workout routine. These include:
- Side Plank Clamshell
- Weighted Clamshell
- Banded Clamshell
- Single Leg Clamshell
Each of these variations targets the same muscle groups as the traditional clamshell exercise, but with added challenges and benefits. Try incorporating these variations into your workout routine to mix things up and challenge your body.
Incorporating the Clamshell Exercise into Your Workout Routine

If you're looking to incorporate the clamshell exercise into your workout routine, there are several ways to do so. You can perform the exercise as a standalone movement, or incorporate it into a larger lower body workout.
To get started, try performing 2-3 sets of 10-15 reps on each side. As you become more comfortable with the movement, you can increase the number of reps and sets to challenge yourself further.
Conclusion
The clamshell exercise is a simple yet effective movement that targets the muscles in your hips and glutes. By incorporating this exercise into your workout routine, you can strengthen these muscles, improve your overall fitness, and reduce your risk of injury. Try incorporating the clamshell exercise and its variations into your workout routine to challenge your body and experience the benefits.
Related video of Clamshell Exercise Muscles Worked

The incline hammer strength machine is a popular piece of equipment found in most gyms. It is designed to work on your upper body, specifically your chest muscles. This machine provides a lot of benefits and is perfect for people who want to increase their chest strength and size. In this article, we will discuss the benefits of using the incline hammer strength machine and how to use it properly.
Benefits of Using the Incline Hammer Strength Machine

1. Targets Upper Chest Muscles: The incline hammer strength machine is designed to target the upper chest muscles, also known as the pectoralis major. This machine allows you to isolate the upper chest muscles, which helps in building strength and size.
2. Reduces Risk of Injury: Unlike free weights, using a machine like the incline hammer strength machine reduces the risk of injury. The machine stabilizes your movement, and you can adjust the seat and backrest to fit your body, ensuring proper form and reducing the risk of injury.
3. Provides More Control: The incline hammer strength machine provides more control over the movement. This machine allows you to adjust the weight and the seat, which ensures that you are doing the exercise properly and not overexerting yourself.
4. Easy to Use: The incline hammer strength machine is easy to use, and anyone can use it, regardless of their fitness level. The machine is designed in such a way that it provides maximum results with minimum effort.
How to Use the Incline Hammer Strength Machine

1. Adjust the Seat and Backrest: Before starting your workout, make sure to adjust the seat and backrest to fit your body. This will ensure proper form and reduce the risk of injury.
2. Warm-up: Always warm-up before starting your workout. This will help to prevent injury and prepare your muscles for the workout.
3. Choose the Right Weight: Choose a weight that is challenging but still manageable. Start with a lighter weight if you are a beginner and gradually increase the weight as you get stronger.
4. Position Yourself: Sit on the seat with your back against the backrest and your feet flat on the ground. Grip the handles with your palms facing down.
5. Start the Exercise: Push the handles away from your body, keeping your elbows slightly bent. Pause for a second when your arms are fully extended, then slowly bring the handles back to the starting position.
6. Repeat: Repeat the exercise for the desired number of repetitions.
Tips for Using the Incline Hammer Strength Machine

1. Focus on Form: Always focus on your form when using the incline hammer strength machine. This will ensure that you are targeting the right muscles and reduce the risk of injury.
2. Breathe Properly: Remember to breathe properly during the exercise. Inhale when you are lowering the handles and exhale when you are pushing the handles away from your body.
3. Don't Overexert Yourself: It is important not to overexert yourself when using the incline hammer strength machine. Start with a lighter weight and gradually increase the weight as you get stronger.
4. Mix It Up: To prevent boredom and to challenge your muscles, mix up your workout by using different machines and exercises.
Conclusion
The incline hammer strength machine is an excellent piece of equipment that provides a lot of benefits. It is perfect for people who want to increase their chest strength and size. By following the tips, you can ensure that you are using the machine properly and getting the most out of your workout.
Related video of Incline Hammer Strength Machine: Benefits and How to Use It
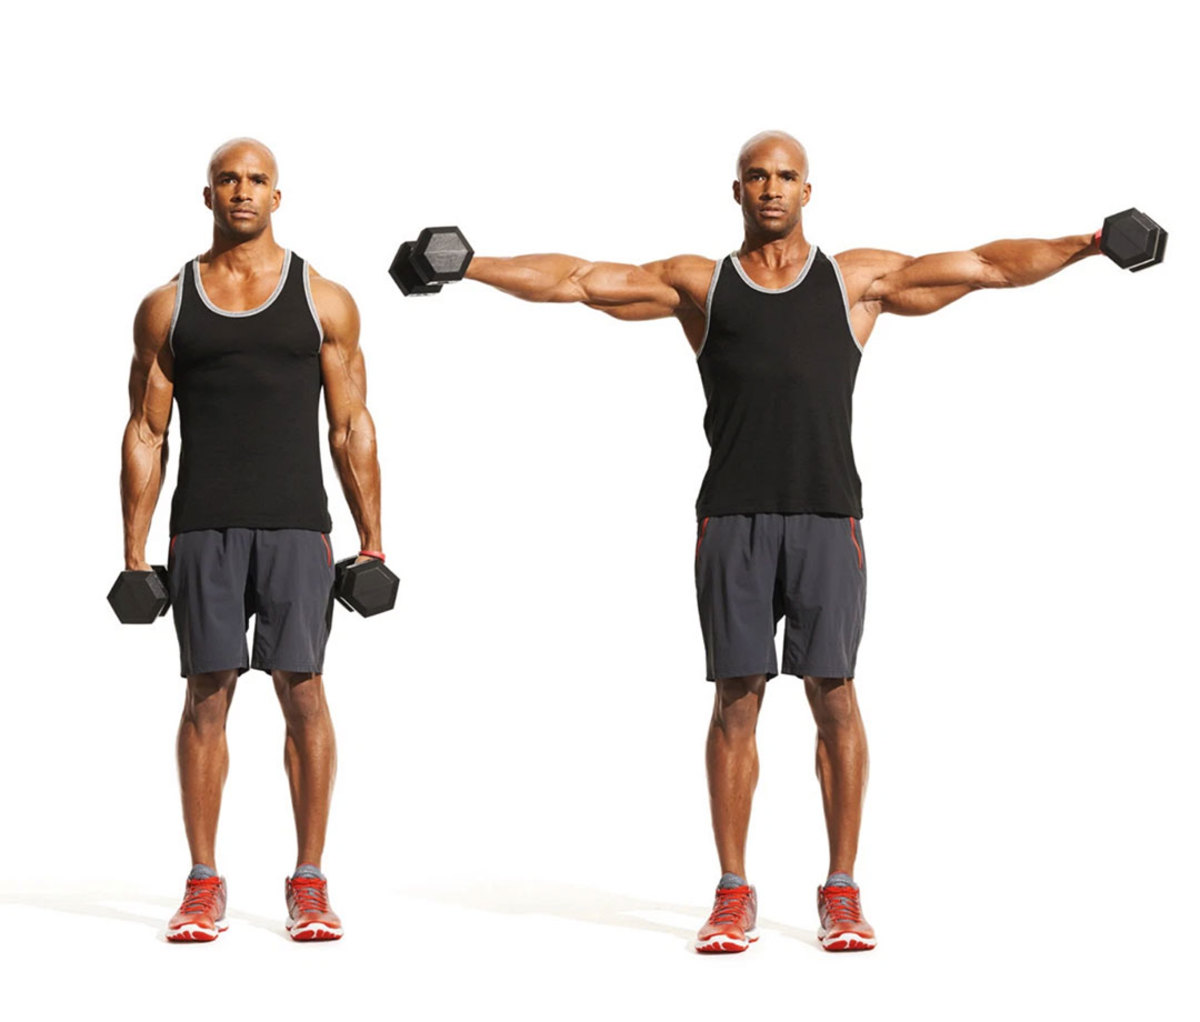
Standing dumbbell lateral raise is a popular exercise among fitness enthusiasts and bodybuilders. This exercise targets the lateral deltoid muscles, which are responsible for the side-to-side movement of the arms. It also works on the traps, serratus anterior, and rotator cuff muscles. In this article, we will discuss in detail the benefits of standing dumbbell lateral raise, how to perform it correctly, and some common mistakes to avoid.
Benefits of Standing Dumbbell Lateral Raise
The standing dumbbell lateral raise has several benefits, including:
- Strengthening the lateral deltoid muscles
- Improving shoulder stability and mobility
- Reducing the risk of shoulder injuries
- Improving posture and overall upper body strength
By performing this exercise regularly, you can achieve a well-defined shoulder and upper body muscles.
How to Perform Standing Dumbbell Lateral Raise
Before starting the exercise, choose an appropriate dumbbell weight that is suitable for your strength level. Stand with your feet shoulder-width apart, holding a dumbbell in each hand with your palms facing down. Keep your arms straight and close to your body.

Slowly lift both dumbbells to the side, keeping your arms straight and parallel to the floor. Exhale as you lift the weights and keep your elbows slightly bent. Pause for a moment at the top of the movement and then lower the weights back to the starting position. Repeat for the desired number of repetitions.
It is essential to perform the exercise with proper form to avoid injuries and maximize the benefits. Here are some tips to help you perform standing dumbbell lateral raise correctly:
- Keep your core tight and maintain a straight back throughout the movement.
- Avoid swinging your arms or using momentum to lift the weights.
- Keep your elbows slightly bent to reduce stress on the joints.
- Focus on contracting your shoulder muscles as you lift the weights.
Common Mistakes to Avoid
Standing dumbbell lateral raise is a relatively simple exercise, but it is easy to make mistakes that can compromise your form and reduce the effectiveness of the workout. Here are some common mistakes to avoid:
- Lifting too much weight that you cannot handle, which can result in injuries.
- Using momentum or swinging your arms to lift the weights, which reduces the effectiveness of the exercise.
- Raising your arms above the shoulder height, which can cause shoulder impingement.
- Leaning forward or backward during the movement, which puts pressure on your lower back.
Conclusion
Standing dumbbell lateral raise is an effective exercise for strengthening and toning your shoulder muscles. By performing it regularly with proper form and technique, you can achieve a well-defined and balanced upper body. It is also essential to avoid common mistakes that can lead to injuries and reduce the effectiveness of the workout.
Related video of Standing Dumbbell Lateral Raise

Side plank with leg lift is a popular exercise that targets your core, hips, and glutes. It's a variation of the traditional side plank that adds an extra challenge to your workout routine. In this article, we'll go over the proper form and technique for performing a side plank with leg lift, as well as the benefits and variations of the exercise.
How to Perform a Side Plank With Leg Lift

Start by lying on your side with your legs extended and your feet stacked on top of each other. Place your elbow directly under your shoulder and prop yourself up into a side plank position. Make sure your body forms a straight line from your head to your heels.
Next, lift your top leg up towards the ceiling while keeping it straight. Hold for a few seconds, then lower your leg back down to the starting position. Repeat for 10-15 repetitions, then switch sides.
Benefits of Side Plank With Leg Lift

Side plank with leg lift offers several benefits for your body, including:
- Strengthens your core muscles, including your obliques, rectus abdominis, and transverse abdominis.
- Targets your hip abductors and glutes, helping to improve hip stability and reduce the risk of injury.
- Improves balance and coordination, as you need to engage multiple muscle groups to maintain proper form.
- Increases overall body strength and endurance, as you're working against gravity to hold your body in position.
Variations of Side Plank With Leg Lift

Once you've mastered the basic side plank with leg lift, you can try these variations to add more challenge to your workout:
- Side Plank with Knee Tuck: Instead of lifting your leg straight up, bring your knee towards your chest and then extend it back out.
- Side Plank with Arm Reach: Raise your top arm up towards the ceiling while performing the leg lift.
- Side Plank with Hip Dip: Lower your hip towards the ground, then raise it back up to the starting position before performing the leg lift.
Tips for Proper Form

Here are some tips to ensure you're performing side plank with leg lift with proper form:
- Keep your body in a straight line from your head to your heels.
- Avoid letting your hips sag towards the ground.
- Engage your core muscles throughout the exercise.
- Keep your neck in line with your spine to avoid straining your neck muscles.
- Breathe deeply and evenly throughout the exercise.
Conclusion
Side plank with leg lift is a challenging yet effective exercise that targets multiple muscle groups in your body. By incorporating this exercise into your workout routine, you can improve your core strength, hip stability, balance, and overall fitness. Remember to start with proper form and technique, and gradually increase the difficulty level as you become more comfortable with the exercise.