
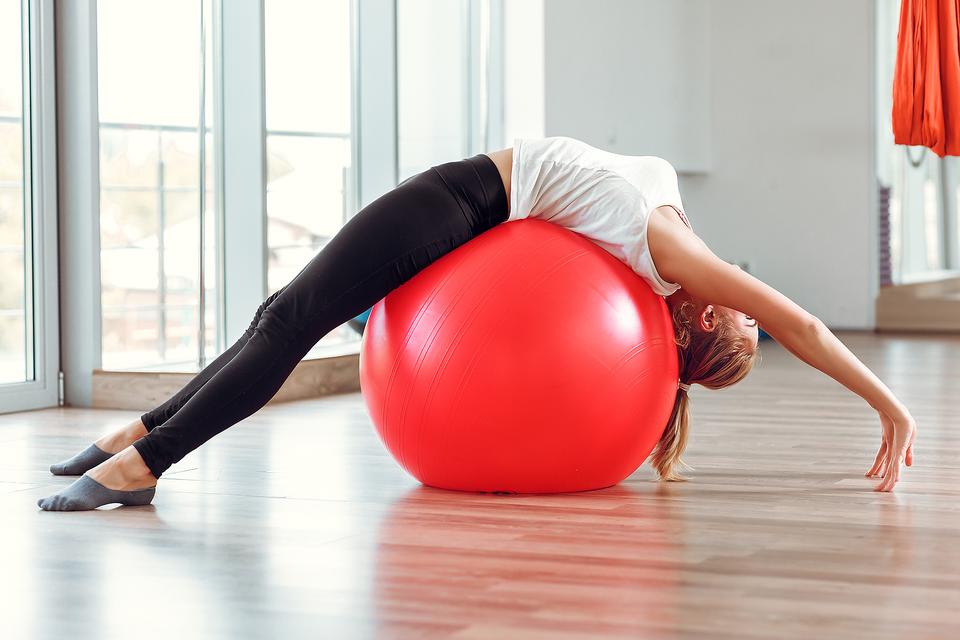
Do you want to spice up your sit-up routine and make it more challenging? Try doing sit-ups with a ball! This exercise can help you target your core muscles more effectively and improve your balance and coordination. Let's take a closer look at how to do it and its benefits.
What You Need

To do sit-ups with a ball, you'll need an exercise ball (also known as a stability ball or Swiss ball). Choose a ball that's the right size for your height – when you sit on it, your knees should be at a 90-degree angle and your feet should be flat on the floor. You'll also need a mat or a soft surface to lie on.
How to Do It

Here are the steps to do sit-ups with a ball:
- Start by sitting on the exercise ball and walking your feet forward until your lower back is supported by the ball.
- Place your hands behind your head or cross them over your chest.
- Engage your core muscles and lift your upper body off the ball, curling your shoulders towards your hips.
- Pause for a moment at the top of the movement, then slowly lower your upper body back down to the ball.
- Repeat for the desired number of reps.
Remember to keep your movements slow and controlled, and avoid using momentum to lift yourself up. Exhale as you lift your upper body and inhale as you lower it.
Variations
:max_bytes(150000):strip_icc()/mature-woman-doing-sit-ups-on-fitness-ball-153348363-576548eb5f9b58346a870749.jpg)
If you want to make sit-ups with a ball more challenging or target different muscles, you can try these variations:
- Side twists: After lifting your upper body off the ball, twist your torso to one side and reach your elbow towards the opposite knee. Return to the center and repeat on the other side.
- Reverse crunches: Lie on the ball with your legs straight up in the air and your hands supporting your lower back. Use your abs to lift your hips off the ball and towards your chest.
- Ball passes: Lie on your back with the ball between your feet. Use your abs to lift your legs and the ball off the ground, then pass the ball to your hands and lower your legs back down. Repeat, passing the ball back to your feet.
Benefits

Adding a ball to your sit-up routine can offer several benefits:
- Targeted core workout: Sit-ups with a ball can help you engage your core muscles more effectively, including your rectus abdominis, obliques, and transverse abdominis.
- Improved balance and coordination: The unstable surface of the exercise ball can challenge your balance and coordination, which can help you improve these skills over time.
- Reduced strain on your back: Sitting on the ball can help you maintain a neutral spine position, which can reduce strain on your lower back compared to traditional sit-ups.
- Increased variety: Adding a ball to your sit-up routine can help you avoid boredom and keep your workouts fresh and interesting.
Conclusion
Sit-ups with a ball can be a fun and effective way to target your core muscles and improve your balance and coordination. Make sure to choose the right size ball for your height, and start with the basic sit-up before moving on to more challenging variations. As with any exercise, listen to your body and stop if you experience any pain or discomfort. Happy sweating!
Related video of Sit Ups With Ball: How to Do It and Its Benefits

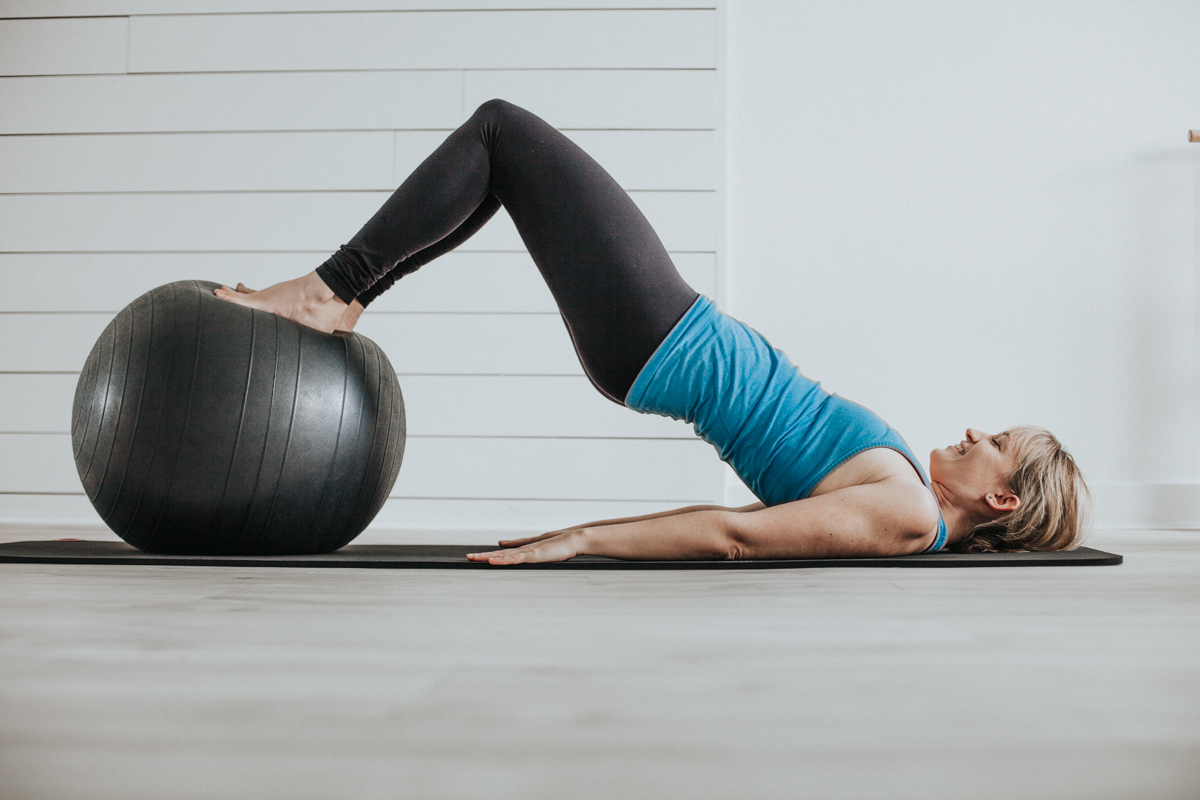
Pilates on ball exercises are one of the most effective ways to get in shape while having fun at the same time. This workout routine is perfect for people who want to improve their posture, balance, and core strength. Pilates on ball exercises are easy to perform and can be done by anyone, regardless of their fitness level.
What is Pilates on ball?
Pilates on ball is a type of exercise that combines the principles of Pilates with the use of a stability ball. The ball adds an element of instability to the workout, which forces your body to engage more muscles to maintain balance. This workout is great for building core strength, improving balance, and increasing flexibility.
Benefits of Pilates on ball
There are many benefits to incorporating Pilates on ball exercises into your fitness routine. These benefits include:
- Improved posture
- Increased core strength
- Better balance and stability
- Increased flexibility
- Reduced risk of injury
- Improved overall fitness
How to do Pilates on ball exercises

Here are some Pilates on ball exercises that you can do:
1. Roll up
To do the roll up, sit on the ball with your feet flat on the ground. Slowly roll down the ball until your back is resting on it. Then, slowly roll back up to a seated position. Repeat for 10 reps.
2. Plank

To do the plank, place your hands on the ball and walk your feet out until your body is in a straight line. Hold for 30 seconds.
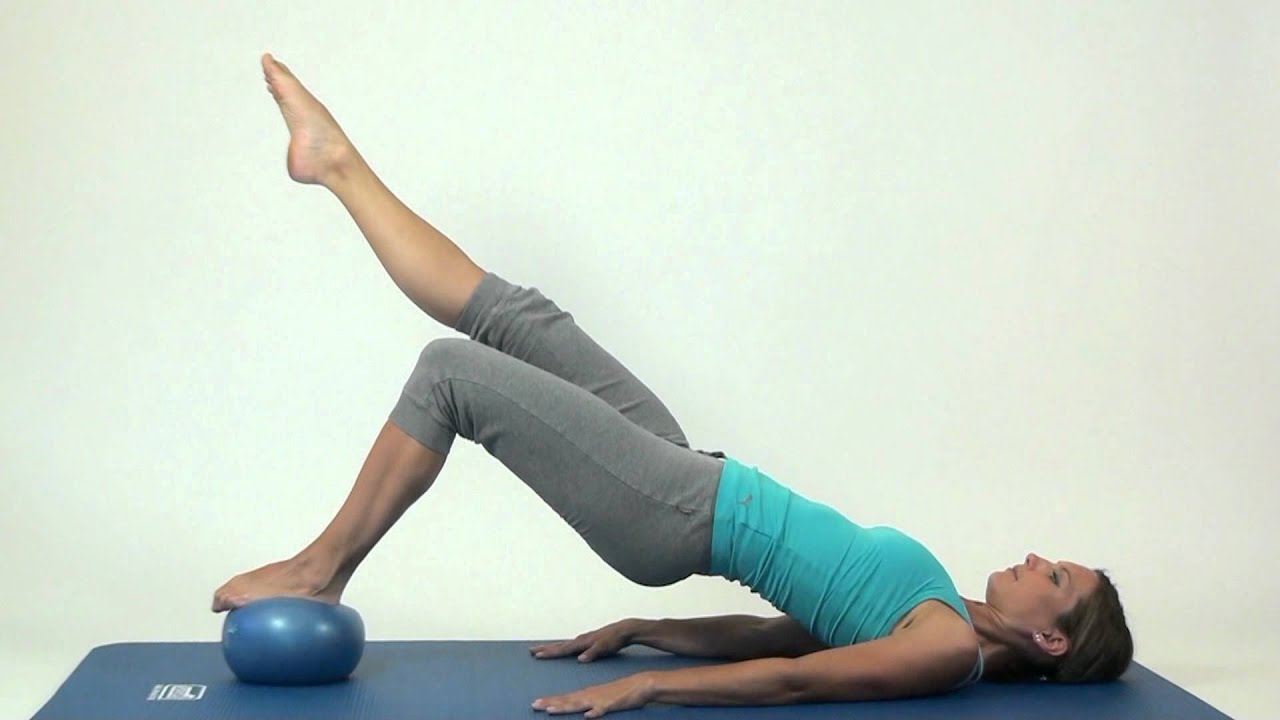
3. Leg circles
/Pilates-pike-5697f9155f9b58eba49e918b.jpg)
To do leg circles, lie on your back with your legs extended and your feet resting on the ball. Circle your legs around the ball, keeping your abs engaged. Repeat for 10 reps and then switch directions.
Conclusion
Pilates on ball exercises are a fun and effective way to improve your overall fitness. By incorporating these exercises into your fitness routine, you can improve your posture, balance, and core strength while having fun at the same time.
Related video of Pilates On Ball Exercises
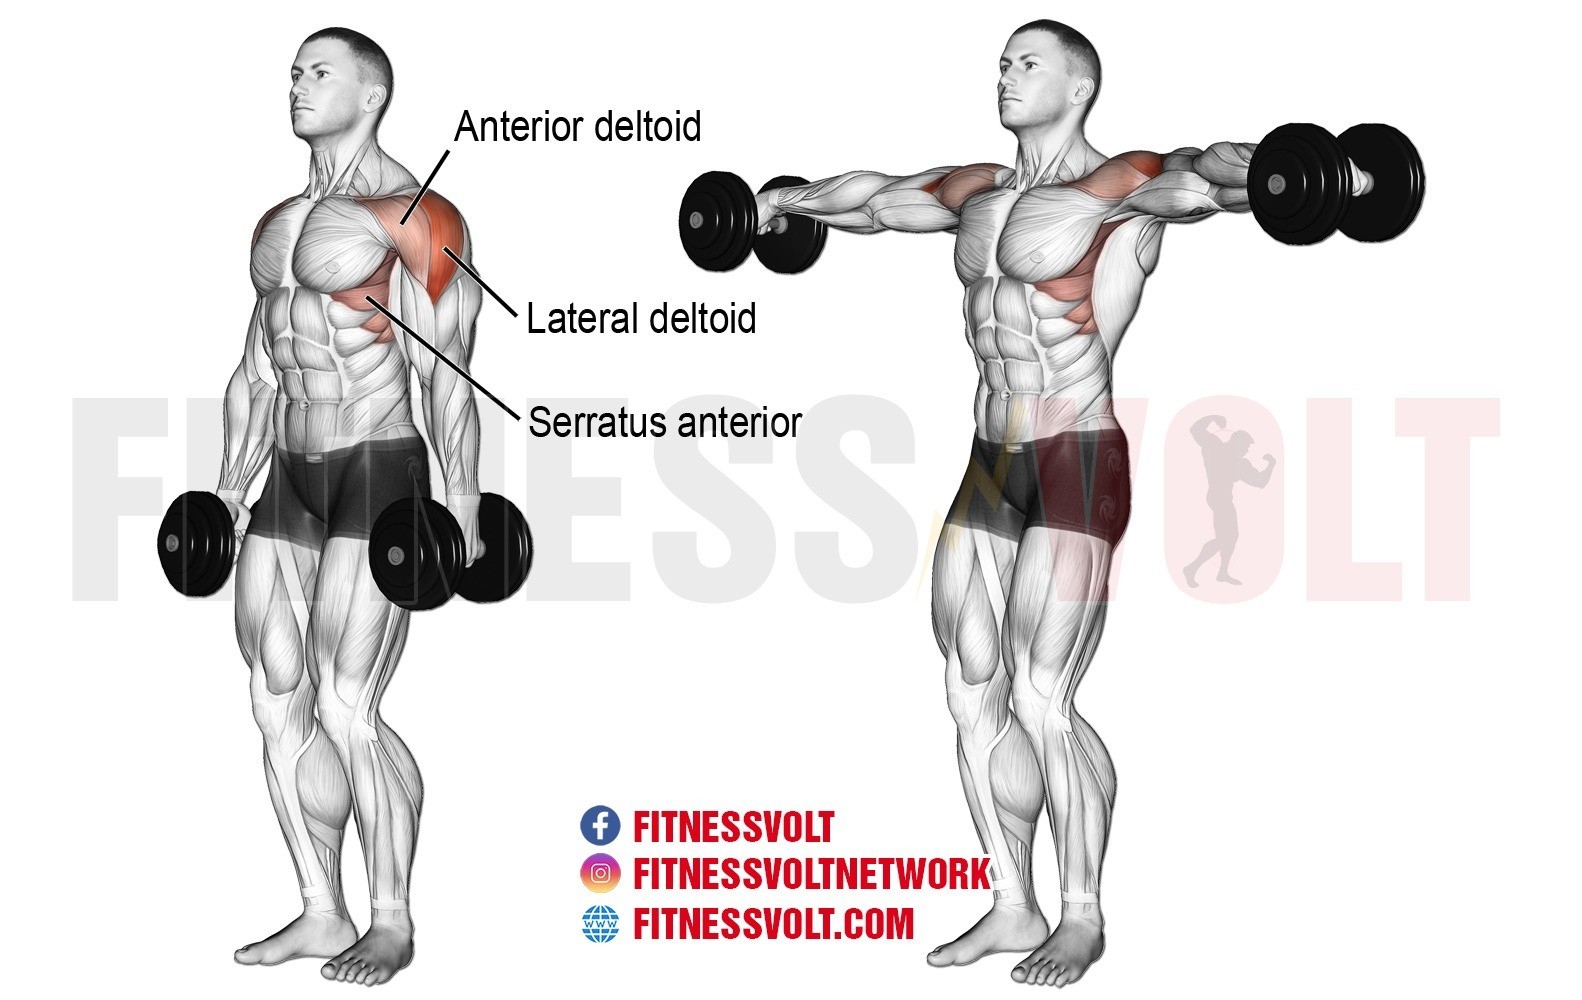
The lateral raise is a popular exercise that targets various muscles in the shoulders, arms, and upper back. It is also known as the side raise, and it involves raising your arms to the side until they reach shoulder height. This movement engages several muscles and can help you develop stronger, more defined shoulders, which is why it is a staple exercise in many workout routines.
Deltoids
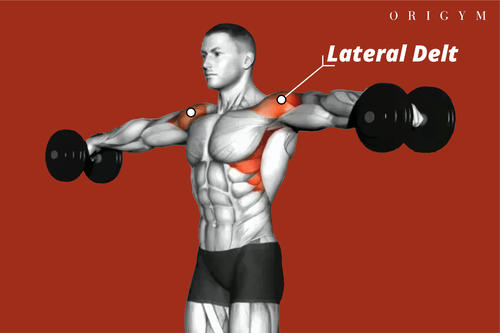
The primary muscle group that the lateral raise targets is the deltoids or the shoulder muscles. The deltoids consist of three heads – the anterior, medial, and posterior – and the lateral raise primarily targets the medial head. This muscle is responsible for shoulder abduction, which is the movement of the arm away from the body.
By performing lateral raises, you can strengthen and tone the medial head of your deltoids, resulting in wider and more defined shoulders. Additionally, strong deltoids can also help improve your posture and reduce the risk of shoulder injuries.
Trapezius
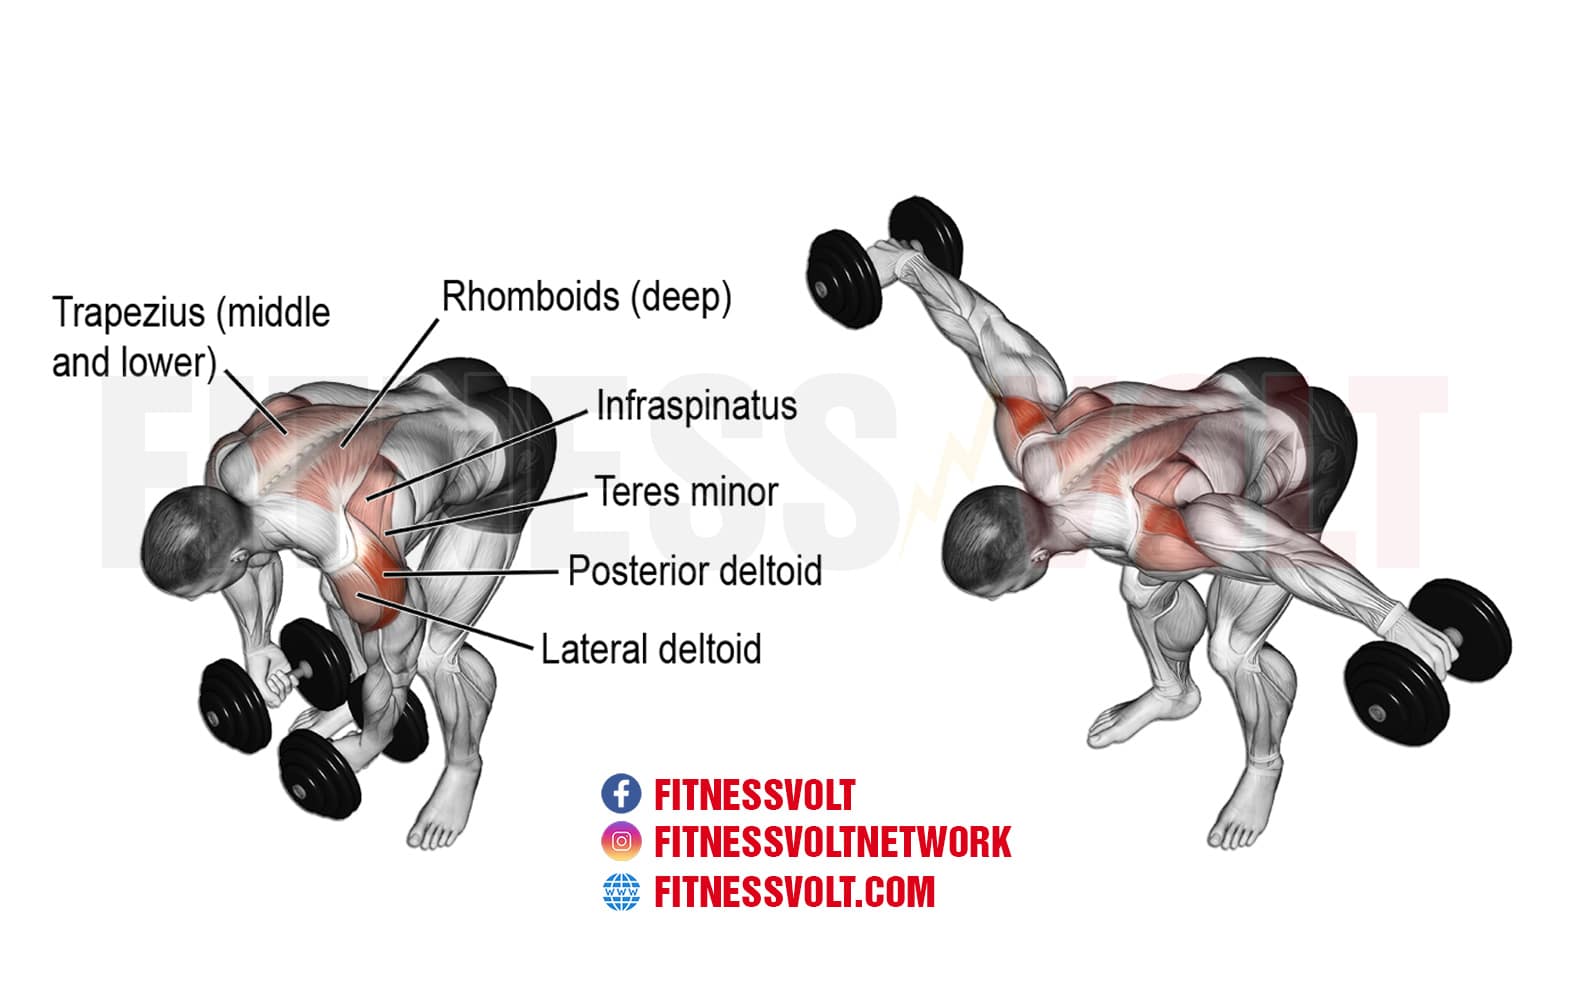
Another muscle group that the lateral raise works is the trapezius or the upper back muscles. The trapezius is a large muscle that runs from the base of the skull to the middle of the back and is responsible for shoulder movement and upper back stabilization.
During the lateral raise, the trapezius acts as a stabilizer muscle, helping to keep the shoulder blades in place and prevent them from lifting off the back. This helps to maintain proper form and reduces the risk of injury.
Rotator Cuff

The rotator cuff is a group of muscles and tendons that surround the shoulder joint and help to keep it stable. These muscles are involved in many shoulder movements, including the lateral raise.
During the lateral raise, the rotator cuff muscles work to stabilize the shoulder joint and prevent it from dislocating. This is particularly important if you are using heavy weights or performing the exercise with poor form.
Biceps and Triceps

In addition to the shoulder and upper back muscles, the lateral raise also engages the biceps and triceps. These muscles are located in the arms and are responsible for elbow flexion and extension.
During the lateral raise, the biceps and triceps act as supporting muscles, helping to stabilize the arm and prevent it from swinging or jerking. This can help to isolate the shoulder muscles and make the exercise more effective.
How to Perform Lateral Raises
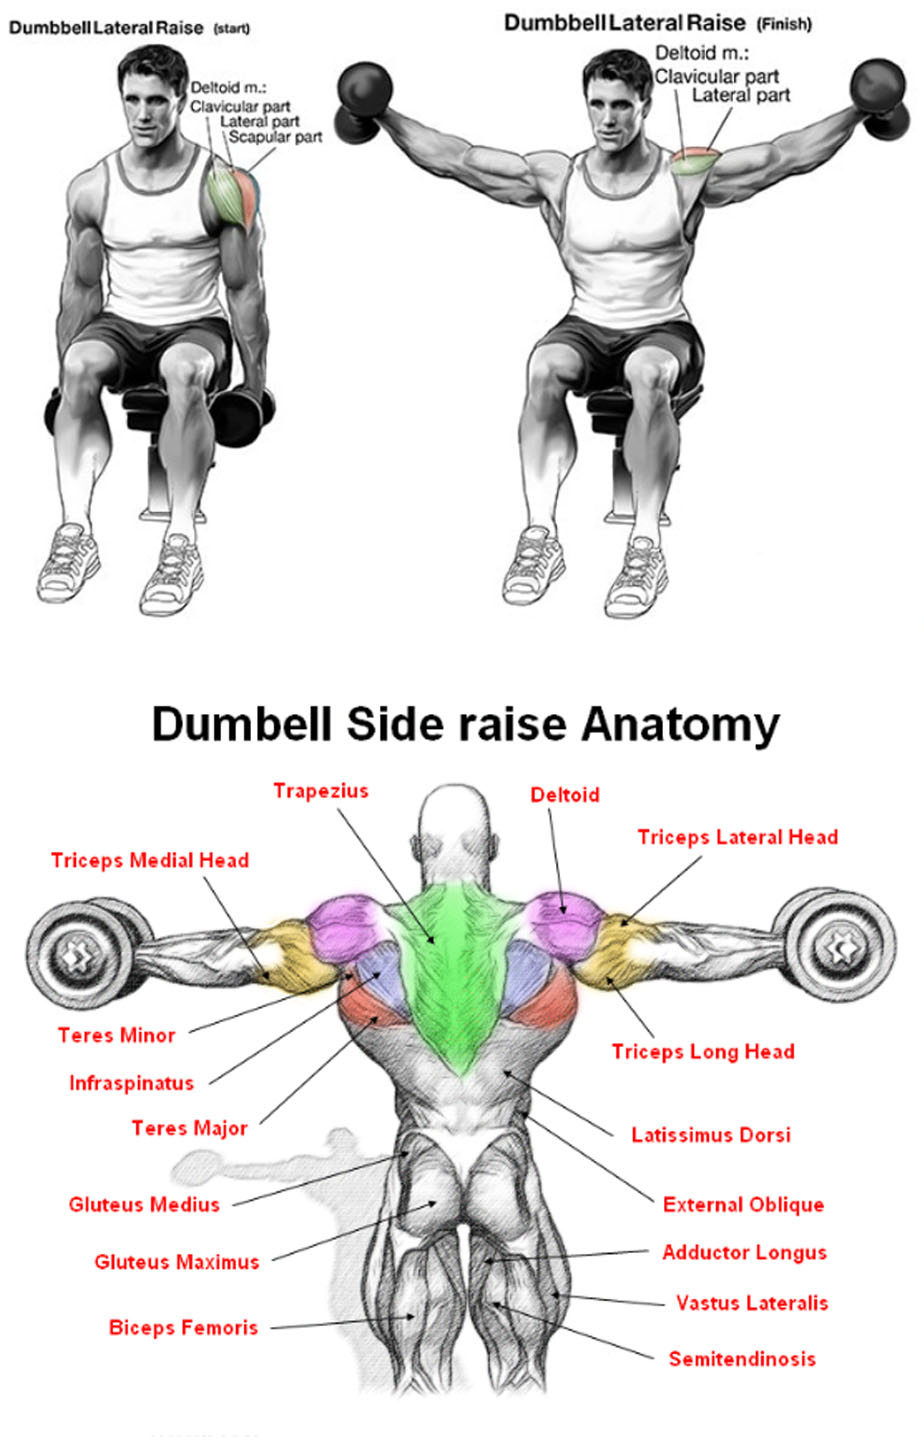
To perform lateral raises:
- Stand with your feet shoulder-width apart and hold a dumbbell in each hand with your palms facing inward.
- Keep your arms straight and lift them to the side until they are at shoulder height.
- Pause for a moment, then slowly lower your arms back to your sides.
- Repeat for the desired number of repetitions.
When performing lateral raises, it is essential to maintain proper form to avoid injury and engage the correct muscles. Keep your shoulders down and back, engage your core, and avoid swinging your arms or lifting them too high.
Conclusion
The lateral raise is an effective exercise that targets several muscles in the shoulders, arms, and upper back. By incorporating lateral raises into your workout routine, you can strengthen and tone your deltoids, trapezius, rotator cuff, biceps, and triceps, resulting in stronger, more defined shoulders and improved posture.
Remember to use proper form and start with light weights if you are new to the exercise. As you progress, gradually increase the weight and reps to challenge your muscles and achieve your fitness goals.
Related video of Lateral Raise Works What Muscles

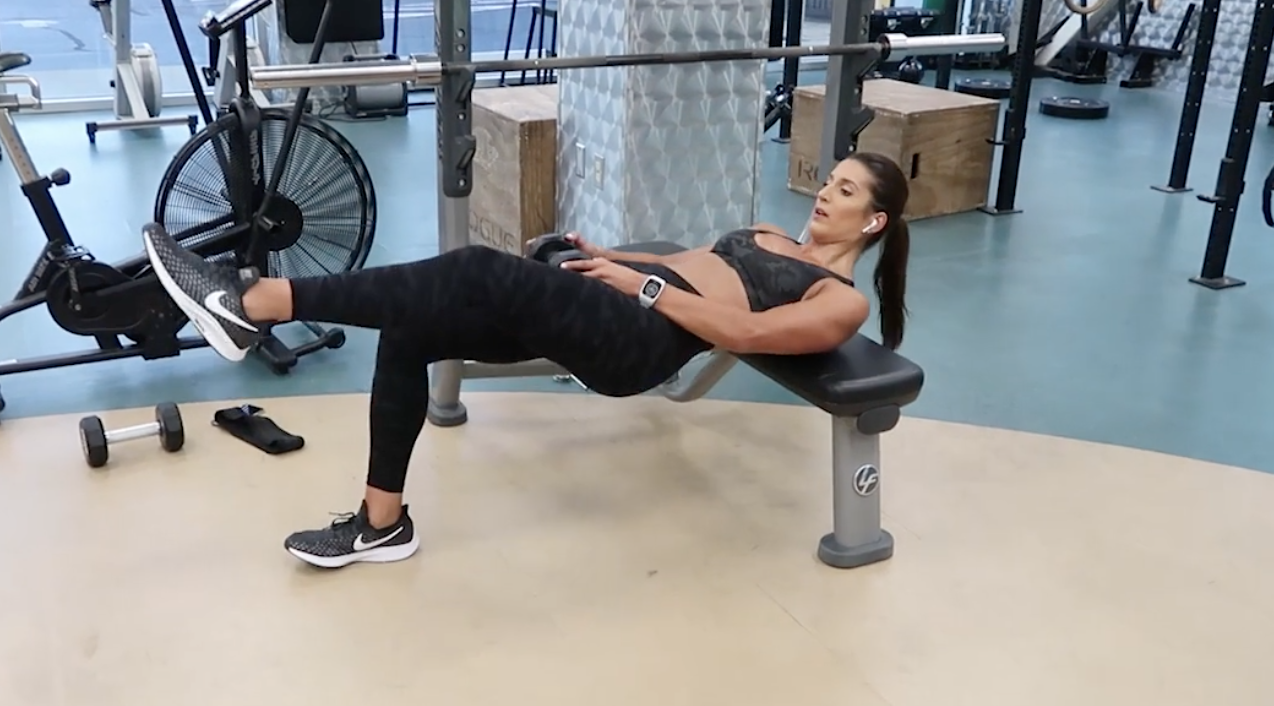
Single Leg Hip Thrust with Dumbbell is a great exercise to strengthen your glutes, hamstrings, and lower back muscles. It is a variation of the traditional Hip Thrust exercise that is performed with a barbell. This exercise is perfect for people who don't have access to a barbell or those who want to switch up their exercise routine.
How to perform Single Leg Hip Thrust with Dumbbell?

To perform the Single Leg Hip Thrust with Dumbbell, follow these steps:
- Start by lying on your back with your knees bent and feet flat on the ground.
- Hold a dumbbell in one hand and raise the other leg off the ground, keeping it straight.
- Press your heel into the ground and lift your hips off the ground until your body forms a straight line from your shoulders to your knees.
- Pause for 1-2 seconds at the top of the movement, then lower your hips back down to the ground.
- Repeat for the desired number of reps, then switch to the other leg.
Tips for performing Single Leg Hip Thrust with Dumbbell

Here are some tips to help you perform the Single Leg Hip Thrust with Dumbbell correctly:
- Make sure to keep your core engaged throughout the movement. This will help stabilize your spine and prevent any lower back pain.
- Keep your foot flat on the ground and press through your heel to lift your hips off the ground.
- Don't let your knee cave in towards your midline. Keep it in line with your hip and ankle.
- Exhale as you lift your hips off the ground and inhale as you lower them back down.
- Start with a lighter weight to ensure proper form and gradually increase the weight as you get stronger.
Benefits of Single Leg Hip Thrust with Dumbbell
Single Leg Hip Thrust with Dumbbell is a great exercise with many benefits, including:
- Strengthening your glutes, hamstrings, and lower back muscles.
- Improving your balance and stability.
- Increasing your hip mobility.
- Helping to prevent lower back pain.
- Incorporating unilateral training which helps to eliminate muscle imbalances.
Conclusion
The Single Leg Hip Thrust with Dumbbell is a great exercise that can help you strengthen your glutes, hamstrings, and lower back muscles. It is a variation of the traditional Hip Thrust exercise and is perfect for people who don't have access to a barbell or want to switch up their exercise routine. Remember to keep your core engaged, foot flat on the ground, and knee in line with your hip and ankle. Start with a lighter weight and gradually increase the weight as you get stronger. Incorporate this exercise into your workout routine to see the benefits for yourself!
Related video of Single Leg Hip Thrust With Dumbbell

The neutral grip incline dumbbell press is a great exercise for targeting the upper chest muscles. It is performed with dumbbells and an incline bench, and involves pressing the weights upwards while keeping the palms facing each other (neutral grip).
How to Perform the Neutral Grip Incline Dumbbell Press
1. Start by setting up an incline bench at a 30-45 degree angle.

2. Grab a pair of dumbbells and sit on the bench, holding the weights at shoulder level with the palms facing each other.

3. Keep your feet flat on the ground and your back flat against the bench.
4. Slowly lower the dumbbells towards your chest while keeping your elbows at a 45-degree angle.

5. Pause for a second at the bottom of the movement, then press the dumbbells upwards while exhaling.
6. Extend your arms fully at the top of the movement, but do not lock out your elbows.
7. Slowly lower the dumbbells back down to the starting position while inhaling.
8. Repeat for the desired number of reps.
Benefits of the Neutral Grip Incline Dumbbell Press
The neutral grip incline dumbbell press has several benefits:
1. Targets the upper chest muscles: The incline angle of the bench puts more emphasis on the upper portion of the chest, which can help create a well-rounded chest.

2. Allows for a neutral grip: The neutral grip used in this exercise is easier on the wrists and elbows compared to other pressing exercises that use a pronated (palms facing down) grip.
3. Works the triceps and shoulders: The triceps and shoulders are also engaged during this exercise, making it a great overall upper body movement.
Common Mistakes to Avoid
1. Using too much weight: It is important to start with a weight that is manageable and allows you to maintain proper form throughout the exercise.
2. Arching the back: Keeping the back flat against the bench is important to avoid injury and ensure proper muscle engagement.
3. Locking out the elbows: While it is important to extend the arms fully at the top of the movement, locking out the elbows can put unnecessary stress on the joint.
Conclusion
The neutral grip incline dumbbell press is a great exercise for targeting the upper chest, triceps, and shoulders. By performing the exercise properly and avoiding common mistakes, you can maximize your results and minimize your risk of injury.
Related video of Neutral Grip Incline Dumbbell Press

Back pain is a common problem for many people, especially those who spend long hours sitting at a desk or engaging in activities that require repetitive motion. Foam roller exercises can help alleviate back pain by improving flexibility, reducing muscle tension, and increasing blood flow to the affected area. In this article, we will discuss some of the best foam roller exercises for the back and shoulders.
Upper Back Roll
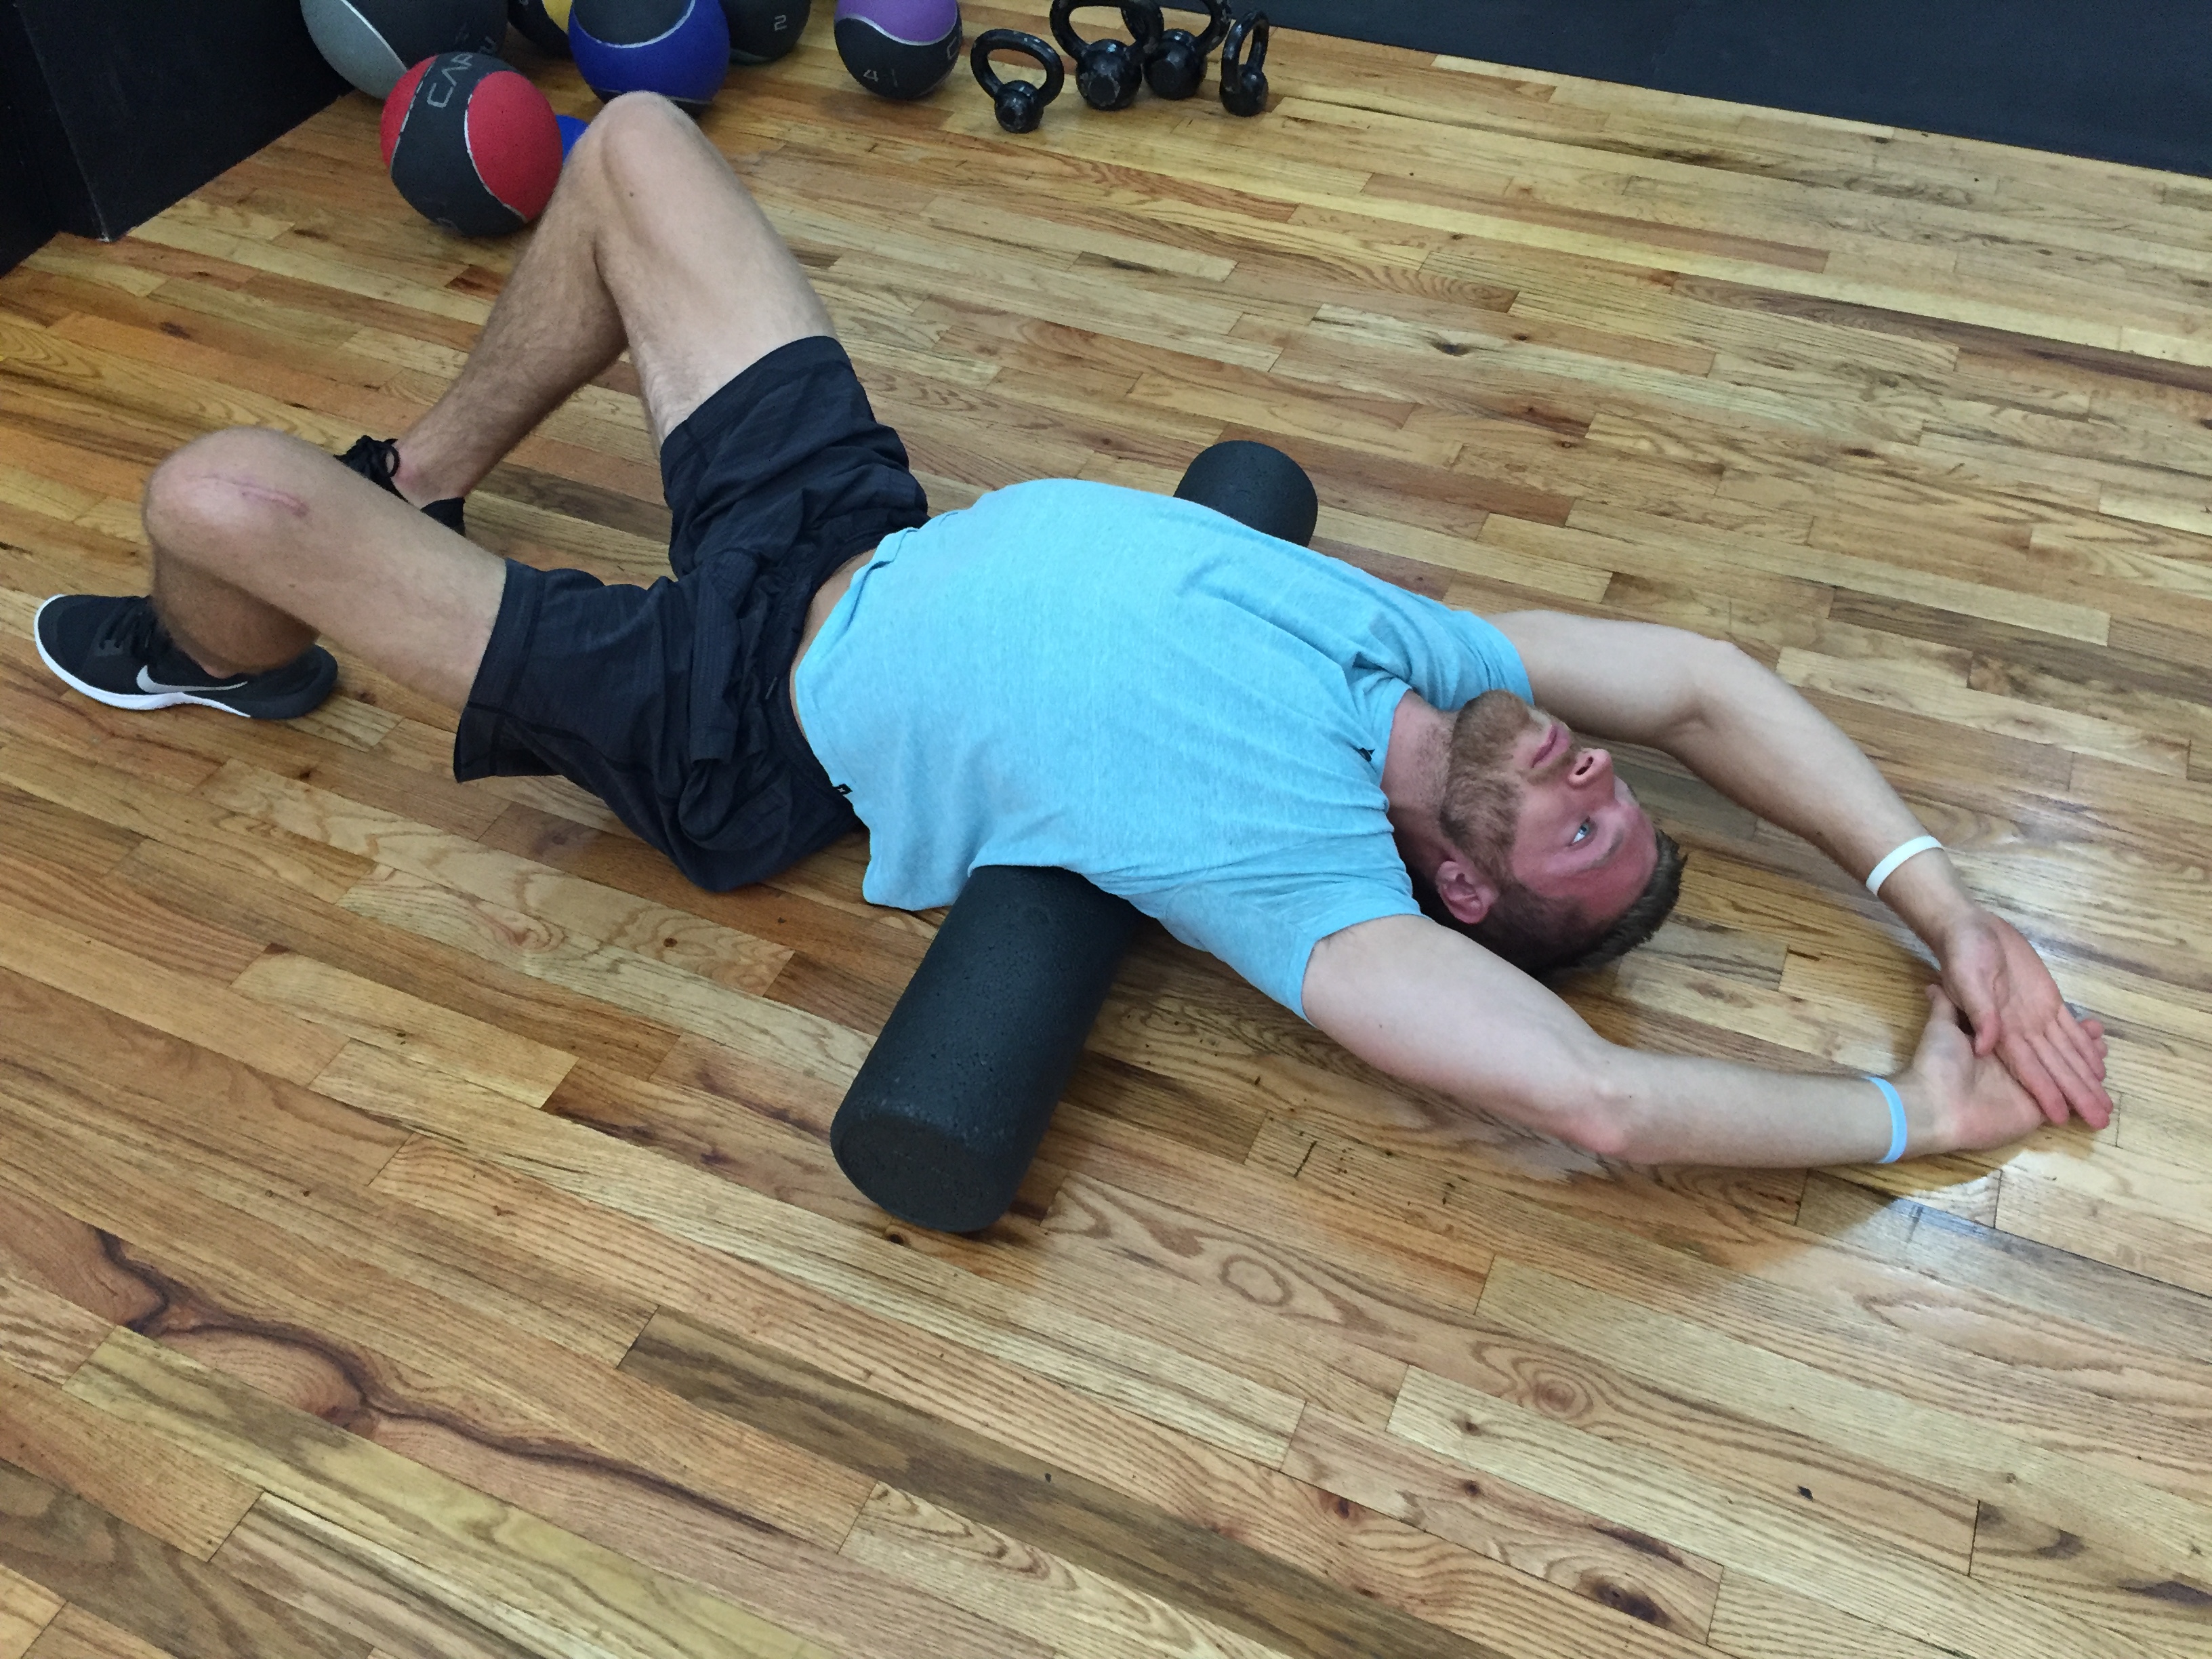
The upper back roll is an excellent exercise for relieving tension in the upper back and shoulders. To perform this exercise, place the foam roller under your shoulder blades and slowly roll up and down the spine. Focus on the areas that feel particularly tight or sore, and hold the roller on those areas for a few seconds to release the tension.
Thoracic Extension

The thoracic extension exercise can help improve posture and reduce pain in the upper back and shoulders. To perform this exercise, place the foam roller under your shoulder blades and slowly lift your hips off the ground. Arch your back over the roller and hold the position for a few seconds, then lower your hips back down. Repeat for several reps.
Shoulder Blade Squeeze
The shoulder blade squeeze is a simple exercise that can help improve posture and reduce tension in the shoulders. To perform this exercise, sit on the ground with your legs extended in front of you. Hold a foam roller in both hands and squeeze your shoulder blades together. Hold the position for a few seconds, then release and repeat for several reps.
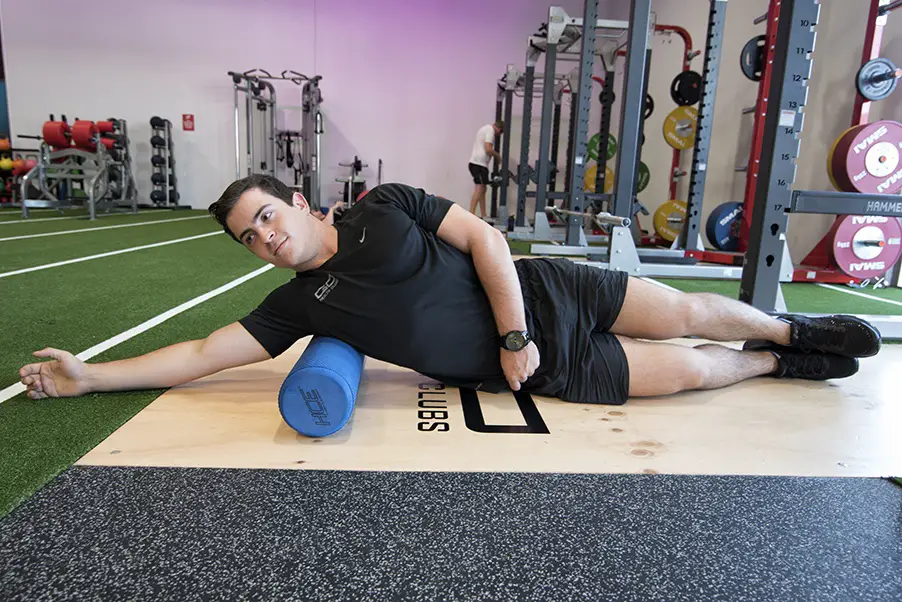
Lat Roll

The lat roll is an excellent exercise for relieving tension in the shoulders and upper back. To perform this exercise, lie on your side with the foam roller under your armpit. Slowly roll up and down the side of your body, focusing on the areas that feel particularly tight or sore. Hold the roller on those areas for a few seconds to release the tension.
Scapular Wall Slide

The scapular wall slide is a great exercise for improving posture and reducing tension in the shoulders. To perform this exercise, stand with your back against a wall and hold a foam roller in both hands. Slowly slide your arms up the wall, keeping your elbows and wrists against the wall. Hold the position for a few seconds, then lower your arms back down. Repeat for several reps.
Conclusion
Foam roller exercises can be a great way to alleviate back pain and reduce tension in the shoulders. By incorporating these exercises into your daily routine, you can improve your posture, flexibility, and overall well-being. Remember to start slowly and gradually increase the intensity of your workouts to avoid injury. If you have any concerns about your back pain or shoulder tension, be sure to consult with your healthcare provider before beginning any new exercise routine.
Related video of Foam Roller Exercises For Back And Shoulders

The chest press is a popular exercise that is commonly performed using dumbbells or barbells. However, not everyone has access to a gym or weightlifting equipment. This is where resistance bands come in handy. Resistance bands are affordable, portable, and versatile pieces of exercise equipment that can be used to perform a variety of exercises, including the chest press.
What are Resistance Bands?
Resistance bands are elastic bands made of rubber or latex that are used for strength training. They come in varying levels of resistance, from light to heavy, and can be used to target different muscle groups. Resistance bands are lightweight, portable, and can be used anywhere, making them a popular choice for home workouts or when travelling.
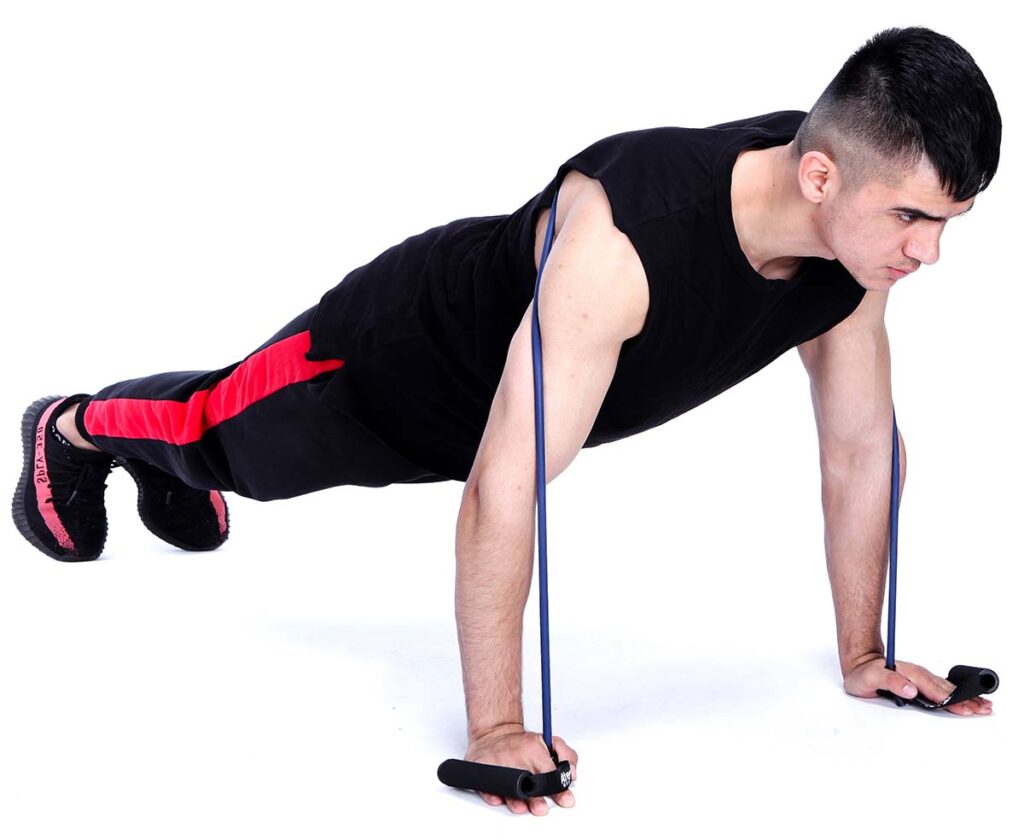
How to Perform the Chest Press with Resistance Bands

To perform the chest press with resistance bands, follow these steps:
- Anchor the resistance band to a sturdy object, such as a doorframe or a piece of furniture.
- Grasp the handles of the resistance band with both hands and face away from the anchor point.
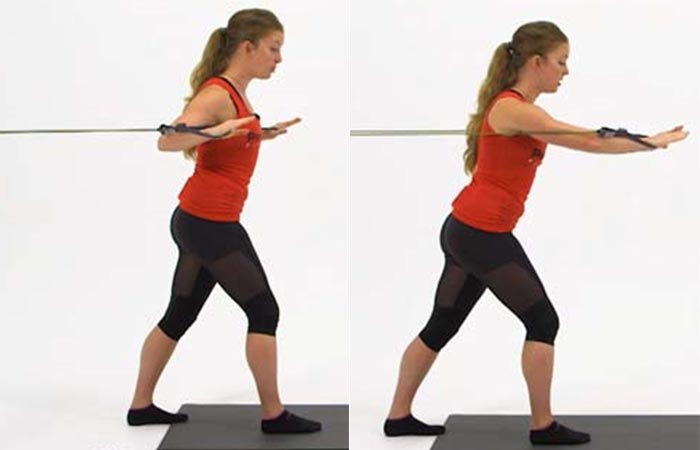
- Stand with your feet shoulder-width apart and your arms bent at a 90-degree angle, with your hands level with your chest.
- Extend your arms straight in front of you, pushing against the resistance of the band, until your arms are fully extended.
- Slowly return your arms to the starting position, keeping your elbows bent at a 90-degree angle.
- Repeat for the desired number of repetitions.
Variations of the Chest Press with Resistance Bands

There are several variations of the chest press that can be performed using resistance bands to target different areas of the chest and engage different muscle groups. Some of these variations include:
- Incline chest press
- Decline chest press
- One-arm chest press
- Plyometric chest press
Tips for Performing the Chest Press with Resistance Bands
Here are some tips to help you perform the chest press with resistance bands correctly:
- Choose a resistance band that matches your fitness level and the desired intensity of the exercise.
- Ensure that the resistance band is securely anchored to a sturdy object.
- Maintain good posture throughout the exercise, keeping your back straight and your core engaged.
- Breathe steadily and exhale as you push against the resistance of the band.
- Focus on squeezing your chest muscles as you extend your arms.
Benefits of the Chest Press with Resistance Bands

The chest press with resistance bands offers several benefits, including:
- Improved upper body strength and muscle tone
- Increased chest, shoulder, and tricep muscle activation
- Greater range of motion compared to traditional weightlifting exercises
- Reduced risk of injury due to the low-impact nature of the exercise
- Convenient and flexible exercise option that can be performed anywhere
Conclusion
The chest press with resistance bands is a simple yet effective exercise that can be performed by anyone, regardless of their fitness level or access to gym equipment. With proper form and technique, this exercise can help improve upper body strength, muscle tone, and overall fitness. So, grab a resistance band and give this exercise a try!
Related video of Chest Press With Resistance Bands

When it comes to building bigger biceps, there are few exercises as effective as the reverse grip barbell curl. This classic exercise targets the biceps brachii, as well as the brachialis and brachioradialis muscles, helping you to achieve the coveted "peak" look in your arms. In this article, we'll take a closer look at the reverse grip barbell curl, including how to perform it, its benefits, and some tips for incorporating it into your workout routine.
What Are Reverse Grip Barbell Curls?
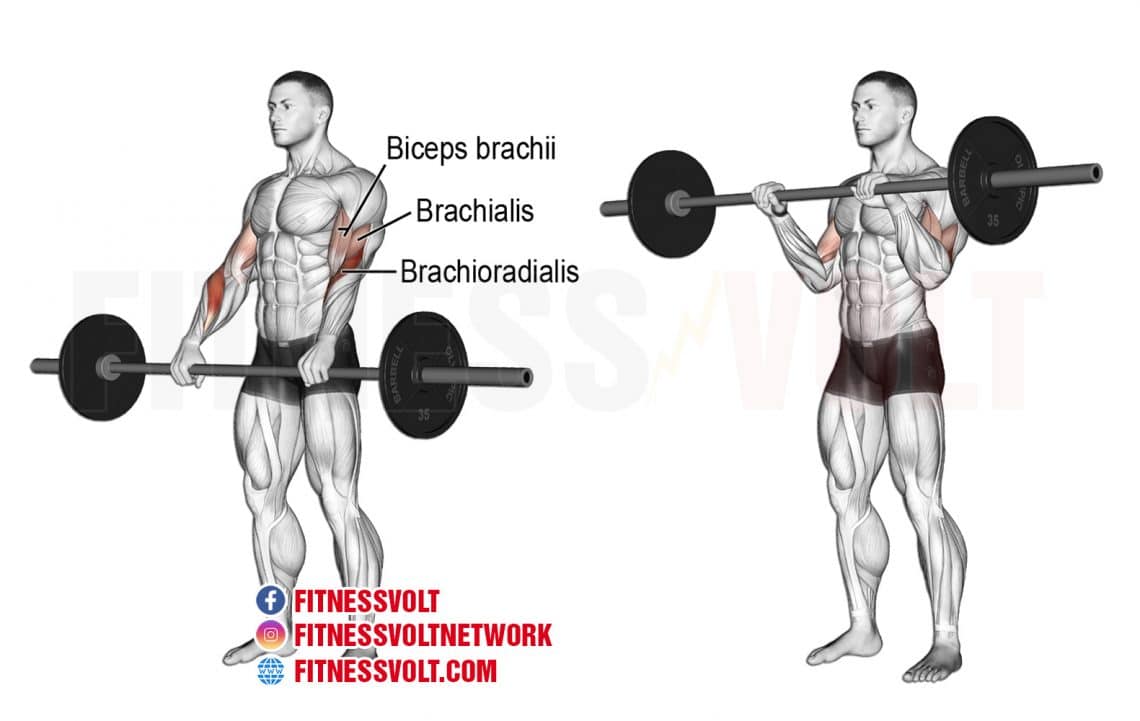
Reverse grip barbell curls are a variation of the traditional barbell curl, in which you hold the bar with an underhand grip (i.e., palms facing up) instead of an overhand grip. This changes the angle of your wrist and elbow, placing more emphasis on the biceps brachii muscle.
How to Perform Reverse Grip Barbell Curls

To perform reverse grip barbell curls:
- Stand with your feet shoulder-width apart and grasp a barbell with an underhand grip, hands slightly wider than shoulder-width apart.
- Hold the barbell with your arms fully extended, palms facing up.
- Curl the barbell towards your shoulders, keeping your elbows close to your body.
- Pause briefly at the top of the movement, then slowly lower the barbell back to the starting position.
- Repeat for the desired number of reps.
Benefits of Reverse Grip Barbell Curls

Reverse grip barbell curls offer several benefits for building bigger biceps:
- Increased activation of the biceps brachii muscle.
- Greater emphasis on the brachialis and brachioradialis muscles, which can help to give your arms a more "3D" look.
- Improved grip strength, as the underhand grip requires more forearm activation.
- Variety in your workout routine, as the reverse grip barbell curl is a less common exercise than the traditional barbell curl.
Tips for Incorporating Reverse Grip Barbell Curls Into Your Workout Routine

If you're looking to add reverse grip barbell curls to your workout routine, here are a few tips to keep in mind:
- Start with a lighter weight than you would for traditional barbell curls, as the underhand grip can feel more challenging at first.
- Keep your elbows close to your body throughout the movement, to maintain tension on the biceps muscle.
- Experiment with different grip widths and angles to find what feels most comfortable and effective for your body.
- Try incorporating reverse grip barbell curls into a superset or drop set with other biceps exercises, to really challenge your muscles and maximize your results.
Conclusion
Reverse grip barbell curls are a highly effective exercise for building bigger, stronger biceps. By incorporating this exercise into your workout routine, you can target the biceps brachii, brachialis, and brachioradialis muscles, helping you to achieve the "peak" look in your arms that many bodybuilders aspire to. Remember to start with a lighter weight, keep your elbows close to your body, and experiment with different grip widths and angles to find what works best for you. With consistent effort and proper form, you'll be well on your way to achieving your biceps goals.
Related video of Reverse Grip Barbell Curls: The Ultimate Guide to Bigger Biceps

Stretching is an essential part of any workout routine. It helps to prevent injury and increase flexibility. One stretch that is often overlooked is the hip internal rotator stretch. This stretch targets the muscles that rotate the hip inward, which can become tight from prolonged sitting or certain exercises. In this article, we will discuss the benefits of the hip internal rotator stretch and how to perform it correctly.
Benefits of the Hip Internal Rotator Stretch

The hip internal rotator stretch has several benefits:
- Improve hip mobility: Tight hip internal rotators can limit your range of motion and make it difficult to perform certain exercises or movements. By stretching these muscles, you can improve your hip mobility and reduce the risk of injury.
- Reduce lower back pain: Tight hip internal rotators can also contribute to lower back pain. By stretching these muscles, you can alleviate the tension in your lower back and reduce pain and discomfort.
- Improve posture: Tight hip internal rotators can pull your pelvis forward, causing an anterior pelvic tilt. This can lead to poor posture and lower back pain. By stretching these muscles, you can improve your posture and reduce the risk of lower back pain.
How to Perform the Hip Internal Rotator Stretch

To perform the hip internal rotator stretch, follow these steps:
- Sit on the floor with your legs extended in front of you.
- Bend your left leg and place your left foot on the outside of your right knee.
- Place your right elbow on the outside of your left knee.
- Twist your torso to the left, using your elbow to push your knee further to the left.
- Hold the stretch for 30 seconds.
- Repeat on the other side.
Remember to breathe deeply and relax into the stretch. You should feel a stretch in your left hip and glute.
Precautions

As with any exercise or stretch, it is important to take precautions to avoid injury:
- Don't push yourself too hard: Stretching should feel uncomfortable, but not painful. If you experience pain, stop immediately.
- Don't bounce: Bouncing can cause injury and does not effectively stretch the muscles.
- Don't force the stretch: Stretching should be gradual and gentle. Don't force your body into a position that feels uncomfortable.
When to Stretch

The best time to stretch is after a workout when your muscles are warm and pliable. However, you can also stretch in the morning or throughout the day to improve your flexibility and reduce tension in your muscles.
Conclusion
The hip internal rotator stretch is a simple yet effective stretch that can improve your hip mobility, reduce lower back pain, and improve your posture. By following the correct technique and taking precautions, you can safely incorporate this stretch into your workout routine. Remember to listen to your body and never push yourself too hard. Happy stretching!
Related video of Hip Internal Rotator Stretch

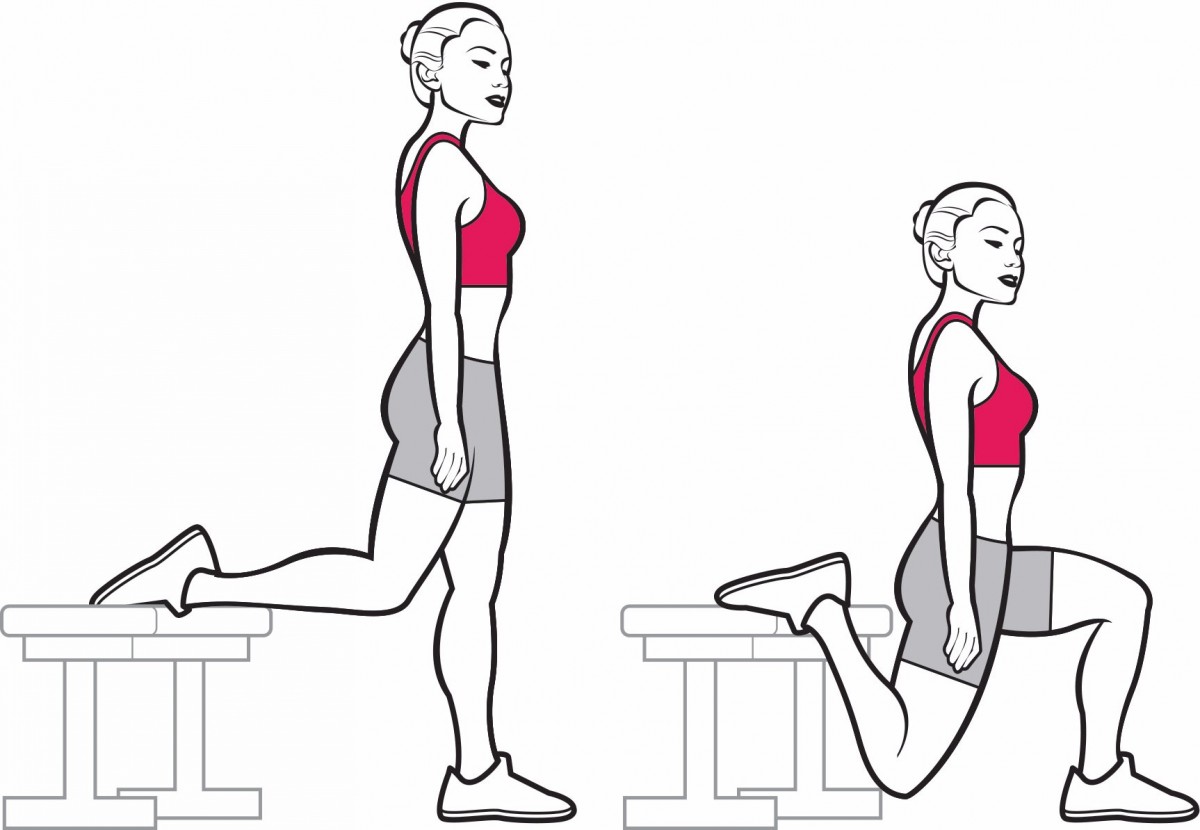
Split squats are an excellent exercise for building lower body strength, increasing flexibility, and improving balance. They are also a great way to target your glutes, quads, and hamstrings. If you're new to split squats, don't worry! This article will teach you how to set up split squats properly to ensure a safe and effective workout.
Step 1: Warm Up

Before you start your workout, it's essential to warm up your muscles. Spend a few minutes doing some dynamic stretches, such as leg swings or walking lunges, to get your heart rate up and your muscles ready for the workout ahead.
Step 2: Choose Your Weight

Once you're warmed up, it's time to choose your weight. Start with a weight that you can comfortably lift for 10-12 reps. You can always increase the weight as you get stronger and more comfortable with the exercise.
Step 3: Find Your Stance

Stand with your feet hip-width apart and take a big step forward with one foot. Your feet should be far enough apart that your front knee is directly above your ankle when you lower into the squat.
Step 4: Position Your Feet

Point your front foot straight ahead and your back foot slightly outward. This will help you maintain stability and balance throughout the exercise.
Step 5: Get Into Position

Bend your front knee and lower your back knee toward the floor. Your back knee should be hovering just above the ground, and your front knee should be at a 90-degree angle. Keep your torso straight and your core engaged throughout the exercise.
Step 6: Lift Your Weight

Hold your weight in both hands, with your arms straight down in front of you. Slowly lift the weight up toward your chest, keeping your elbows close to your body. Pause for a second at the top of the movement.
Step 7: Lower Your Weight

Slowly lower the weight back down to the starting position, keeping your elbows close to your body. Repeat for 10-12 reps on one side before switching to the other side.
Step 8: Breathe

Remember to breathe throughout the exercise. Inhale as you lower into the squat and exhale as you lift the weight back up.
Step 9: Keep Your Focus
Keep your focus on your form throughout the exercise. Make sure your front knee stays directly above your ankle, and your back knee hovers just above the ground.
Step 10: Cool Down

Once you've completed your reps, take a few minutes to cool down. Stretch your muscles, and walk around to lower your heart rate.
Tips for Success

Here are a few tips to help you get the most out of your split squat workout:
- Start with a weight that you can comfortably lift for 10-12 reps.
- Focus on your form throughout the exercise.
- Breathe throughout the exercise.
- Cool down properly to avoid injury.
Conclusion
Split squats are an excellent exercise for building lower body strength, increasing flexibility, and improving balance. By following these simple steps, you can set up split squats safely and effectively. Remember to start with a weight that you can comfortably lift, focus on your form throughout the exercise, and breathe properly. With time and practice, you'll be able to perform split squats like a pro!